BMW M5 Forum and M6 Forums banner

TPS DIY.

37K views 50 replies 27 participants last post by  Trizzuth  
#1 ·
Well, since apparantly no one has ever successfully done this themselves, I guess I'll be the first. I've searched and searched, and any time someone asks for a DIY people change the subject like someone just asked about unicorn blood.

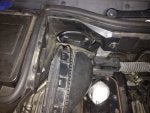
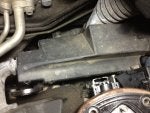
So I'm in the middle of this right now. Let me tell you, it sucks. Huge pain in the ***. Again, BMW in their infinite wisdom places these sensors behind the gad-damn motor. Sure, they're high up alright, but there is convenienly a plastic black wall containing all the engine wires and harnesses in it running like less than an inch from the two screws you need to get to.

And yes, I said SCREWS. Not allen head, but good old fashioned phillips-head screws torqued down like they hold the car together or something. Oh, and they're Chinese, so they must strip extemely easy as well.

FML.

Needed to take a coffee break and a rant seemed appropriate. Anyone here (dare I ask) ever done this themselves, without removing the engine? Trying to avoid doing that...
 
#3 · (Edited)
plenty have done this before, myself included. I guess you're the first to document it. Not the easiest job but not the most difficult either. I ended up destroying my screws - unscrewed them with pliers, couldnt find another way - and replaced them with hex. An 'upgrade', if you will. Thanks for writing it up! Were you getting failsafe codes?
 
  • Like
Reactions: TheProPilot
#6 ·
I'll document it better once I get a chance and the beast is up and running again. Beat me to it with the hex upgrade! Went to Ace this morning, since I wanted to burn the screws to the firey depths of hell and replace them with anything better. The Allen head will make this job 100% easier in the future...

Image


Image


Wasn't getting codes.. basically did it as PM since I was in there anyways for a t-stat changeout and coolant flush.

small pair of vice grips works well. also you can take a small sharp chisel and knock off the top "fins" on the tps. makes it easier to turn the screws on the vice grips are locked on.
Very good tip! Almost came down to that, but remember, at that point there is no turning back :)

I feel your pain Brother...I remember one of those CPSs on the drivers side being akin to trying to tie your shoes with a baseball bat...What doesn't kill you will make you stronger...
All very true. This was every bit as exhausting as the CPS's were.
 
#5 ·
I feel your pain Brother...I remember one of those CPSs on the drivers side being akin to trying to tie your shoes with a baseball bat...What doesn't kill you will make you stronger...
 
#7 ·
Additional TPS Removal & Install Tips

Jetpilot - I just did the same job today.

My M5 was stumbling/hesitating/running crappy - finally got the "cross check code" and the "bank 1 failure code" (I posted in the Peake Code section)

One thing I found is that you do not have to remove the plastic ducting.
I used my trusty Xcelite 378M needlenose pliers - had these for over 20 years and they always seem to solve a problem - heavily serrated jaws that grip like a psychotic ape - and they are thin enough to get between the screw head and the plastic duct.

Here's the steps I took to remove:

1) Loosen the screws with the pliers completely.
2) Back them out till they hit the plastic wire duct.
3) Pry the TPS loose from the head and push forward.
4) With your thumb, push back the plastic wire duct - there is "JUST" enough flex to clear the screws & TPS as 1 unit. (Screws completely un-threaded, but still in TPS holes.)
5) Remove TPS.
6) Remove connector.

To Install:

1) Throw away the Phillips screws & get (4) M4 bolts/washers - and a 7mm combo wrench if you don't have one. (I didn't - my set stops at 8mm)

2) Attach connector to new TPS.
3) Insert the bolts/washers into the TPS holes
4) Push the plastic wire duct to flex back enough to position the TPS (with the bolts through the TPS holes as 1 unit).
5) Position the bolts & tighten.

I found this method alleviates much of the time in removing the plastic ducting - I know - I did one side that way! (I'm not sure, but I may have invented some new curse words in the process).
I guess I'm used to removing the screws/bolts first, then the part - in this case removing the part with the screws worked out much better.

Another project saved by the Xcelite 378M! (I don't work for them) - Add it to your toolbox.

Hope this info is helpful!

I reset the codes and took a non-spirited 10 mile drive after installing the new TPS's - no hesitation/stumbling/crappy running.
I also noticed that the previously "raunchy" 1-2 shift is so much smoother.
The real test is tomorrow - a spirited drive on the NY Thruway - taking my wife to Imax at Pal Park Mall.
 
#8 ·
+1 on the hex bolts

I replaced both TPS when I had the plenum off a few weeks ago. Only two things I would add:

1. I had an old 90 degree philips head screw driver - its basicaly just a piece of metal with a 90 degree elbow on it that ends in a philips head. I believe this is used by plumbers or electricians to get into really tight spaces - it just barely fit between the sensor and plastic wire bundle. Can't remember if I got this at homedepot or sears. Locking pliers work too.

2. Hex bolt size is M4x7 25mm long. Perfect fit and w/ a 7mm wrench piece of cake putting the new sensors in. Well worth doing.
 
#41 ·
I replaced both TPS when I had the plenum off a few weeks ago. Only two things I would add:

1. I had an old 90 degree philips head screw driver - its basicaly just a piece of metal with a 90 degree elbow on it that ends in a philips head. I believe this is used by plumbers or electricians to get into really tight spaces - it just barely fit between the sensor and plastic wire bundle. Can't remember if I got this at homedepot or sears. Locking pliers work too.

2. Hex bolt size is M4x7 25mm long. Perfect fit and w/ a 7mm wrench piece of cake putting the new sensors in. Well worth doing.
Here is an excellent TPS DIY write-up with tons of great pictures: http://www.m5board.com/vbulletin/e3...bulletin/e39-m5-e52-z8-discussion/163958-throttle-position-sensors-changed.html

Also, does the hex screw need to be 20mm or 25mm?
Bringing this thread back as I need to find the right size bolts to get for the tps and I am nut and bolt illiterate.

It is an M4x7 25mm long?

My car is doing some funny things right about now.. lol
 
#9 ·
#11 ·
Are TPS considered Preventative Maintenance?


Hello Nightkrawler,

I'm a newer member here, and have read 2 schools of thought on replacing parts - 1. Wait till a code is thrown and 2. Preventative maintenance.

From reading the board, I know the CPS & O2 sensors are considered PM - are the TPS sensors also?
I Had to replace mine, but I'd like to know from your experience -what other parts would you consider to be PM at 68K miles - I wouldn't like any surprises like I had with the TPS - plus it's starting to get cold outside!
 
#15 ·
For those who attempted this, do you still have the part # for the TPS? I will replace the CPSs the upcoming weekend, will add TPS to the mix, since my beast has a slight hesitation from 1500 to 2400 rpm.
 
#17 ·
Hi Folks,

I am now stuck with removing the damn TPS. Spent a whole evening to no avail.
The philips bolt head is stripped. The plastic wire duct is in place. Trying different options at the moment....
 
#18 ·
Hi Folks,

I am now stuck with removing the damn TPS. Spent a whole evening to no avail.
The philips bolt head is stripped. The plastic wire duct is in place. Trying different options at the moment....

Did you watch the video, near :40 seconds, I mention how I used both a small stubby screwdriver, AND a vice grip on the head of the screw and turned them both carefully and in unison to get the screw to come out. I then replaced the screws with a proper allen-head (which is what should have been in there in the first damn place).

So, if your head is screwed you have two options:

1 - try the vice grip method, after soaking the screw with some PB blaster

2 - (if replacing the TPS anyways) destroy the plastic around the TPS, then use a small hacksaw to cut the heads off the screws. Then, the rest of the screw will come out in your hand easily.
 
#19 ·
I understand the first method, mate. But don't quite get the second one.
If you cut off the head, how are you gonna unscrew it from the motor?
 
#20 ·
He's basically saying

you can crack the plastic around the old tps sensor and then cut off the screw head w/ a hacksaw blade - allowing you to pull the sensor off and then use vise grips to grab the piece of screw left and turn it. What you might also try is using a hacksaw blade to try cutting a new slot across the face of the screw and then use a flat head screw driver (or something that fits in said groove) to try turning the screw.

Do yourself a favor and make sure you've removed the air ducts AND the black plastic by the firewall for as much clearance as you can get. I used a combination of needle nose vise grips (very small/thin jaws) and a 90 degree stubby phillips screwdriver (it looks like a phillps head bit with a 90 bend at the end - I found it in the plumbing section of lowes of all places). Replace the screws with hex head bolts to save yourself (or some other poor shmuck) the pain in the future.

Good luck.
 
#22 ·
you can crack the plastic around the old tps sensor and then cut off the screw head w/ a hacksaw blade - allowing you to pull the sensor off and then use vise grips to grab the piece of screw left and turn it. What you might also try is using a hacksaw blade to try cutting a new slot across the face of the screw and then use a flat head screw driver (or something that fits in said groove) to try turning the screw.

Do yourself a favor and make sure you've removed the air ducts AND the black plastic by the firewall for as much clearance as you can get. I used a combination of needle nose vise grips (very small/thin jaws) and a 90 degree stubby phillips screwdriver (it looks like a phillps head bit with a 90 bend at the end - I found it in the plumbing section of lowes of all places). Replace the screws with hex head bolts to save yourself (or some other poor shmuck) the pain in the future.

Good luck.

^^ This! Thanks for the clarification for him, you have to get pretty inventive at times with this car. The "break it off/hacksaw" method is like, plan G or H.. lol
 
#21 ·
It is possible the reason people are having problems with that screw is they are using the wrong bit or driver. That is not a standard North American Phillips. Like metric and imperial, Euro things are different. I think technically it is a 2PZR driver, closest thing we have is a 2PR a drywall screw bit. It is not a 2PH which is the standard Phillips screw driver we use in NA.
Even if you have stripped a TPS screw with a Phillips screw driver if you put a "Phillips reduced" 2PR (sometimes called PR2) you will likely get the stripped screw out.
Just to confuse more I think they call the 2PZR bit a "pozi drive" here in NA.
 
#26 ·
Wow, you are very serious about bolts and screws. This is a science :)
Never could have thought that there are such detailed differentiation...
 
#23 ·
Thanks guys for a very informative reply.
I finally got it out. Phew.... It is indeed pain the ***. I spent two evenings in doing this. By the way, DIY post here helped me save around 70 USD on labor at a local BMW shop :) Thanks M5board.

Now, how I did it... The hacksaw method was not used. I even did not have to undo the plastic wire duct. I took a file and cut the two sides of the bolt. Then used pair of grips and twisted it. The screw started moving. Now how happy I was you can't even imagine.

Looking at these photos you can basicly see what happened to the bolt and what method I used. There was no need for a screwdriver.

 
#24 ·
I have a question now though.
According to my Peake scanner, only one of the sensors is malfunctioning. I remember it referred to the one attached to the bank 1. Is that the left side of the engine when sitting in driver's seat (driver's side)?

Should I replace both at the same time or replace only the 'dead' one?
Thanks
 
#27 ·
You only save $70 for labor? Honestly if I knew a place that would do it for that I would have paid instead of doing it myself. It was a PITA!! Bank 1 is the passenger side of the car. I would replace both if I were you. That's what I did. It would suck to do this for just one and have the other fail in a few months or even a year.
 
#28 ·
I also thought it would be more expensive than that and started doing it myself.
Now when the engine was apart, I asked the LOCAL OFFICIAL BMW dealer. And they INDEED quoted me 70 USD. Ridiculous, eh?
 
#29 ·
Yeah especially considering there's really no way I can see to change them out without removing the plenum.
 
#30 ·
TPS Sensor replacement vs throttle body cleaning

I have noticed several posts about replacing the TPS after getting the Check Engine or Engine Failsafe Mode warnings--both of which I received and verified by my Peake. My questions is:

Isn't the point of the TPS or other sensors to indicate that the throttle position is not in sync. It seems many posts are quick to replace the sensor rather than reviewing if the throttle positions are fully closing or opening. I have seen several throttle bodies with gummed up areas on other cars--seems that simply cleaning the throttle plates may be a good option before replacing sensors, no?

M
 
#31 ·
It would be easier to explain the codes if you posted them. There is one that says the throttles are not closed. There is no code to say they are not in-sync. The single motor and twin arms keep them in sync at least as much as they were setup. When you get TPS errors it is because the volts are not correct. One tps reads up in volts the other reads down. You could check the arms for play, but if there were some play you would likely get engine performance codes, like fuel. The TPS only check the end of the bank not each throttle.
 
#32 ·
I guess the actual codes would help...from the Peake:
78, 76, then all cylinders with misfire during warmup...Cd, CE, CF, d0, d2, d3, d4, d5, d1. Not sure if the misfire during warmup is related. Also, (and this may have been stated before), code 76 is TPS 1. Is 1 the drivers side I presume? Plan on replacing both anyway, and from this post looks like a pain...

My beast is still driveable at this point but does show hesitation below 2k rpm with misfires. Wonder if this may be more related to simply requiring new ignition coils/wires?

Thanks for the reply...I am getting ahead of myself somewhat and the TPSs should be here by mailorder tomorrow. BTW, found a good price here for the OEM Hella: partsgeek.com
 
#34 ·
Nearly 3 years ago had did the following service done: Replaced oil sep, return, crank vent, idle air, elbow, & T hose; new spark plugs, fuel filter and MAFs replaced to fix the SES with other unrelated items. I did discover what appears to be an easier method for removing the TPSs. Instead of removing the covers from the rails, simply remove the cabin air intakes. This will allow more room to get a needle nose vise grip on the screws (I did not even bother attempt to use any method of removal with insertion of a Phillips drive). Once the sleeve is unlatched, the intake twists out like a light bulb socket.

This will allow room for the needle nose vise grip to remove the TPSs...now I hope it will fix the problem.
 

Attachments