BMW M5 Forum and M6 Forums banner

ger's M5

1 reading
97K views 199 replies 37 participants last post by  matt_berninger  
#1 ·
I thought it might be a good idea to bring everything I've done together into one thread, sort of a project thread.

I'll start from the beginning and I'll update it often to bring it all up to date. Any comments welcome, but remember that these first posts are for work I did a good while ago.

November 2009.
Bought the car. It's a Nov 2000 facelift model, LMB, pretty much standard. Car had seen better days but was mechanically sound and seeing I like palying with cars, it was ideal for me.

I had to sort the headlight adjusters as soon as I had it, I mentioned this here in my first post on m5board!:
http://www.m5board.com/vbulletin/e39-m5-e52-z8-discussion/149580-can-someone-help-i-need-headlight-part.html

January 2010.
Bought some 13cm speakers for the rear of the car, thinking they'd make a world of difference. I was very wrong. Car has the ordinary business radio and no amp, subs or anything good in the sounds department. Seed sown, remember this for later!

Very soon after I modified the wiper arms to take e60 flat blades, I like how these blades work. I followed a guide on the bmw5 forum here:
http://forum.bmw5.co.uk/topic/22408-aero-wiper-project-now-finished-with-how-to-guide/page__st__30

February 2010.
During this initial time I also had to:
Strip down and repair the mirrors so that they folded, the little internal gears had worn so I managed to get hold of some broken 2nd hand mirrors and strip them down for the bits.

I also discovered that the mirror/window control switch had a burnt out chip in it, sorted that out as well.

Also discovered that you can reverse the wing mirror folding action by simpy swapping the two motor wires in the connector, they are a solid blue wire and a solid white wire (by solid I mean only one colour, there are no trace colours). A bit on this here:
http://www.m5board.com/vbulletin/e39-m5-e52-z8-discussion/172186-auto-fold-mirrors-new-module-help-please.html

Through sheer luck I got hold of and fitted an alcantara headlining and associated bits, very nice.

Fitted a glass sunroof panel instead of the steel one. This meant that I took out the roof lining again, as I wanted to sort a 'drag' fault to the sunroof mechanism, it was a slider of sorts that had broken. Learnt a lot about the sunroof mechanism, DIS was handy in re-setting the control.

I got another key and discovered all about 'key memory' which is a pretty cool feature that allows many options/settings to be assigned differently to different keys. So, I would have my seat, steering wheel, heater, radio and maybe a few other quirky options (bongs, closure etc) and my wife would have her settings on her key (but she never drives it, but that's not the point!).
I was surpised that the dealer would have wanted about ÂŁ100 to set this to 'on' using the diag, I did it myself with my own one for free! That was a good feeling.

...
 
#2 ·
Here's a little update:

March 2010
Following a post on here, I changed the driver's seat sponge. It was wearing badly at the outermost bolster, there was loads of little bits on the carpet beneath. Car felt much better after this, and comfier. But, it's starting to leave little bits again, I want to return to the area and see what's up, I'm thinking of bonding a tougher material to go over the metal frame in the bolster (a canvass/denim type material, quite tough but pliable enough not to be noticed).

The seats are rather heavy, since they house about six different motors! Not particularly difficult to remove, just watch your back if you ever remove one!

Have a look here:
http://www.m5board.com/vbulletin/e39-m5-e52-z8-discussion/155334-best-mod-your-100k-mile-m5.html

May 2010
I had an engine light appear, turned out to be the exhaust cam sensor for bank 1 (this is the easy to get to sensor, I was sure glad to realise that!). Car felt better after changing that.

June 2010
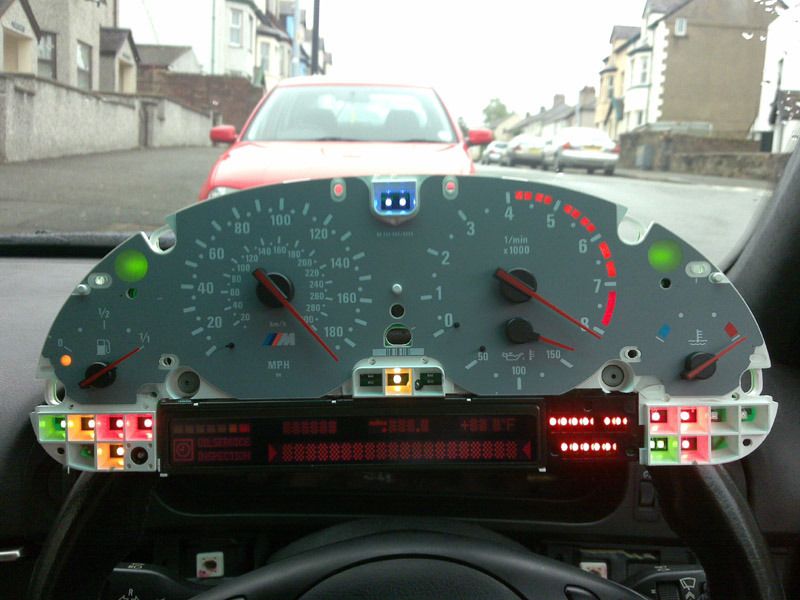
Decided that I'd had enough of dead pixels on the dash, so ordered a new ribbon off ebay and fitted that, wrote it up and I think it's in the 'How To' section:
http://www.m5board.com/vbulletin/e39-m5-e52-z8-discussion/158260-pixel-fix-replacement-ribbon-diy.html

and a picture of the now working dash:

Image


June 2010
A few more jobs including sorting out leaking rear door cards (butyl seal had given up) and changing the diff and gearbox oil.
September 2010. Relocated the TCM switch (tyre pressure monitor re-set switch) to the redundant manual headlight adjuster on the dash trim, thanks to this post:

http://www.m5board.com/vbulletin/e39-m5-e52-z8-discussion/49876-empty-switch-next-fog-light-switch-e39-2.html#post531719

and this one by aok2me:
http://www.m5board.com/vbulletin/e39-m5-e52-z8-discussion/108263-interior-trim-should-i-mess-2.html#post1196326

I cut the hole using a lazer cutter in work. I measuerd up the original hole and worked out the postion for the blank on the machine and let it run.

Image


Image


Image


September 2010
Changed power steering pipes and flushed the system. Bought a 5litre can of power steering fluid and made up a reservoir and a drain can so that the old fluid could be properly flushed out. A lot of fluid gets pumped in no time when you run the engine! However, there's nice, clean and fresh fluid in there now. I had seen this post:

http://www.m5board.com/vbulletin/e39-m5-e52-z8-discussion/163480-power-steering-flush-reservoir-replacement.html

This one is handy regarding power steering pipes too:

http://www.m5board.com/vbulletin/e39-m5-e52-z8-discussion/161197-p-s-flush-diy-pics-added.html
 
#3 ·
Another update:


October 2010.

Early on in the month I changed the diff input shaft seal. Whilst I was there I changed the prop intermediate bearing (and added the butyl seal), gearbox mounts, propshaft spigot bearing, handbrake cables and shoes.

Removed the EGT sensor, a relic from the early cars and made a blanking plug to seal the hole (had the car been a month younger, this would not be on the exhaust system at all). Also changed some suspension parts. Car was up in the air, what do you do!

A difficult part of this job was the exhaust system, which runs from the front to the rear in one piece and it's really heavy, especially when you're under the car.

Discovered that the handbrake cables like to corrode into the rear hub carriers but got them out in the end with a good old fashioned 'persuasion device'!

Also found that one of the gearbox mounts had completely split! Really glad that a one-piece version is in there now.

Input shaft nut marked so that it can be returned to the same position to keep the preload the same.
Image


Gear lever carrier rear bush filled with sealant to stiffen it up a bit, it felt very weak, much better after this. This part used to be about ÂŁ15, now it's closer to ÂŁ70!!
Image


I also painted the rear diffuser black, it's hardly noticeable but I think it looks better. No pictures I'm afraid.

At the end of the month, just before we were to go for a short weekend break, I decided to reverse into someone's car in the work car park! No excuse really, my fault entirely. Sorted the other person's car through a very good repairer but decided to tackle my own bumper myself (and the pot was now empty!). We managed to go for a short break with the bumper very roughly painted/patched up. It was later removed and properly painted.

Here is the car immediately after the impact, oops!
Image


I collected all of the bits off the floor and set about to plastic weld them back together. The years of repairing motorbike fairings came in handy now :)

Just before adding the final two bits:
Image


To help strengthen the repair, I added an aluminium mesh, it was melted into the plactic (that took ages!). This was on the inside of course.
Image


Filler added to even out all the rough bits:
Image


I spent some time preparing it after this, getting the shape spot on , there wasn't much filler left on it!
Also took my time to prep it, painted it in the garage. Result wasn't bad at all:
Image


December 2010.

I cleaned up my injectors and had a tidy up of the top end a good while ago, wrote about it here:

http://www.m5board.com/vbulletin/e3...-discussion/169861-recent-compression-test-injector-clean-cam-timing-check.html

Car runs better after this work and as I discovered, a bit more efficient (always welcome!).
 
#4 ·
Awesome man..
I'm gonna want to clean my fuel injectors and do my timing now..
Lol
 
#7 · (Edited)
Thanks for the comments.
My family have always been quite practical and we've always looked after our own cars, so I suppose I have a fair amount of experience.

However, I immersed myself into the manuals so that I was familiar with the car and I'd been reading a few things on the forum for a few months before buying it. You can never know too much. I think it's daft to try to do something without reading up on it beforehand, you usually end up doing a better job.

The available manuals are TIS (from ebay etc and lately most of it is on 'spaghetticoder.org,' together with wiring information), an old Haynes manual, a downloaded Bentley and downloaded torque specs.
Realoem.com (and bmwfans.info) are also fantastic for part numbers but also to see what, how and where various parts go and fit together.

This forum is a mountain of knowledge, filling in the sometimes huge gaps left by the manuals. Some of the people here are very knowledgable and we all should respect and thank them for their contributions, I certainly do (thanks guys!).
 
#11 ·
Thanks.
No towbar involved, I glanced the side of the other car!
However, it did become clear that the bumper had been damaged before and had not been repaired very strongly, only a couple of wire ties and tons of filler (talking of about 6mm or 1/4" thick here, inside and out, it didn't even sit on the aluminium carrier properly!!). It just fell appart when I touched the other car. At least it's better now but it could have happened at a better time!

I'm pretty happy with the result, would do more but dad is a bit sceptical of spraying and it's dangers (fair enough, it's his garage really!) so I ask someone else to paint for now.

No good pictures of the bumper on the car and it needs a good clean after the work I'm doing on it now. I'll get some pics then!
 
#12 ·
wow, great job done, result looks good. ;)
yeah, last summer I helped repairing friend's motorbike fairing, so now I do know that your previous experience repairing motorbike fairings sure was very useful for you bumper repair. :D
 
#13 ·
Great read ger, and thanks for the links too. Result getting that headliner. And hats off to you for tacking the pixel fix!

I am quite interested in doing that tyre pressure switch relocation job having read the threads. But just so I am clear, you can definitely buy a new bit of titanium trim without the hole in it, yes?

Oh yeah, whereabouts in Wales are you ger?
 
#14 ·
Headliner was a great find, I was rather glad when I happened upon that. Pixels had to be fixed, without question and I don't like giving people money for what I can do myself.

Titanium trim without the hole is certainly available, part number for the UK rhd version is : 51 45 2695568 and it cost about ÂŁ22 from BMMiniparts. This is what I ordered and it was correct!

I'm up in North Wales...
 
#15 ·
Time for the next update :)

March 2011.
Decided I'd make up a tool to hold the oil filter housing steady whilst the lid is opened to remove the filter as the whole housing is twisted about like hell without it and have you seen how much are them little mountings!

Wrote about it here:
http://www.m5board.c...using-tool.html

April 2011.
Removed the IHKA (heater panel) module and cleaned it up, especially the sampling fan. I'ts nice to know that there's no old horrible dust in there anymore!

Fitted a transmission tunnel cargo net, might be handy to hold some flat items and it takes no room. If you order one, remember to order the screw in clips as well.
Image


Fitted some DRL's either side of the front number plate.
I would like to get the angel eyes to work as DRL's, however, the easy ways to do it mean that they're not properly connected, meaning I'd lose the option of them lighting up with the indicator stalk moved (either up or down) when parked. Even though I don't often use this feature, I like that it's there, it allows you to show that the car is there if it's dark.

Anyway, I wrote about the DRL's here:
http://www.m5board.c...tml#post2052497

Right at the end of this month I got hold of a carbon bonnet, very similar to a Vorsteiner but it's a Schmeidmann, has the dome and the vents (I like the dome, not so sure of the vents). It's painted (of which I'm glad) and I'll have it painted to match the car:
Image


I also got some new bonnet struts made up to be about half the strength of the standard ones.
They were made by a company known as Car Gas Struts or Struts Direct (use google), who were very helpful. To order them I asked for the standard BMW items (BMW-022-SDRS128658) but included a request for them to be pressurised to a different, lower pressure (360 Newtons), they were about ÂŁ40.

The standard ones, with a lighter bonnet will open it quickly, which isn't bad, but will also tend to bend the bonnet upwards, as they still exert a force on the bonnet even when it's shut, which isn't so good as it puts a constant strain on the hinge area of the bonnet.

Standard e39 M5 bonnet struts have a pressure or force of 700N.
Standard e46 M3 bonnet struts have a pressure of 380N.

Most buy the M3 ones as they are for an aluminium bonnet and are therefore weaker, but they're not exactly the same length, meaning that the bonnet would be lower when fully open. I don't fancy this, I don't want to hit my head on the bonnet as I hit it against a hatchback boot not too long ago, and it really hurt like hell!

My replacements are exaclty the same as the original ones, same open and closed length, so the bonnet will be in the same position when it's opened but the weaker strength means that it won't flip up and they wont cause it to bend upwards when it's shut. I asked for them to be pressurised to 360 Newtons which works a charm.

A little link about them here:
http://www.m5board.c...tml#post2066895

I also decided to get one of them rear windscreen spoilers or roof extenders. The bonnet and spoiler thing were both fitted at the beginning of August, painting took a while and I did a few other things in between.

May/June 2011.
After reading and reading more about it on the forum, I decided I'd sort out the rod bearings.
I was convinced I could hear a very quiet clunking from low down the engine. I couldn't enjoy using the car anymore, everytime I used it I tuned in to this noise and got worried that the damned thing would blow up. It was time to sort this out for my sanity!

Here's a taster pic:
Image


I wrote it up here:
http://www.m5board.c...ing-change.html

Whilst at it I changed the front crank main seal and timeserted the lower oil pan. I also found that my steering idler arm bush had virtually seized in the arm. Sorted that out very cheaply!

Whilst doing this I changed the coolant auxiliary pump, or more accurately, made one good one out of two failed units. On mine the pump motor wasn't quite strong enough (sometimes turned when I applied the battery voltage to it, sometimes too stiff, newer one always turned) and on the replacement one I bought, the solenoids at the top were seized. Taking them to bits and picking the working parts gave me one working unit and a better understanding of the damned thing!

July 2011.
Stripped down the rear right wheel arch. Lip has some rust on it so it's cleaned up and sorted.
 
#97 ·
Awesome thread, congrats on the car!

How do you like the bonnet so far? Especially I've been wondering if there's anything done on the other side of the vents to keep outside water away from electronics? Is there some sort of a water gutter?

Right at the end of this month I got hold of a carbon bonnet, very similar to a Vorsteiner but it's a Schmeidmann, has the dome and the vents (I like the dome, not so sure of the vents). It's painted (of which I'm glad) and I'll have it painted to match the car:
Image
 
  • Like
Reactions: ger
#16 ·
Here's today's post.

I should have mentioned earlier on in the thread that sometime during the first six months I replaced all of the front suspension arms and the big upper one at the rear, as well as both track rod ends (which were passable but I now know they're fresh).

Steering improved markedly, being much more responsive and sharp.

Only the rear wishbones, rear ball joints and rear subframe bushes (plus diff mounts) remain, but all of these seem quite healthy for the time being.

August 2011.
Fitted a valved vanos accumulator. Vanos noise isn't too bad but I'd welcome an improvement. I know that fitting new vanos springs is the best way, but this can't harm and is much easier! After fitting, the engine fires up quieter. That's about all it could do really.

Here's a picture of all the bits:
Image


I wrote a bit here and had some pictures on the following page, this linked thread has a lot of information on the accumulator:
http://www.m5board.com/vbulletin/e3...39-m5-e52-z8-discussion/186811-vanos-accumulator-upgrade-kit-6.html#post2136526

September 2011.
Discovered a couple of months back that three of the jacking points had rust on them.

Cleaned them up and in the process made three holes!!! At least they weren't holes beforehand, so no internal deterioration had taken place. I had a local bodyshop weld in fresh sections as I was a little bit worried of frying the electrics, though the guy was pretty sure I'd be ok. Drowned the sills with cavity wax and sealed the outside. Nice to know it's repaired, should be ok for a good few years!

Had some pictures up here:
http://www.m5board.com/vbulletin/e3...lletin/e39-m5-e52-z8-discussion/204112-rust-anybody-rust-anybody-some-rust.html

I had always felt that the brakes weren't what they should be. So I flushed out the brake fluid. Used DOT5.1 and the diag to do the job, so that the ABS etc units were all flushed. Not certain if it's much better but certainly can't be any worse.
Brakes work well and slow down, it's the feel that's not quite right somehow. More on this later...

I bought a new Bosch battery from Euro Car parts. I had a new Exide shortly after buying it, but it gave up, I was very glad I had kept the receipt carefully and I was awarded all my money back!!

Euro Car Parts still don't list the battery for the M5, even though it's within 1mm of the OEM battery size and more pwerful. The Euro Car Parts item number is:444779008.

More on that here:
http://www.m5board.com/vbulletin/e3...tin/e39-m5-e52-z8-discussion/134634-uk-members-bosch-battery-110ah-920-cca.html

October 2011.
Very interesting! A little box from Evolve arrived :) alpha-n here we go!

Image


I'm still not sure where to stick the emblem, I'll think of somewhere someday and no, I'm not going to sell it :)

Installed in no time. Evolve were good at returning emails and the 'tune' file. I've set a few options and it's all just as I want it now. Car runs great, smoother and more eager somehow.

This will allow me to run alpha-n mafless, so I started thinking...

I thought of fitting the IAT relocation kit, but something tells me it can't respond to changes in temp as quick as the standard, bare sensor located under the mafs. The iat kit's sensor is inside some plastic and I just can't get my head around it being able to respond as quick. I do however realize that the standard maf mounted sensor is in a heatsoak zone, but here in Wales that can't be too much of an issue!

Anyway, I got hold of a couple of non M5 mafs and stripped them out; I should add that I electrically compared the temperature sensor that lives on the underside the maf's and they performed identically to the standard M5 versions, so I could strip them out and reating the temp sensor. The right hand one merely holds the wiring connector tidy, inside it has been cut to be flush with the bore of the inlet pipe. The left hand one has been shortened, it now doesn't have the little labyrinth at the very end, but it still does protrude into the airflow so that the temp sensor works in the airflow.

Their innards were removed and a good glob of polyurethane adhesive used to fill the void, so there shouldn't be any strange noises from weird air currents inside them!

Here are a handful of pictures, showing the truncated MAF's compared to a standard sized one:
Image


Image


Image


Image


Image


I might still change my mind and go for the IAT kit.

Back to the brakes:
My brother had a 'drive' (bloody hell! He used to be a rally driver, you'd never think!) in the car. His feelings about the brakes mirrored mine. I decide to overhaul the calipers and get fresh felxible hoses, all six of them (four at each caliper and two under the bonnet, just behind the abs unit, feeding the rear brakes).

Also, at this time I quantified the ride height discrepancy between both sides at the rear. I knew it wasn't 100% but hadn't until now got around to looking at it properly, it wasn't a priority as it went ok. It took me months to notice it too. Car seems to have ACS springs, but one side is 14mm higher than the other. One spring has rusted more that the other, so I presume it's sagged a bit (I said sagged!!). I'm pretty sure it hasn't snapped. Incidentally, the ACS rear springs only lower the car by 5mm.

I phoned ACS and enquired about springs. They wanted about ÂŁ300 for two rear springs. I asked why are they so expensive, their reply was that they're the best. To this day I regret not telling the guy that if they're that good, why has one sagged! Anyway, it won't be getting ACS springs again. I decide I'll fit standard springs as the car is, for practicality, too low, especially at the front.

Another little job:
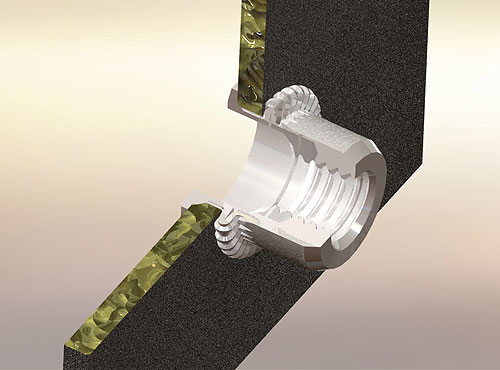
Fitted rivnuts into the shell where the rear seat back is secured.
The original holes had enlarged to an unusable extent and I couldn't find any self tappers that would work and fit through the rear seat eye. An M6 rivnut works great.
For those who haven't seen these things, they are similar to a large pop rivet but with a thread inside. You drill a hole, push it in and fix in place using a tool (thats very similar to a riveter, surprisingly!) and we-hey, you now have a secure thread in a panel.

I think this picture depicts it quite well, bolt or screw would go in from the back in this picture:
Image


Search the usual places (and ebay) for more information if you wish. They're known by a number of other names, but I like rivnut, it makes sense!

Cleaned and fed rear seat and headrests, they were painfully dry and are considerably better now. Used Gliptone stuff that I had from a kit for my previous car, seems to be good stuff.

Something else:
Realised that the headlights were very low (probably after me doing things). Inspection revealed a seized front sensor link bar and that the rear sensor bar was the wrong way. When the rear wishbone moved, only the link bar rotated, it hardly moved the rear sensor's arm at all. A new front and rear bar were fitted and everything fitted properly, lights now respond to virtually all movements (even when accelerating and braking), I'm quite impressed as to how 'live' the system really is. The diag was quite useful too, having a good test procedure that helped identify the cause quickly. I could lower or lift the car, with everything sorted I could see a reading change on the screen in response to the lifting.

Busy month, this October!

My boot lock spring snapped, making it impossible to shut it. Took it all apart and found a suitable replacement and had it working again in no time. It's a shame that BMW don't sell just the spring.
To get it sorted with dealer parts would require a new boot lock latch, about ÂŁ40 or so iirc. A spring from the oddments drawer did the trick :)

November 2011.
For the brake system overhaul, I get hold of a set of rear brake calipers, so I can work on them without disturbing the car. Stripping them down reveals perfect pistons and good seals but the seals shall be replaced anyway. Clean up and paint the calipers black.
Might paint the stripes and 'M' in the ususal colours but they're not easliy visible when on the car, so not a priority and, where do you get the paint?

Sorry, can't find the pictures. I'll take some when they're fitted!

Didn't do that much important stuff on it in December, so we're coming into this year (2012) at long last.

I'll post another update tomorrow :)
 
#19 ·
January 2012.
For some time, most of last year probably, I wanted to get e60 washer nozzles to work with my car and it's two reservoirs. These have a spray pattern rather than a jet, so cover the screen better and I'm convinced they help clean the screen better too. As the e60 nozzles only have one inlet, it was a bit of a pain, as I needed to feed from two reservoirs (normal and intensive) into each nozzle, without any of the fluid going back into the other reservoir.
Two 'non return valves' per nozzle would have worked, but I couldn't get hold of any that opened with a low enough force (called cracking pressure), each one I got hold of dropped the fluid pressure too much, giving me a weak spray at best.

In the end I thought up of using an electrical solenoid to control the flow of screenwash from whichever reservoir to the nozzles.

Here is a picture of the solenoid installed next to the intensive screenwash reservoir.
Image


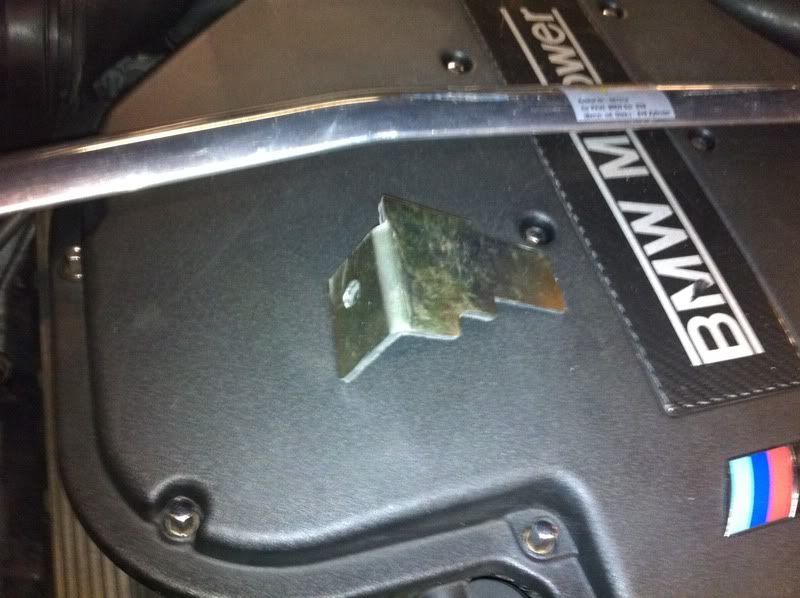
The bracket fits into the mounting that was used to hold the original round diagnostic port on the earlier cars. If I had the earlier model witht he diag port, I'm not sure where I would have mounted the solenoid!

Here's a picture of the bracket 'during development!'
Image


For a bit more information, I did a quick write up here:
http://www.m5board.c...nsive-wash.html

February 2012.
I mentioned earlier that the car had poor audio. I finally decided that I'd like something better, so I thought I'd sort out my own 'M' audio subs under the parcel shelf.

I spoke to thompsonsltd on ebay, I gathered that they would probably be much cheaper than anyone local and they have sorted me with a powerful amp, two 12" subs and fitting kit for a very reasonable price.

The amp is a Pyle Chopper PLA-1200, 1ohm stable monoblock sub amp and the subs are Lanzar Vector 12" 600w shallow mount, dual 4ohm coil.

Amp: http://www.ebay.co.u...=item519b950cea

Subs: http://www.ebay.co.u...=item564b6bfe8e

I was advised to run the amp bridged (it has the two outputs for the dual coil speakers, it's still a mono amp) and wire the subs to 1ohm (all four 4ohm coils in parallel), so that's what I've done (but that happens later
Image
).

I've never heard of these manufacturers before, but they seem to be reasonable quality and anything has to be better than the sub-less old system I used to have!

I decided that I'd also like every speaker location to be populated, so started hunting for front and rear tweeters (someone had removed the fronts from my car, this spec doesn't have rear tweeters nor the mid range tweeters that can be installed next to the vent in the fron door cards).

I realised that I had a set of tweeters that would be ideal for the rear, they came with the rear 13cm speakers years ago. I carefully cut out the blanks (as fitted to most door cards) and was able to 'super glue' the speaker housings to them.
Image


Image


I also decided that I'd like some other little things. I got hold of a set of illuminated 750 interior door handles. Decided to have the exterior handles illuminated as well. Front foot wells will also have some illuimation, sometime! The rears would be great too (to find little bits my girls lose in the car), but I've yet to decide on this as they would have to be under the front seats (and the little girls might end up smashing them!), this one shall be thought about for a few months
Image


Here's a picture of two of the exterior door handles. LED's have been glued into location with PU adhesive (handy stuff). The wiring has been covered with sponge for silence and to help hold the wiring in position. Routing the wires in the front doors was a bit of a pain as the window is a bit in the way, but a suitable route was discovered in the end.
Image


Whilst the rear seat and parcel shelf were out I thought about blinds (they had to be removed to sort the wiring for the speakers). In the end I stopped thinking and got hold of a rear window blind and ordered the aluminium sliders from mr li, the standard plastic sliders are apprently very prone to break and no genuine replacements are available. Here is a link to mr li's work: http://www.m5board.c...r-sunshade.html

These in turn led to some aluminium rad brackets too, they match the strut brace in the engine compartment!). Here they are:
Image


Getting a rear window blind then meant that the correct centre console switch was needed, more looking and finally bought the correct unit from a very nice bloke on 5forum, thanks V8Warrior:

Image


I would really love to get the alcantara parcel shelf for the rear blind, thus far I'm still looking for this. This blind obsession then developed into another search for rear door blinds...

More later
Image
 
#21 · (Edited)
I'm sorry for not updating last night, I was tired having worked on the car all day (you'll soo find out!!!).

So it's time for another update. This is quite a biggie :) I managed to get a bit more time to actually work on the car and also I can remember better what I did; I think I took a bit more pictures too.

Enjoy!


March 2012.
All doors now have the interior and exterior handles illuminated. Both are the BMW amber/orange colour. I had no intention of lighting up the road, I only want to be able to see the outside handle's position, so amber was selected and white leds put back into their bag. I don't know how it will look outside, in the dark etc, but I think that the amber will look ok.

Here's the exterior handles illuminating in the BMW amber (sorry for hopeless picture)
Image


Interior 7 series door handle, illuminated:
Image


Interior 7 series handle, showing the illumniating strip:
Image


April 2012.
Cut out the blanks for the rear shelf subs. Used a Dremel type thing, which worked great but there's dust everywhere. Decide to remove the sound deadening material to clean up properly, found bits of broken cutting discs everywhere!

Image


Used some rivnuts to mount the subs from the boot. Very securely mounted and looking forward to hearing something out of them before the end of the year (I'm slow!). Not entirely happy with how the wiring ends up at the subs, it's a bit untidy but it is practical.
I might make an enclosure to fit snugly over these subs in the 'not too distant' future:
Image


Out of nowhere, some Beastpower arb brackets arrive. Nice that
Image
They went on pretty painlessly. No pic sorry.

May 2012.
Wired up the amp to the power source, through one of them huge fuses they give in these kits. I decided to get a slightly longer earth cable and earth the whole lot at the car's main earth point in the boot. This has a 13mm nut that can be tightened up properly, not a puny little screw into the sheet metal that can't take much and will rust in no time. Cables run neatly behind the boot plastic trim. I did make up a bracket for the amp and had it temporarily fitted to wire up the speakers.

Picture here:
Image


However, amidst all of this I realised that it would be best to drive every speaker separately. A bit more thinking and looking and asking made me realise that probably the best way forwards was to fit the standard BMW amp in the boot and feeding that with the output from the radio (the BMW amp takes audio level signals as inputs, no need for line out converters). I believe that the BMW amp has suitable crossovers for the tweeters etc.
I asked one or two questions about the amp here:
http://www.m5board.c...-amplifier.html

June 2012.
An ebay sourced amp, bracket and wire tails soon arrived and seemingly miles of wires made up a loom to take signals from the radio to the boot and feed each speaker with the correct power. This meant splicing about 10 speaker wires (so that's 20 wires) to the 'tails' the seller had given me. I used the genuine BMW non insulated splice connectors, with three heat shrink tubing over every splice and I staggered each joint, so that they don't sit next to each other, this took ages, but at least I could do it in the living room! I will have to connect the other ends of these in the car at a later date!

Here's the only picture I have of the wiring 'loom,' as it was being fitted into the car:
Image


Amp being fitted, I couldn't tape up the wiring beforehand as I wasn't sure about the various lengths, so it had to be done in situ:
Image


BMW amp fitted and wiring tidied up with cloth tape:
Image


Wiring for the rear tweeters was installed in the rear doors. Ran the rear blind wires up to the front too, but this needs to be routed around the dash area to the centre console switch, I'll do that later.

I modified a genuine BMW amp bracket such that it would sit just in front of the standard amp in the boot (75mm spacers at the mounting holes was ideal). An MDF plate was then made up so that the subwoofer amp could be fitted to it.

I used shortened coach bolts, held in place with a small 'O' ring and fed from behind, to secure the mounting brackets to the chassis. A long-ish extender nut (about 25mm long nut) was used to bolt up the oem frame, and then the second frame was bolted to the etxender nut using a long bolt and a spacer. Sorry, I don't have pictures of this, think about it and it makes sense!

The 'loom' was then fitted and taped up with cloth tape to avoid noises and to look original.

Here are some pictures:
Amp on unpainted adapter. Amp make is unknown to me, but it was recommended.
Image


Rear of adapter:
Image


For this amp frame to fit, I had to modify the lower mounting so that it still works with a second aplifier:
Image


Another view yet again!?
Image


And agian, thought it might come in handy if someoene else want's something similar:
Image


Bracket ready for amp, with modified lower mounting:
Image


Carrier with adapter plate:
Image


Another view of the adapted mounting, you can see the 'T' nuts I embedded into the MDF to take the screws that secure the amp:
Image


All fitted for test fit:
Image


Here's the sub amp mounting fitted to the car, sitting nicely in front of the oem amp:
Image


Here's the sub amp fitted to its frame:
Image


Rear speaker wiring finally being spliced witht he amp's wiring. A nice moment, feeling as if things are beginning to progress at long last!:
Image


Rear speaker wiring taped up, looking much tidier
Image
:
Image


I ordered a rear view mirror cell from the States. Fitted that to my mirror, so it won't leak.

Went ahead and fitted a boot charging point in the right hand boot panel. It might come in handy sometime, thinking of keeping an inspection lamp charged etc.
Made up a template for the socket and marked the panel. I selected this spot as it leavesa bit of room for the wiring behind it, not contacting anything behind it and also it's close to a mounting pin, so it should reduce flex when using the socket. Panel is a tought plastic covered with the material, once an opening was made with the Dremel, it was easy to trim with a Stanley.

Image


Socket fitted, managed to get it nice and snug, it shouldn't move in use:
Image


Right at the end of the month I decide to go the whole hog and get a ski hatch! Boot and rear seat are basically stripped out, so why not. I prepared the panel for cutting it out one night, then the following night cut out the panel using an air saw I bought for dad years ago, it worked brilliantly.

Panel marked out according to the instructions:
Image


I cleaned up the hole and painted it with etching primer to make sure it won't rust. In the end I covered the edge with the cloth loom tape as well, hopefully to stop andy rattles. I didn't worry about the little overspray, it was very localised and won't be in view.
Image


To finish off the month, I removed my rain sensor from the front windscreen. I have a rain and light sensor to fit instead (another little option) together with the correct auto lights switch. I think this will require coding the LCM, I'll sort that later.
 
#22 ·
Here's the last 'catch up' updates. From now on I hope to update quickly what I'm doing.


I hope you've enjoyed the read, either that or you're a glutton for punishment if you've reached this far!


Feel free to comment, they would be welcome!


July 2012.
Ordered new front brake pistons form Brakes International (http://www.brakeparts.co.uk/).

Some information here too:
http://www.m5board.c...e-overhaul.html
and:
http://www.m5board.c...iston-size.html

I'd had enough of the bootlid having rust on it, worst just by the M5 badge (of all places) and with some around the key hole as well.
Boot is taken to painting friends to be sorted.

Cleaned up the front calipers I'd bought, primed with etching primer and then painted black, finally a coat of lacquer to help them along!

Also, painted the new piston ends with the primer, this is where usually rusts so it might help.
Left all the paint to dry for about a week then rebuilt the calipers with the new pistons and new seals. Now ready to fit to the car.

Calipers primed:
Image


Calipers painted with lacquer:
Image


Fitted the rain and light sensor to the car after having to buy a new sensor base from rejel.com (and it wasn't cheap, considering it's only a bit of plastic). Also, fitted the auto lights switch in the clock surround trim.

Started fitting the boot panels, both sides, back and floor panels are back in. This also allowed me to fit the ski bag cassette into its hole. It was a nice snug fit, should not be rattling!

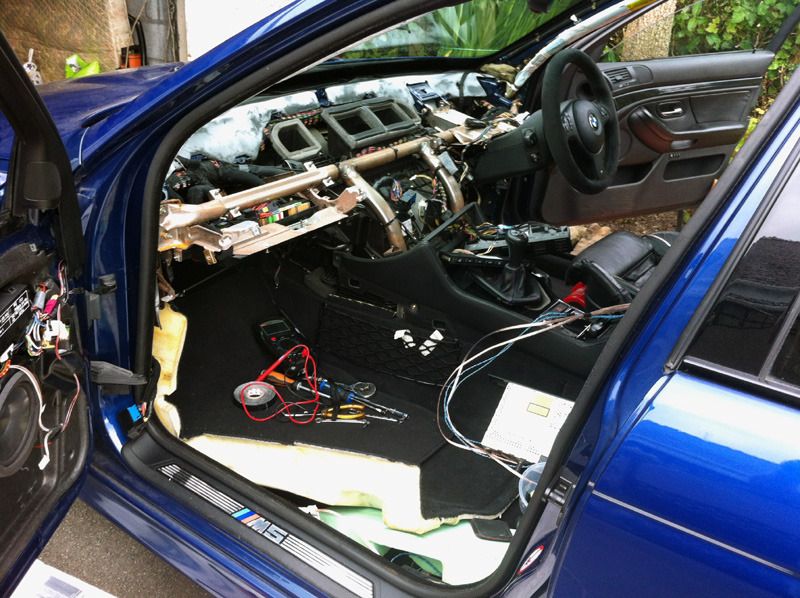
Taped up the remainder of the rear blind wiring run, managed to route it up to behind the clocks. To go further would need removing the dash upper, which means removing the dash lower too. This is done the following day and the rear blind wiring is routed along top of dash, to the fusebox area and back down into the centre console area, behind the switch unit.
Passenger seat is also removed for installation of speaker wiring.
Image


At this time I also discovered the route that BMW use for their radio wiring, which is from boot, along left hand sill until the B pilar, then across to the centre console, forwards and up to just below the sitch units at the centre console, then upwards to the radio itself.

This means a bit of a change of plan, so the centre console needs to come out! Out it comes. The left hand speaker wires are all connected and most of the left hand trim is now refitted. During this time I connect up wires so that I'll have front footwell lights, but don't connect them up to lights yet.

You can see in the picture where the audio wiring appears at the centre console area, coming up the side of the transmission tunnel (wiring running along the transmission tunnel goes to the airbag control unit):
Image


Following day I remove the driver's seat so that I can route the right hand speaker wiring to the front right A pilar connector, car looks a bit empty!:
Image


All of the dash, upper, lower and centre console along with the clocks and surround are refitted that evening. It's starting to look better.

I remove the driver's seat back to have a peek at the stiff headrest. I stick the seat back in the car and connect it up, lubricate the headrest with spray grease and it works fine now. It's electric, so seat had to be powered to be able to move it.

The driver's seat is fitted temporarily, so that I can move the car, but it will be coming out again soon to tidy up the saggin seat sponge (even though it's pretty much brand new).

Here's a picture of everything back that evening:
Image


Yesterday, I connect up the rear blind wiring to the centre console switch unit connector, so all units in the centre console are now back in properly.

I also fitted wiring from the left hand A pilar connector to the speaker pod connector, for the mid tweeter and the tweeter speakers.

Finally, my bootlid appears (friends were good enough to bring it to me as they were coming over my way anyway, very good of them).
Image


and
Image


Now completely up to date
Image


Thanks for reading.
 
#23 ·
Epic journey Gerallt.

I have a few questions for you regarding some of the little projects you've tallied up.

I'm off on holiday soon and my Spitfire is taking up a chunk of spare time at the moment so i'll bug you about it via pm over the next few weeks if you can peel yourself away from the Beast!

Cheers

Jamie