I wanted to write this DIY as I learned some new tip and tricks as well as additional close-up pictures.
So I had peake code E8 but never got a chance to work on it until earlier today") .
.
However I have to say that this thread by Ryan (rdm190) that started it all.
The whole procedure took me about 1.5-2 hr (since I was inspecting some other stuff too when I had everything apart ).
The jobs is not complicated at all, but you'd need a lot of patience, as there are a lot of nuts and bolts to be removed to access the offending part "fuel tank breather valve"
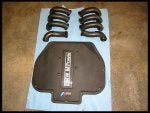
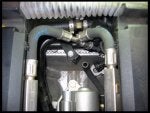
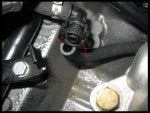
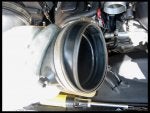
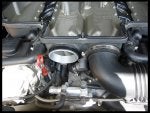
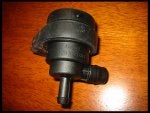
Here are some pictures of the parts in question so that some of you who are thinking of tackling this job by themself have some idea of what the part looks like.
The part number is 13907830766 - fuel tank breather valve
![Image]()
![Image]()
![Image]()
![Image]()
So to those who are going to have a shop do this, if you ever get a quote for 1 hr for labor, just take it..!!!!
1. Below are the tools that I used to tackle this job:
![Image]()
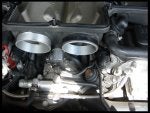
2. First of all remove the air ducts. I also removed the cabin filter housings on both sides as well to give me more room.
![Image]()
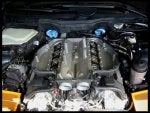
3. To remove the Intake plenum cover there are 15 (10mm) nut.
I am happy to see there are no excessive oil on my intake plenum.
It seems that 2 front (cyl#1 & #5) has more oil trace, and from the look of it, causes by the oil blow by from the oil-separator.
Otherwise looks pretty clean to me.
![Image]()
4. To remove the intake funnel/trumpet there are (2) 8mm nut that hold each of them. FYI these are self-locking nut.
I didn't know that before taking this job. To those who want to replace this, now is the time.
This is what the plenum looks like without those funnels/trumpets
![Image]()
5. I looked at the area where it connect to the MAF tubes, its still pretty clean.
![Image]()
6. Interesting that 6 of the funnels/trumpets seems to be the exact part.
![Image]()
7. To remove the bottom part of the intake plenum there are 33 (10mm) bolt that holding it to the throttle bodies gasket flange(s).
You would also need to remove (2) 10mm bolt that hold the oil-separator to the lower intake plenum (see TIPS A below)
![Image]()
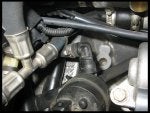
8. Intake plenum is removed. (the fuel tank breather valve location is in red circle)
![Image]()
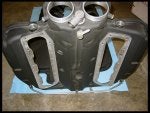
9. This is the view of the back of the lower intake plenum.
![Image]()
10. I put all the nuts and bolts on the magnetic bowls.
![Image]()
11. This is the close up picture of the "tricky" breather valve connector.
![Image]()
12. This is where I used the small screw-driver (see red arrows) to release the securing tabs
And while you jammed the small screw-driver of the tab (red arrows), pry the connector out using a flat screw driver to separate the connector from the "breather valve" (this should be pretty straight foward )
See the step 15 (for the location of the securing tabs on this connector)
![Image]()
13. This is the view with the "tricky" connector off.
And next is to disconnect the "breather valve" from the hose.
(I find the easy way to do this is keep rotating the "breather valve" unit left and right while pulling it out and at the same time hold the hose steady. If you just pull it won't budge )
![Image]()
14. This is the view with both "connector" and the "hose" disconnected form the "breather valve" unit.
As you can see there is virtually very little to "almost" no slack at all with the hoses.
![Image]()
15. Here is the close up picture of the "tricky" connector for the "breather valve".
Notice the red arrow shows where the tabs are.
![Image]()
16. The new part is ready to go in (Putting the new unit in is much easier and much quicker than taking the old unit out )
![Image]()
17. The new part is in place now :thumbsup:
![Image]()
18. Now put everything back together in reverse order (This should be fun )
19. When putting the MAF hose back to the lower intake plenum.
I find it easier to take out the rubber sleve from the MAF hose and put the rubber sleeve on the plenum flange.
Then the MAF hose would just slide in much easier.
![Image]()
![Image]()
![Image]()
TIPS:
A: on step 7 above when removing the lower intake plenum.
You will need to undo (2) 10mm bolt that attach the oil-separator to the plenum (1 on each side).
To get access to this bolt, you will need to disconnect Vanos Selenoid wiring connector.
Becarefull as the Vanos Selenoid connector attachment (the one attach the engine block) might get brittle and broken off easily.
Vanos Selenoid connector is circled in red
![Image]()
Regardz,
J Irwan
So I had peake code E8 but never got a chance to work on it until earlier today
.However I have to say that this thread by Ryan (rdm190) that started it all.
The whole procedure took me about 1.5-2 hr (since I was inspecting some other stuff too when I had everything apart
). The jobs is not complicated at all, but you'd need a lot of patience, as there are a lot of nuts and bolts to be removed to access the offending part "fuel tank breather valve"
Here are some pictures of the parts in question so that some of you who are thinking of tackling this job by themself have some idea of what the part looks like.
The part number is 13907830766 - fuel tank breather valve
So to those who are going to have a shop do this, if you ever get a quote for 1 hr for labor, just take it..!!!!
1. Below are the tools that I used to tackle this job:
- (1) 10mm socket with extension (for Intake plenum cover and bottom)
- (1) 10mm open wrench (to remove Oil separator from the intake (bottom) plenum)
- (1) 8mm socket with extension (for intake funnel/trumpet)
- (2) small flat screw driver (to pry the breather valve connector)
- (1) flat screw driver (to loosen up the hose clamps)
- (2) magnetic bowl (OPTIONAL)
- (1) magnetic pick (this will come handy)
- (1) work light
2. First of all remove the air ducts. I also removed the cabin filter housings on both sides as well to give me more room.
3. To remove the Intake plenum cover there are 15 (10mm) nut.
I am happy to see there are no excessive oil on my intake plenum.
It seems that 2 front (cyl#1 & #5) has more oil trace, and from the look of it, causes by the oil blow by from the oil-separator.
Otherwise looks pretty clean to me.
4. To remove the intake funnel/trumpet there are (2) 8mm nut that hold each of them. FYI these are self-locking nut.
I didn't know that before taking this job. To those who want to replace this, now is the time
.This is what the plenum looks like without those funnels/trumpets
5. I looked at the area where it connect to the MAF tubes, its still pretty clean.
6. Interesting that 6 of the funnels/trumpets seems to be the exact part.
7. To remove the bottom part of the intake plenum there are 33 (10mm) bolt that holding it to the throttle bodies gasket flange(s).
You would also need to remove (2) 10mm bolt that hold the oil-separator to the lower intake plenum (see TIPS A below)
8. Intake plenum is removed. (the fuel tank breather valve location is in red circle)
9. This is the view of the back of the lower intake plenum.
10. I put all the nuts and bolts on the magnetic bowls
.11. This is the close up picture of the "tricky" breather valve connector.
12. This is where I used the small screw-driver (see red arrows) to release the securing tabs
And while you jammed the small screw-driver of the tab (red arrows), pry the connector out using a flat screw driver to separate the connector from the "breather valve" (this should be pretty straight foward
)See the step 15 (for the location of the securing tabs on this connector)
13. This is the view with the "tricky" connector off.
And next is to disconnect the "breather valve" from the hose.
(I find the easy way to do this is keep rotating the "breather valve" unit left and right while pulling it out and at the same time hold the hose steady. If you just pull it won't budge
)14. This is the view with both "connector" and the "hose" disconnected form the "breather valve" unit.
As you can see there is virtually very little to "almost" no slack at all with the hoses.
15. Here is the close up picture of the "tricky" connector for the "breather valve".
Notice the red arrow shows where the tabs are.
16. The new part is ready to go in (Putting the new unit in is much easier and much quicker than taking the old unit out
)17. The new part is in place now :thumbsup:
18. Now put everything back together in reverse order (This should be fun
)19. When putting the MAF hose back to the lower intake plenum.
I find it easier to take out the rubber sleve from the MAF hose and put the rubber sleeve on the plenum flange.
Then the MAF hose would just slide in much easier.
TIPS:
A: on step 7 above when removing the lower intake plenum.
You will need to undo (2) 10mm bolt that attach the oil-separator to the plenum (1 on each side).
To get access to this bolt, you will need to disconnect Vanos Selenoid wiring connector.
Becarefull as the Vanos Selenoid connector attachment (the one attach the engine block) might get brittle and broken off easily.
Vanos Selenoid connector is circled in red
Regardz,
J Irwan