Thanks to a lot of boardmember who posted DIY and instruction previously.
I thought I posted some pic, as I learned a few new things when replacing my bank 2 Exhaust-CPS.
So in continuation of this thread .
The Summary: (current mileage:35K)
Originally I got SES light with peake code: E8 (Fuel Tank Breather valve) I decided to reset it to see if its comes back.
Soon enough I got my second SES within 3 weeks.
<TABLE style="WIDTH: 264pt; BORDER-COLLAPSE: collapse" cellSpacing=0 cellPadding=0 width=352 border=0 x:str><COLGROUP><COL style="WIDTH: 264pt; mso-width-source: userset; mso-width-alt: 12873" width=352><TBODY><TR style="HEIGHT: 12.75pt" height=17><TD class=xl24 style="BORDER-RIGHT: windowtext 0.5pt solid; BORDER-TOP: #ece9d8; BORDER-LEFT: windowtext 0.5pt solid; WIDTH: 264pt; BORDER-BOTTOM: #ece9d8; HEIGHT: 12.75pt; BACKGROUND-COLOR: transparent" width=352 height=17>0B - Exhaust Camshaft Pos Sensor #5-8</TD></TR><TR style="HEIGHT: 12.75pt" height=17><TD class=xl24 style="BORDER-RIGHT: windowtext 0.5pt solid; BORDER-TOP: #ece9d8; BORDER-LEFT: windowtext 0.5pt solid; BORDER-BOTTOM: #ece9d8; HEIGHT: 12.75pt; BACKGROUND-COLOR: transparent" height=17>A2 - Crankshaft/Camshaft Pos Sensor correlation #5-8</TD></TR><TR style="HEIGHT: 12.75pt" height=17><TD class=xl24 style="BORDER-RIGHT: windowtext 0.5pt solid; BORDER-TOP: #ece9d8; BORDER-LEFT: windowtext 0.5pt solid; BORDER-BOTTOM: #ece9d8; HEIGHT: 12.75pt; BACKGROUND-COLOR: transparent" height=17>45 - Knock Sensor, #5-6</TD></TR><TR style="HEIGHT: 12.75pt" height=17><TD class=xl24 style="BORDER-RIGHT: windowtext 0.5pt solid; BORDER-TOP: #ece9d8; BORDER-LEFT: windowtext 0.5pt solid; BORDER-BOTTOM: #ece9d8; HEIGHT: 12.75pt; BACKGROUND-COLOR: transparent" height=17>E8 - Evaporative Emission purge valve</TD></TR></TBODY></TABLE>
So I reset the SES again to see if its comes back.
After about 30 miles of driving SES came back.
This time:
<TABLE style="WIDTH: 264pt; BORDER-COLLAPSE: collapse" cellSpacing=0 cellPadding=0 width=352 border=0 x:str><COLGROUP><COL style="WIDTH: 264pt; mso-width-source: userset; mso-width-alt: 12873" width=352><TBODY><TR style="HEIGHT: 12.75pt" height=17><TD class=xl24 style="BORDER-RIGHT: windowtext 0.5pt solid; BORDER-TOP: #ece9d8; BORDER-LEFT: windowtext 0.5pt solid; WIDTH: 264pt; BORDER-BOTTOM: #ece9d8; HEIGHT: 12.75pt; BACKGROUND-COLOR: transparent" width=352 height=17>0B - Exhaust Camshaft Pos Sensor #5-8</TD></TR><TR style="HEIGHT: 12.75pt" height=17><TD class=xl24 style="BORDER-RIGHT: windowtext 0.5pt solid; BORDER-TOP: #ece9d8; BORDER-LEFT: windowtext 0.5pt solid; BORDER-BOTTOM: #ece9d8; HEIGHT: 12.75pt; BACKGROUND-COLOR: transparent" height=17>A2 - Crankshaft/Camshaft Pos Sensor correlation #5-8</TD></TR><TR style="HEIGHT: 12.75pt" height=17><TD class=xl24 style="BORDER-RIGHT: windowtext 0.5pt solid; BORDER-TOP: #ece9d8; BORDER-LEFT: windowtext 0.5pt solid; BORDER-BOTTOM: #ece9d8; HEIGHT: 12.75pt; BACKGROUND-COLOR: transparent" height=17>B9 - Exhaust Camshaft VANOS Position control #1-4</TD></TR><TR style="HEIGHT: 12.75pt" height=17><TD class=xl24 style="BORDER-RIGHT: windowtext 0.5pt solid; BORDER-TOP: #ece9d8; BORDER-LEFT: windowtext 0.5pt solid; BORDER-BOTTOM: #ece9d8; HEIGHT: 12.75pt; BACKGROUND-COLOR: transparent" height=17>E8 - Evaporative Emission purge valve</TD></TR></TBODY></TABLE>
So I reset the SES again.
After a few restarts I plug in my Peake reader, still no SES I still got 0B, A2 but no E8. So my conclussion at the time that the SES light was triggered by E8 code
After about 100 miles of driving SES came back.
<TABLE style="WIDTH: 264pt; BORDER-COLLAPSE: collapse" cellSpacing=0 cellPadding=0 width=352 border=0 x:str><COLGROUP><COL style="WIDTH: 264pt; mso-width-source: userset; mso-width-alt: 12873" width=352><TBODY><TR style="HEIGHT: 12.75pt" height=17><TD class=xl24 style="BORDER-RIGHT: windowtext 0.5pt solid; BORDER-TOP: #ece9d8; BORDER-LEFT: windowtext 0.5pt solid; WIDTH: 264pt; BORDER-BOTTOM: #ece9d8; HEIGHT: 12.75pt; BACKGROUND-COLOR: transparent" width=352 height=17>0B - Exhaust Camshaft Pos Sensor #5-8</TD></TR><TR style="HEIGHT: 12.75pt" height=17><TD class=xl24 style="BORDER-RIGHT: windowtext 0.5pt solid; BORDER-TOP: #ece9d8; BORDER-LEFT: windowtext 0.5pt solid; BORDER-BOTTOM: #ece9d8; HEIGHT: 12.75pt; BACKGROUND-COLOR: transparent" height=17>A2 - Crankshaft/Camshaft Pos Sensor correlation #5-8</TD></TR><TR style="HEIGHT: 12.75pt" height=17><TD class=xl24 style="BORDER-RIGHT: windowtext 0.5pt solid; BORDER-TOP: #ece9d8; BORDER-LEFT: windowtext 0.5pt solid; BORDER-BOTTOM: #ece9d8; HEIGHT: 12.75pt; BACKGROUND-COLOR: transparent" height=17>E8 - Evaporative Emission purge valve</TD></TR></TBODY></TABLE>
This time I reset the light, and replaced the exhaust CPS (cyl 5-8/bank 2) this morning.
I didnt notice noticeably powerloss, but even if there was it is very little.
I had no blatty exhaust sympton, but at certain rpm the engine/exhaust sounded a bit different for a second and then normal as it comes and goes (I had to really pay attention to hear this sound), but not blatty.
Perhaps my CPS is on the verge of going-out which might exlpain no sympton on real power loss and blatty exhaust in my case.
So for reference there are a lot of good thread that helps me doing my CPS-job this morning. SO thanks again guys.. keep up the good works..:cheers:
Reference threads:
Thread 1
Thread 2 - which lead to the excellent DIY page
Tools req:
Hex/allen key 5mm for the CPS screw (I had normal small rachet, which prooved to be too tall/thick for limited cleareance to do CPS)
Phllips screwdriver for the under-belly pan.
Worklight
Floor Jack + jack stands
Now my suplemental write-up") :
:
I've ordered couple of parts to stock up (2 intake CPS, 2 exhaust CPS, fuel filter, and fuel tank breather from Crown BMW) and received my parts last week.
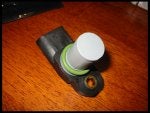
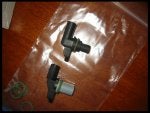
Here is a pic of the new revised Exhaust-CPS, which looks different than the original part that came with the car.
![Image]()
![Image]()
![Image]()
![Image]()
![Image]()
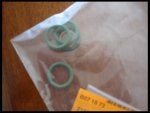
I also purchased new CPS screws (5mm hex) and O-rings (however once I got my parts I come to learn that you'd only need to purchase O-ring only for intake CPS as exhaust CPS came with one)
![Image]()
![Image]()
Notice the new CPS screw already has anti-seize on it.
![Image]()
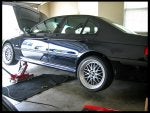
The car is getting prepped
![Image]()
I decided to access it from under based on what I have read.
There are 10 screws (philips - large philips screw driver is required)
![Image]()
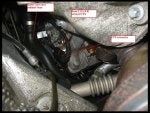
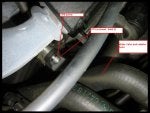
This is the view from the bottom (I was on my back taking this picture)
Notice the Hose is obstructing the access so access is limited.
![Image]()
I had spent much more time than needed tinkering on how to get best access to undo the CPS screw.
Given I don't have special tools (low profile rachet - pictured below).
To others who are planning to tackle this on their own making special tools like what amrit50 (board member) like this will definitley come handy.
(so given what I have, I just have to be patience and slowly undo the CPS screw :crying2.
![Image]()
At one point I almost given up because I can't really do much to turn the socket wrench(small rachet) to undo the CPS screw (I can only turn very little because space is very tight).
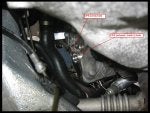
So I thought I'd try from the top, to see if its make any easier.
And to my surprise the CPS exhaust is actually very accessible from the top. As it sit pretty close to the top.
Unfortunately with the tool I have It doesn't do me good either, as the Water Valve and Radiotor hose doesnt allow any access with my tools.
But with above tool it might actually be a lot quicker to undo the screw from the top. (the connector still much easier to disconnect from under).
![Image]()
After good 1.5 hr monkeying around finally the Exhaust CPS (bank 2/cyl 5-8) comes out mmmmmm
![Image]()
Lesson Learned:
Exhaust CPS bank 2/cyl 5-8 can be easly removed from the top with the right tools. (I still think the electrical connector is best to be disconnected from the bottom).
From what I read the Exhaust CPS bank1/cyl 1-4 should be much much easier as there are no hoses in the way (even without the special flat-wrenches).
It tooks me 2 hr, since this is my first time, trying to get oriented with how/where everything located. Next CPS replacement should be a breeze:biggrinbounce:.
I am still gonna have to replace my Fuel-Tank breather valve (Peake E8 code).
But thats for another weekend, now I got to test drive :wroom: and make sure those CPS code don't come back
Regardz,
J Irwan
I thought I posted some pic, as I learned a few new things when replacing my bank 2 Exhaust-CPS.
So in continuation of this thread .
The Summary: (current mileage:35K)
Originally I got SES light with peake code: E8 (Fuel Tank Breather valve) I decided to reset it to see if its comes back.
Soon enough I got my second SES within 3 weeks.
<TABLE style="WIDTH: 264pt; BORDER-COLLAPSE: collapse" cellSpacing=0 cellPadding=0 width=352 border=0 x:str><COLGROUP><COL style="WIDTH: 264pt; mso-width-source: userset; mso-width-alt: 12873" width=352><TBODY><TR style="HEIGHT: 12.75pt" height=17><TD class=xl24 style="BORDER-RIGHT: windowtext 0.5pt solid; BORDER-TOP: #ece9d8; BORDER-LEFT: windowtext 0.5pt solid; WIDTH: 264pt; BORDER-BOTTOM: #ece9d8; HEIGHT: 12.75pt; BACKGROUND-COLOR: transparent" width=352 height=17>0B - Exhaust Camshaft Pos Sensor #5-8</TD></TR><TR style="HEIGHT: 12.75pt" height=17><TD class=xl24 style="BORDER-RIGHT: windowtext 0.5pt solid; BORDER-TOP: #ece9d8; BORDER-LEFT: windowtext 0.5pt solid; BORDER-BOTTOM: #ece9d8; HEIGHT: 12.75pt; BACKGROUND-COLOR: transparent" height=17>A2 - Crankshaft/Camshaft Pos Sensor correlation #5-8</TD></TR><TR style="HEIGHT: 12.75pt" height=17><TD class=xl24 style="BORDER-RIGHT: windowtext 0.5pt solid; BORDER-TOP: #ece9d8; BORDER-LEFT: windowtext 0.5pt solid; BORDER-BOTTOM: #ece9d8; HEIGHT: 12.75pt; BACKGROUND-COLOR: transparent" height=17>45 - Knock Sensor, #5-6</TD></TR><TR style="HEIGHT: 12.75pt" height=17><TD class=xl24 style="BORDER-RIGHT: windowtext 0.5pt solid; BORDER-TOP: #ece9d8; BORDER-LEFT: windowtext 0.5pt solid; BORDER-BOTTOM: #ece9d8; HEIGHT: 12.75pt; BACKGROUND-COLOR: transparent" height=17>E8 - Evaporative Emission purge valve</TD></TR></TBODY></TABLE>
So I reset the SES again to see if its comes back.
After about 30 miles of driving SES came back.
This time:
<TABLE style="WIDTH: 264pt; BORDER-COLLAPSE: collapse" cellSpacing=0 cellPadding=0 width=352 border=0 x:str><COLGROUP><COL style="WIDTH: 264pt; mso-width-source: userset; mso-width-alt: 12873" width=352><TBODY><TR style="HEIGHT: 12.75pt" height=17><TD class=xl24 style="BORDER-RIGHT: windowtext 0.5pt solid; BORDER-TOP: #ece9d8; BORDER-LEFT: windowtext 0.5pt solid; WIDTH: 264pt; BORDER-BOTTOM: #ece9d8; HEIGHT: 12.75pt; BACKGROUND-COLOR: transparent" width=352 height=17>0B - Exhaust Camshaft Pos Sensor #5-8</TD></TR><TR style="HEIGHT: 12.75pt" height=17><TD class=xl24 style="BORDER-RIGHT: windowtext 0.5pt solid; BORDER-TOP: #ece9d8; BORDER-LEFT: windowtext 0.5pt solid; BORDER-BOTTOM: #ece9d8; HEIGHT: 12.75pt; BACKGROUND-COLOR: transparent" height=17>A2 - Crankshaft/Camshaft Pos Sensor correlation #5-8</TD></TR><TR style="HEIGHT: 12.75pt" height=17><TD class=xl24 style="BORDER-RIGHT: windowtext 0.5pt solid; BORDER-TOP: #ece9d8; BORDER-LEFT: windowtext 0.5pt solid; BORDER-BOTTOM: #ece9d8; HEIGHT: 12.75pt; BACKGROUND-COLOR: transparent" height=17>B9 - Exhaust Camshaft VANOS Position control #1-4</TD></TR><TR style="HEIGHT: 12.75pt" height=17><TD class=xl24 style="BORDER-RIGHT: windowtext 0.5pt solid; BORDER-TOP: #ece9d8; BORDER-LEFT: windowtext 0.5pt solid; BORDER-BOTTOM: #ece9d8; HEIGHT: 12.75pt; BACKGROUND-COLOR: transparent" height=17>E8 - Evaporative Emission purge valve</TD></TR></TBODY></TABLE>
So I reset the SES again.
After a few restarts I plug in my Peake reader, still no SES I still got 0B, A2 but no E8. So my conclussion at the time that the SES light was triggered by E8 code
After about 100 miles of driving SES came back.
<TABLE style="WIDTH: 264pt; BORDER-COLLAPSE: collapse" cellSpacing=0 cellPadding=0 width=352 border=0 x:str><COLGROUP><COL style="WIDTH: 264pt; mso-width-source: userset; mso-width-alt: 12873" width=352><TBODY><TR style="HEIGHT: 12.75pt" height=17><TD class=xl24 style="BORDER-RIGHT: windowtext 0.5pt solid; BORDER-TOP: #ece9d8; BORDER-LEFT: windowtext 0.5pt solid; WIDTH: 264pt; BORDER-BOTTOM: #ece9d8; HEIGHT: 12.75pt; BACKGROUND-COLOR: transparent" width=352 height=17>0B - Exhaust Camshaft Pos Sensor #5-8</TD></TR><TR style="HEIGHT: 12.75pt" height=17><TD class=xl24 style="BORDER-RIGHT: windowtext 0.5pt solid; BORDER-TOP: #ece9d8; BORDER-LEFT: windowtext 0.5pt solid; BORDER-BOTTOM: #ece9d8; HEIGHT: 12.75pt; BACKGROUND-COLOR: transparent" height=17>A2 - Crankshaft/Camshaft Pos Sensor correlation #5-8</TD></TR><TR style="HEIGHT: 12.75pt" height=17><TD class=xl24 style="BORDER-RIGHT: windowtext 0.5pt solid; BORDER-TOP: #ece9d8; BORDER-LEFT: windowtext 0.5pt solid; BORDER-BOTTOM: #ece9d8; HEIGHT: 12.75pt; BACKGROUND-COLOR: transparent" height=17>E8 - Evaporative Emission purge valve</TD></TR></TBODY></TABLE>
This time I reset the light, and replaced the exhaust CPS (cyl 5-8/bank 2) this morning.
I didnt notice noticeably powerloss, but even if there was it is very little.
I had no blatty exhaust sympton, but at certain rpm the engine/exhaust sounded a bit different for a second and then normal as it comes and goes (I had to really pay attention to hear this sound), but not blatty.
Perhaps my CPS is on the verge of going-out which might exlpain no sympton on real power loss and blatty exhaust in my case.
So for reference there are a lot of good thread that helps me doing my CPS-job this morning. SO thanks again guys.. keep up the good works..:cheers:
Reference threads:
Thread 1
Thread 2 - which lead to the excellent DIY page
Tools req:
Hex/allen key 5mm for the CPS screw (I had normal small rachet, which prooved to be too tall/thick for limited cleareance to do CPS)
Phllips screwdriver for the under-belly pan.
Worklight
Floor Jack + jack stands
Now my suplemental write-up
:I've ordered couple of parts to stock up (2 intake CPS, 2 exhaust CPS, fuel filter, and fuel tank breather from Crown BMW) and received my parts last week.
Here is a pic of the new revised Exhaust-CPS, which looks different than the original part that came with the car.
I also purchased new CPS screws (5mm hex) and O-rings (however once I got my parts I come to learn that you'd only need to purchase O-ring only for intake CPS as exhaust CPS came with one)
Notice the new CPS screw already has anti-seize on it.
The car is getting prepped
I decided to access it from under based on what I have read.
There are 10 screws (philips - large philips screw driver is required)
This is the view from the bottom (I was on my back taking this picture)
Notice the Hose is obstructing the access so access is limited.
I had spent much more time than needed tinkering on how to get best access to undo the CPS screw.
Given I don't have special tools (low profile rachet - pictured below).
To others who are planning to tackle this on their own making special tools like what amrit50 (board member) like this will definitley come handy.
(so given what I have, I just have to be patience and slowly undo the CPS screw :crying2
.
At one point I almost given up because I can't really do much to turn the socket wrench(small rachet) to undo the CPS screw (I can only turn very little because space is very tight).
So I thought I'd try from the top, to see if its make any easier.
And to my surprise the CPS exhaust is actually very accessible from the top. As it sit pretty close to the top.
Unfortunately with the tool I have It doesn't do me good either, as the Water Valve and Radiotor hose doesnt allow any access with my tools.
But with above tool it might actually be a lot quicker to undo the screw from the top. (the connector still much easier to disconnect from under).
After good 1.5 hr monkeying around finally the Exhaust CPS (bank 2/cyl 5-8) comes out mmmmmm
Lesson Learned:
Exhaust CPS bank 2/cyl 5-8 can be easly removed from the top with the right tools. (I still think the electrical connector is best to be disconnected from the bottom).
From what I read the Exhaust CPS bank1/cyl 1-4 should be much much easier as there are no hoses in the way (even without the special flat-wrenches
). It tooks me 2 hr, since this is my first time, trying to get oriented with how/where everything located. Next CPS replacement should be a breeze:biggrinbounce:.
I am still gonna have to replace my Fuel-Tank breather valve (Peake E8 code).
But thats for another weekend, now I got to test drive :wroom: and make sure those CPS code don't come back
Regardz,
J Irwan