BMW M5 Forum and M6 Forums banner

Partee equal length header installation

2.1K views 48 replies 11 participants last post by  specialized2010  
#1 ·
Well I am stoked! Just picked up my short block and headers from Partee racing. The engine build will take awhile and the Vanos line failed in the car so the oil pan is coming off and the headers are going in.
Image

There is a method to getting the pipes in but I think I'll get some tips along the way. Details to follow!
Image
 
#3 ·
Image
 
#8 ·
Does anyone know if there is a superior header option? Just curious. I've read about several quality options like, Partee, InfinityDesign, Supersprint, and even Fluid Motor Union (on YouTube) advertises a custom set. Are they all basically the same? Weight savings might differ but surely not by a huge amount. Lol anyway just wanted to ask because I can't make up my mind
 
#9 ·
I don't think there is enough data to say which is the best aftermarket option. There are plenty of opinions and observations but no back to back data. That said observational they're all better than stock the stock headers have lots of crushed areas. I gathered a little stock data that I plan on comparing to data collected after the install
 
#15 ·
If anyone is willing to get a xusomt

What data do you have from stock? Just curious.

We have extensive data on the most popular headers more than anyone else including the manufacturer.

You should also upgrade the injectors as well as you will be close to its duty cycle.~73% at the minimum if these headers flows even better than anything else then you can forget about stock injectors. Completely stock car runs around 62.3-65% duty cycle.
 
#11 ·
Too bad it's not like it was when I was in high school with Mustangs where you had magazines that would buy sets of headers from many of the options and dyno test them, then again there were probably more v8 mustangs sold in a month than all E60 M5s so probably makes sense. I've planned to go with RMS decats because of the easy of swapping back cats in and under the assumption removing the primary cat which is accomplished with decats or any of the longtubes would be the bulk of the gain, but I really wonder if headers like these Partee that appear to have zero restriction whatsoever would provide more hp/tq worth investing in.

Fairly useless rambling thoughts of a post, sorry.
 
#12 ·
Too bad it's not like it was when I was in high school with Mustangs where you had magazines that would buy sets of headers from many of the options and dyno test them, then again there were probably more v8 mustangs sold in a month than all E60 M5s so probably makes sense. I've planned to go with RMS decats because of the easy of swapping back cats in and under the assumption removing the primary cat which is accomplished with decats or any of the longtubes would be the bulk of the gain, but I really wonder if headers like these Partee that appear to have zero restriction whatsoever would provide more hp/tq worth investing in.

Fairly useless rambling thoughts of a post, sorry.
Oh you're not alone - I'd be curious myself to see back to back header impact. Would partee be the best option? Sure looks like it. But how much would having RMS convenience to swap cats in cost? 3 or 30hp? Of course it's also what torque looks like, etc.
 
#19 ·
Had a 67 289 auto for the length of a test drive to confirm I wanted to buy it, but destroyed by not so attentive red light runner. Still ended with a 1990 GT and 1997 Cobra, miss all of them and tried more than once to see where they ended up.

Starting to think it may be the beauty of those headers that are alluring as well because they look like works of art!
 
#20 · (Edited)
Okay, 3rd attempt. I got some tips from @herrubermensch and gave it another go. I used a bungee cord instead of rubber bands but the short story is that you wrap the where the pipes come together and install all 5 at the same time. There was a tip to lower the engine a couple of inches on the passenger side but I haven't given up yet, mostly because I can't.

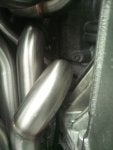
From now on it's 1st, 2nd, 3rd. I can't keep the cylinders straight in my head. Passenger side.

So on the first try I got the 3rd one on as recommend but couldn't get the 4th one on. Those two are a must because the nuts get covered by the other header pipes. On the second try I was able to get the 3rd and 4th pipe on together. Here's a tip, if you don't have big guns like Peter get a strap under where the pipes come together to hold the assembly up while you rest your arms.

So now you have the 3rd and 4th pipe on the engine, how do you get the nuts on? You need a long extension and a 12mm swivel socket, not a swivel and a socket. The 3rd pipe upper you can see until you put the nut and socket in place. The 3rd lower you place in-between your fingers backwards and slide your hand up under the headers along the block to get it started. After that you can use a wrench to tighten it. The 4th pipe lower comes in from the side with the other pipes loose with the swivel socket. The 4th pipe upper you have to look straight up from the bottom wiggling the other pipes out of the way to see it.

The 5th pipe is on but I haven't figured out how to get the nuts on, YET! The 1st & 2nd pipes will be easy, relatively speaking. They do have to go in together because the 1st pipe will block the 2nd pipe flange.

Finally, you will see a pry bar and a zip tie holding the assembly up while I started and tightened the 4th pipe upper nut. I can't imagine how difficult this was for @herrubermensch with the subframe in place!

Image
 
#22 · (Edited)
Driver's side in, took a couple of hours, this was much more direct. again I used a bungee cord to hold the pipes together before knocking the collector off. As with the passenger side slide the 3rd and 4th pipes on and then bolt them up. You just have to wiggle the pipes around until you get a good sight line of the stud. Then you can wiggle the 5th pipe into place and bolt it up, 1st & 2nd pipe are easy. I wish I could say go this way or that way but I can't, you just move the pipes around until you can get pretty straight shot at the stud. The order is what matters most.
Image

There is a left & right adaptor, if the O2 sensors don't fit swap the adaptors.
Image

Amazing fit once you get it bolted up. I have never been good a DIY threads, I just get going and get done. I'll rig some stuff up to show how I did things, you need a strap to hold the header up while your arms rest. My strap went from the tie rod mounts.
Image
 
#24 · (Edited)
Okay, so the passenger side is in. I ended up removing the small pump on the side of the oil pan. This allowed me to see the lower stud of the 5th pipe. I wrapped the bungee back around the collector to hold the 1st & 2nd pipes up and out of the way. Much like the 3rd pipe I had to use a wrench along the block.
Image
Image

Image

No tools going through there!
Image

You can see the 5th pipe stud & nut.
Image

You can see it from the rear but the tool goes through the headers from the bottom.

This is a exercise where you need both sides of your brain. Yes there is a stud, hole and nut, even if you can't see them. You have to be patient and creative to find the path to success. Take your time rest your arms and you will get there. I could have dropped the oil pan to make it easier but I was trying to prove that it can be done, with the subframe out anyway!

I have been wrenching for most of my life, this took tremendous hand and finger dexterity.
 

Attachments