We have at board couple diy:s but no pictures incluted. So i write now "my version" how to repair pixel issue.
During the project you will have to be very careful and patient. New cluster isnt so cheap!!!!
You can do this alone but it is really difficult beacause sometimes you need 6 hands at the same time :biggrinbounce:
So if you are doing this first time, ask your friend to help.
You need new ribbon cable. I purchased mine from Ribbontrade Ltd LCD pixel failure repair for BMW instrument cluster, MID radio & OBC unit.
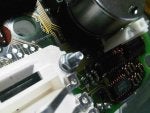
Well, when cluster is on table open clamps and put zip ties throught them (helps you at next step)
![Image]()
Now you have to open pins(5pcs) that you will get back cover away. Start from side. I lifted with screwdriver the cover while turning pins.
(No zipties in picture but they are in)
![Image]()
When back cover is away you can lift allso front cover away. Put front cover somewhere that dust wont fall in.
After that put zip ties to the clamps so that they are "unlocked". Unscrew 8 torx screws.
![Image]()
Now you have unlock wire connectors. You have to push connector locking clamps against connector and push sligtly connector allso at same time. It should slide out. I started with black connector. Remember that you have to put something under the cluster that pins wont hit to the table. I used taperoll.
![Image]()
Here is connectors and you can see how those pins look.
![Image]()
Cluster in part.
![Image]()
Now the intresting part starts! DRILLING! Be really careful when you are drilling holes to cluster. You dont want drill througt cluster!
In this picture you see hole locations. Dont drill throught gray surface, you have to lift it!
PATIENCE! PATIENCE! PATIENCE!
I drilled first 2mm hole, then 3.5mm hole and finally 5mm hole. You have to drill 4 holes.
![Image]()
4 holes invidually.
![Image]()
![Image]()
![Image]()
![Image]()
After holes are drilled, take T8 torx screws out from holes. After that OBD panel is locked only with 6 pins. They are NOT soldered!
Here you can see 3 holes where pins are (Pic is after pins are pulled up with obd) 3 pins both sides. Left side is pretty tight but it comes out.
![Image]()
Rip ribbon cable away from cluster.
![Image]()
Take LCD panel frame away. You see from pic locking pin locations. DONT BRAKE LCD PANEL OR ITS GAME OVER!
![Image]()
Take ribbon cable away from LCD panel.
![Image]()
Now starts cleaning process. I uses piece of plastic (credit card etc) to get old stuff away.
LCD half way cleaned.
![Image]()
Cluster half way cleaned.
![Image]()
Cluster cleaned!
![Image]()
Now ribbon cable installing starts. I used scotch tape to attach cable to cluster. See red box how it is taped.
![Image]()
Take all silicon strips out.
![Image]()
Now you have cut some paper strips under the red silicone (from postcard or similar thikness). Put paper strips under the silicone and then install only red silicone strips (3pcs). This is that you can get good pressure to cable. You have to line ribbon cable with cluster!
![Image]()
Put the obd panel back in. Check that metal pins goes correctly in.
![Image]()
Put torx screws in from the holes what we drilled.
![Image]()
Now cut paper piece to long silicone strip and put it under the long silicone. Allso install foam piece what you recived.
Remember to put small blue silicone pieces to corners.
![Image]()
Silicone and foam piece.
![Image]()
Now flip LCD panel to the "obd cluster" I used piece of cardboard to hold foam piece that it wont fall off. Remember to match ribbon on lcd panel "lines". You will need flashlight to see lines from LCD panel.
![Image]()
Now hold LCD panel under the pressure with your fingers and check again that ribbon lines matches with lcd panel lines. Allso check that foam piece is correctly there. Still hold the pressure to lcd panel and put lcd panel cover on the lcd panel and lock it.
2 visible clamps are easy to clip in but 3 hiding clamps are hard to get. You most likely need screwdriver to push them in completely. You will HEARD A SNAP! This is importand beacause if you wont lock this correctly, ribbon wont get goot pressure and you will see missing pixels.
![Image]()
After this test cluster! If it works congrats! Now assemble rest of the cluster.
![Image]()
It tooked me about 3 hours to fix pixels.
Vantaam5 helped me when i needed some extra hand.
Hope this is helpful. If you order ribbon cable from Ribbontrade you will recive allso really good instructions.
When i did pixel repair first time, i printed all instructions what i found :typing:
Over and out!
During the project you will have to be very careful and patient. New cluster isnt so cheap!!!!
You can do this alone but it is really difficult beacause sometimes you need 6 hands at the same time :biggrinbounce:
So if you are doing this first time, ask your friend to help.
You need new ribbon cable. I purchased mine from Ribbontrade Ltd LCD pixel failure repair for BMW instrument cluster, MID radio & OBC unit.
Well, when cluster is on table open clamps and put zip ties throught them (helps you at next step)

Now you have to open pins(5pcs) that you will get back cover away. Start from side. I lifted with screwdriver the cover while turning pins.
(No zipties in picture but they are in)

When back cover is away you can lift allso front cover away. Put front cover somewhere that dust wont fall in.
After that put zip ties to the clamps so that they are "unlocked". Unscrew 8 torx screws.

Now you have unlock wire connectors. You have to push connector locking clamps against connector and push sligtly connector allso at same time. It should slide out. I started with black connector. Remember that you have to put something under the cluster that pins wont hit to the table. I used taperoll.

Here is connectors and you can see how those pins look.

Cluster in part.

Now the intresting part starts! DRILLING! Be really careful when you are drilling holes to cluster. You dont want drill througt cluster!
In this picture you see hole locations. Dont drill throught gray surface, you have to lift it!
PATIENCE! PATIENCE! PATIENCE!
I drilled first 2mm hole, then 3.5mm hole and finally 5mm hole. You have to drill 4 holes.

4 holes invidually.


After holes are drilled, take T8 torx screws out from holes. After that OBD panel is locked only with 6 pins. They are NOT soldered!
Here you can see 3 holes where pins are (Pic is after pins are pulled up with obd) 3 pins both sides. Left side is pretty tight but it comes out.

Rip ribbon cable away from cluster.

Take LCD panel frame away. You see from pic locking pin locations. DONT BRAKE LCD PANEL OR ITS GAME OVER!

Take ribbon cable away from LCD panel.

Now starts cleaning process. I uses piece of plastic (credit card etc) to get old stuff away.
LCD half way cleaned.

Cluster half way cleaned.

Cluster cleaned!

Now ribbon cable installing starts. I used scotch tape to attach cable to cluster. See red box how it is taped.

Take all silicon strips out.

Now you have cut some paper strips under the red silicone (from postcard or similar thikness). Put paper strips under the silicone and then install only red silicone strips (3pcs). This is that you can get good pressure to cable. You have to line ribbon cable with cluster!

Put the obd panel back in. Check that metal pins goes correctly in.

Put torx screws in from the holes what we drilled.

Now cut paper piece to long silicone strip and put it under the long silicone. Allso install foam piece what you recived.
Remember to put small blue silicone pieces to corners.

Silicone and foam piece.

Now flip LCD panel to the "obd cluster" I used piece of cardboard to hold foam piece that it wont fall off. Remember to match ribbon on lcd panel "lines". You will need flashlight to see lines from LCD panel.

Now hold LCD panel under the pressure with your fingers and check again that ribbon lines matches with lcd panel lines. Allso check that foam piece is correctly there. Still hold the pressure to lcd panel and put lcd panel cover on the lcd panel and lock it.
2 visible clamps are easy to clip in but 3 hiding clamps are hard to get. You most likely need screwdriver to push them in completely. You will HEARD A SNAP! This is importand beacause if you wont lock this correctly, ribbon wont get goot pressure and you will see missing pixels.

After this test cluster! If it works congrats! Now assemble rest of the cluster.

It tooked me about 3 hours to fix pixels.
Vantaam5 helped me when i needed some extra hand.
Hope this is helpful. If you order ribbon cable from Ribbontrade you will recive allso really good instructions.
When i did pixel repair first time, i printed all instructions what i found :typing:
Over and out!