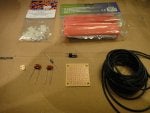
First of all a HUGE thanks to Richard for helping me figure out the technical bits of exactly how this cable is put together. The first photo is all the pieces I purchased. 1x 300k ohm resistor, 2x 0.22 micro farad capacitors, 18 gauge wire, (you could probably use 22 gauge), 1x 3.5mm stereo mini receptacle, printed circuit board, (also pictured is the small chunk of circuit board I already cut to use as the splint), heat shrink tubing, and connectors. The connectors are optional but it allows you to make a nice removable cable that you don't have to permanently solder to the connection in back of the nav/radio.
![]()
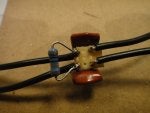
Here are the capacitors, left and right channel wire, and resistor soldered to the chunk of circuit board. The resistor is on the nav/radio side of the capacitors. This may or may not matter but seeing as it's how the nav/radio recognizes the aux input it's probably safer to place it there rather than on the other side of the capacitors.
![]()
A reverse angle of the build
![]()
Here is the 3.5mm stereo mini receptacle. If you are planning to terminate the cable in the same place I have (next to the cup holders) I suggest you use a similar receptacle as there isn't much room behind there for any other size or shape of receptacle. The longer of the 3 leads in ground.
![]()
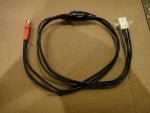
Here is the complete cable with receptacle and female connector soldered in. I had hoped to cover the middle part of the cable with heat shrink tubing for a nice professional look but I didn't have any tubing that large. If I had a solder jig I probably could have made the "guts" a bit smaller and thus fitted a large piece of tubing over top. Anyhow, electrician's tape had to do.
![]()
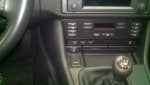
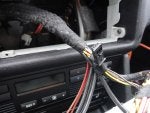
Once you pull off the Nav/radio surround and remove the 6 screws, the unit easily slides out and you find the cable that the Aux input connects to. Placing a tape part way in the cassette deck stops the unit from auto retracting while you are trying to unscrew the lower screws.
![]()
I cut off the oem connector and soldered on the male end of the connector I used for my cable. Black and yellow are R/L, and brown is ground.
![]()
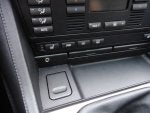
Here is the receptacle in place! Note: I was not able to completely remove the cup holder. There was some tab that I couldn't release. However, once the 2 screws holding it in were removed I was able to pull it out just far enough to the drill the hole and tuck the receptacle in from behind. I wasn't able to center the hole exactly in the middle of the plastic as the design of the back of the plastic and what is behind the dash wouldn't allow it. I decided to line it up with the middle of the climate controls above and that feels about right.
![]()
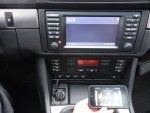
Here is the final product with my Griffin Bluetrip installed. It allows me to stream music and calls wirelessly from my iphone. The small button on the Bluetrip allows you to answer and end calls plus it activates voice control on the ipod so you can do pretty much everything without the phone leaving your pocket. I plan to make a really short stereo mini cable so that I don't have that extra slack you see wound up. For the money I feel this is a fairly complete sollution that is visually minimal.
![]()
Thanks again to Richard for the help! This beats paying $75 plus tax to my stealer. I know it's cheaper for you guys in the states.
Here are the capacitors, left and right channel wire, and resistor soldered to the chunk of circuit board. The resistor is on the nav/radio side of the capacitors. This may or may not matter but seeing as it's how the nav/radio recognizes the aux input it's probably safer to place it there rather than on the other side of the capacitors.
A reverse angle of the build

Here is the 3.5mm stereo mini receptacle. If you are planning to terminate the cable in the same place I have (next to the cup holders) I suggest you use a similar receptacle as there isn't much room behind there for any other size or shape of receptacle. The longer of the 3 leads in ground.

Here is the complete cable with receptacle and female connector soldered in. I had hoped to cover the middle part of the cable with heat shrink tubing for a nice professional look but I didn't have any tubing that large. If I had a solder jig I probably could have made the "guts" a bit smaller and thus fitted a large piece of tubing over top. Anyhow, electrician's tape had to do.
Once you pull off the Nav/radio surround and remove the 6 screws, the unit easily slides out and you find the cable that the Aux input connects to. Placing a tape part way in the cassette deck stops the unit from auto retracting while you are trying to unscrew the lower screws.
I cut off the oem connector and soldered on the male end of the connector I used for my cable. Black and yellow are R/L, and brown is ground.

Here is the receptacle in place! Note: I was not able to completely remove the cup holder. There was some tab that I couldn't release. However, once the 2 screws holding it in were removed I was able to pull it out just far enough to the drill the hole and tuck the receptacle in from behind. I wasn't able to center the hole exactly in the middle of the plastic as the design of the back of the plastic and what is behind the dash wouldn't allow it. I decided to line it up with the middle of the climate controls above and that feels about right.
Here is the final product with my Griffin Bluetrip installed. It allows me to stream music and calls wirelessly from my iphone. The small button on the Bluetrip allows you to answer and end calls plus it activates voice control on the ipod so you can do pretty much everything without the phone leaving your pocket. I plan to make a really short stereo mini cable so that I don't have that extra slack you see wound up. For the money I feel this is a fairly complete sollution that is visually minimal.
Thanks again to Richard for the help! This beats paying $75 plus tax to my stealer. I know it's cheaper for you guys in the states.
 I do like the location of where you installed it though, I rarely use mine mainly due to it being in the glovebox and the fact that I don't have a stand alone iPod to play music off as someone always ends up calling me. I need to get bluetooth but I don't want to pay $700+ for it... can you macguyver up a kit with richard or what?