

Ok, here we go.
I attached a number of pictures, unfortunately, not of ALL actions that need to be done. But I'll explain these actions in more detail.
* The starting point: picture 1...
* Remove the cover with a flat screwdriver: picture 2. The cover is attached at the bottom line at 3 points, and at the higher sides of the left and right line. The cover is quite solid, you should not be scared to break it. I did put quite some force on it.
* Picure 3: cover removed...
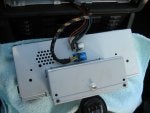
* Remove the monitor from the car: picture 4. You should remove the 4 'yellow' screws. In my case, it were only 3, probably one got lost when I swapped from 4/3 to 16/9 (didn't do that myself...)
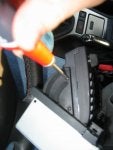
* Take the monitor out of the 'car': picture 5. Do NOT disconnect the plugs yet. You should tilt the monitor down(eject), and while open, remove the plugs. Remember, the time to remove the plugs is limited, since the monitor will claose automatically in 10 seconds or so.
So, best thing to do, is put a towel between the shifter and the airco controls (this should protect your screen from scratches). Push the eject button. Put the monitor down, with the screen on the towel. Remove the plugs. I guess once the blue one is removed, the screen won't wlose automatically. So, if you're not used to these kind of plugs, better start with the blue one. Pictures of the plugs: picture 6 and 7.
To remove the plugs (for those who don't know yet...), you have to push the plastic right near the black clip, and then move the black clip aside. The plug will come out automatically while moving the clip aside. Plugging back in, is the other way around, as you might have guessed :M5thumbs:
* Now, you're ready to open up the monitor. Go out of the car, to a place where you've got plenty of light, a table, and a chair, and some towels, or magazines, or anything to prevent scratching your monitor.
* Open the top cover of the monitor (sorry, no picture). I mean the metal cover of the monitor. There are 2 black screws at the back side, and 2 black screws at the top. Remove those screws, and lift up the cover. Without the screws, the cover won't just pop off, you'll have to use some force to lift the cover.
* Now under the cover, you'll see 2 "kupferfarbenen cables". I don't know the exact word for this, but I found this 'translation' a little lower in this thread. You know which ones I mean when you look inside, the 2 wide orange 'cables'. These should be removed. Again, no picture (these were the actions I was doing in the complete wrong order, when I totally lost confidence, and just focused on not ruining my monitor ouich )
To remove these cables, you'll have to lift the white plastic things, on the left and right side, and quitely pull the cable out. !!! ONLY THE CABLE !!! should come out, the white plastic stuff should remain on the green print!!! To be honest, this is easier than it sounds... I was a little scared starting to fool around with this stuff, but it really wasn't that big deal. And these cables are rather solid. I even jammed my cables (later on in the story, I'll warn you when it's about to happen), and everything still works.
So, if you got the cables out of the white plastic things (really don't know an English word to describe these, so I'll stick to 'thing' :hihihi: ), you should loosen them up (you see the holes at the side of the cables. The cables are attached to the black cover using these holes), and you're ready to go to the next step.
* remove the screen: picture 8. Remove the 2 screws on each side (now you see why you had to press the eject button...). Now you can take the screen off. The 2 "kupferfarbenen cables" can slide out, and will remain on the screen. If you're not comfortable getting these cables back in, using this tiny space, you can optionally remove the black cover using the 7 black screws. This might make it easier to get the cables back in place. I did this the first time, but not the second time. I think I got the cables through the tiny space in 15 seconds, so really no need to get the black cover off.
* Now, open up the screen: picture 9. Remove the 4 screws.
* Turn the screen around (mind the "kupferfarbenen cables"), and pull the buttons off: picture 10. These buttons come of rather easy. Just pull, no turning required.
* Now you can lift the cover off, QUITELY!! There is still a cable attached to it. Remove the 2 screws (picture 11). Put the cover in safe place, you'll only need it once you're finished.
* Current situation: picture 12.
* Remove the black rear cover. No screws, just lift the print out of the cover. It is a 'close fit'.
* Put the rear cover in a safe place, you'll only need it again when finished.
* Now, on the backside of the screen print, you'll see 2 rows of adjustment screws (picture 14). Find a screwdriver that fits these screws. Trust me, THIS is the perfect time to find that screwdriver. I used a tiny flat screwdriver, and that worked OK.
* The screws you need, are in the left row on picture 14. I used the first and second screw, starting from the bottom. I don't know if you need the first screw, the second one, is the one you really need.
* Now, you should make your monitor operational again, while having access to the adjustment screws...
Making it operational, means connecting the "kupferfarbenen cables". Now, to be able to reach the adjustment screws, you should NOT route the cables in the same way as they were routed originally. You should route them to the white 'things' :hihihi: from the top. (you can see the "kupferfarbenen cables" in picture 13.
Now, to connect the "kupferfarbenen cables", you should lift the white things, and put the cable in (one by one, you'll see for yourself which one should go first...). The blue line indicates if the cable is in deep enough. If it is in, press the white things down, and do the same thing for the other cable.
* Ok, now you're ready to go back to your car, and do some adjustments. Make sure the towel is still in place, and you bring your screwdriver with you!!
* Go back to the car, and, before you plug the 2 plugs back in, make sure the screen is exactly in the right place. BEWARE!!! As soon as the plugs are connected, the monitor will try to 'close'. If you're not holding the screen correct, you might jam your "kupferfarbenen cables". I warned you! But relax, I didn't expect that, and mine isn't broken either zzzzz
* Ok, now, put the key in the ignition, and turn it to position 1 (or any position where the monitor will work). Now plug in the 2 plugs. Pay attention for the closing monitor!!
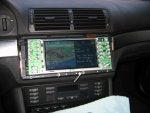
* Now, put the monitor in about the same position as when it is installed (see picture 13). Make sure you SEE anything. If the screen remains black, you didn't connect the "kupferfarbenen cables" correct. Unplug everything, go back inside, and reconnect the cables.
Ok, assuming you can see anything on the screen, lift it up, and do some adjustment. Do small adjustments, 1/8 of a turn at once (the complete range is about 1 complete turn). Put the screen back in the right position, and check if it is better or worse. MAKE SURE YOU'RE IN THE CORRECT POSITION while looking at the screen (or you end up like me, and have to do it all over).
* Once satisfied with the adjustments, take the monitor back out, disconnect the plugs, and go back inside, to put everything back together.
* Leave the top cover open. This allows you play with the "kupferfarbenen cables" if there is a problem when you install the monitor again.
* First put the back cover on the screen (make sure the "kupferfarbenen cables" are routed through the opening, and make sure no spare piece of these cables is left inside the cover, you'll need all the cable at the other end, for reconnecting it).
* Then put the front cover back on. First you'll have to attach the sensor again (picture 11). Then add the 4 screws again in the back.
* Now the "kupferfarbenen cables" should be routed to the white 'things' again. This time they should be routed correctly! Once the cables are routed, you should place the screen in it's correct location. If it's in the correct location, you won't have to hold it all the time, and you'll have your 2 hands for connecting the "kupferfarbenen cables". Make sure they are connected very good this time, because now it is for real!!
* Now go back to the car, and take every spare part with you.
* Plug the monitor back in. Make sure it works (otherwise, go back inside, and fix these "kupferfarbenen cables")
* Press the eject button, and disconnect again. (mind your "kupferfarbenen cables"!!)
* Fit the screws at the sides again (picture 8)
* If you feel more comfortable, connect again, to test if it still works.
* Put the top cover back on.
* Connect, and see if it works.
* Put it in the correct place, and fir the 4 'yellow' screws again.
* Put the finishig cover back on.
* Smile!! You're ready!
cherrsagai Have a drink, you deserve one :cheers:
I attached a number of pictures, unfortunately, not of ALL actions that need to be done. But I'll explain these actions in more detail.
* The starting point: picture 1...
* Remove the cover with a flat screwdriver: picture 2. The cover is attached at the bottom line at 3 points, and at the higher sides of the left and right line. The cover is quite solid, you should not be scared to break it. I did put quite some force on it.
* Picure 3: cover removed...
* Remove the monitor from the car: picture 4. You should remove the 4 'yellow' screws. In my case, it were only 3, probably one got lost when I swapped from 4/3 to 16/9 (didn't do that myself...)
* Take the monitor out of the 'car': picture 5. Do NOT disconnect the plugs yet. You should tilt the monitor down(eject), and while open, remove the plugs. Remember, the time to remove the plugs is limited, since the monitor will claose automatically in 10 seconds or so.
So, best thing to do, is put a towel between the shifter and the airco controls (this should protect your screen from scratches). Push the eject button. Put the monitor down, with the screen on the towel. Remove the plugs. I guess once the blue one is removed, the screen won't wlose automatically. So, if you're not used to these kind of plugs, better start with the blue one. Pictures of the plugs: picture 6 and 7.
To remove the plugs (for those who don't know yet...), you have to push the plastic right near the black clip, and then move the black clip aside. The plug will come out automatically while moving the clip aside. Plugging back in, is the other way around, as you might have guessed :M5thumbs:
* Now, you're ready to open up the monitor. Go out of the car, to a place where you've got plenty of light, a table, and a chair, and some towels, or magazines, or anything to prevent scratching your monitor.
* Open the top cover of the monitor (sorry, no picture). I mean the metal cover of the monitor. There are 2 black screws at the back side, and 2 black screws at the top. Remove those screws, and lift up the cover. Without the screws, the cover won't just pop off, you'll have to use some force to lift the cover.
* Now under the cover, you'll see 2 "kupferfarbenen cables". I don't know the exact word for this, but I found this 'translation' a little lower in this thread. You know which ones I mean when you look inside, the 2 wide orange 'cables'. These should be removed. Again, no picture (these were the actions I was doing in the complete wrong order, when I totally lost confidence, and just focused on not ruining my monitor ouich )
To remove these cables, you'll have to lift the white plastic things, on the left and right side, and quitely pull the cable out. !!! ONLY THE CABLE !!! should come out, the white plastic stuff should remain on the green print!!! To be honest, this is easier than it sounds... I was a little scared starting to fool around with this stuff, but it really wasn't that big deal. And these cables are rather solid. I even jammed my cables (later on in the story, I'll warn you when it's about to happen), and everything still works.
So, if you got the cables out of the white plastic things (really don't know an English word to describe these, so I'll stick to 'thing' :hihihi: ), you should loosen them up (you see the holes at the side of the cables. The cables are attached to the black cover using these holes), and you're ready to go to the next step.
* remove the screen: picture 8. Remove the 2 screws on each side (now you see why you had to press the eject button...). Now you can take the screen off. The 2 "kupferfarbenen cables" can slide out, and will remain on the screen. If you're not comfortable getting these cables back in, using this tiny space, you can optionally remove the black cover using the 7 black screws. This might make it easier to get the cables back in place. I did this the first time, but not the second time. I think I got the cables through the tiny space in 15 seconds, so really no need to get the black cover off.
* Now, open up the screen: picture 9. Remove the 4 screws.
* Turn the screen around (mind the "kupferfarbenen cables"), and pull the buttons off: picture 10. These buttons come of rather easy. Just pull, no turning required.
* Now you can lift the cover off, QUITELY!! There is still a cable attached to it. Remove the 2 screws (picture 11). Put the cover in safe place, you'll only need it once you're finished.
* Current situation: picture 12.
* Remove the black rear cover. No screws, just lift the print out of the cover. It is a 'close fit'.
* Put the rear cover in a safe place, you'll only need it again when finished.
* Now, on the backside of the screen print, you'll see 2 rows of adjustment screws (picture 14). Find a screwdriver that fits these screws. Trust me, THIS is the perfect time to find that screwdriver. I used a tiny flat screwdriver, and that worked OK.
* The screws you need, are in the left row on picture 14. I used the first and second screw, starting from the bottom. I don't know if you need the first screw, the second one, is the one you really need.
* Now, you should make your monitor operational again, while having access to the adjustment screws...
Making it operational, means connecting the "kupferfarbenen cables". Now, to be able to reach the adjustment screws, you should NOT route the cables in the same way as they were routed originally. You should route them to the white 'things' :hihihi: from the top. (you can see the "kupferfarbenen cables" in picture 13.
Now, to connect the "kupferfarbenen cables", you should lift the white things, and put the cable in (one by one, you'll see for yourself which one should go first...). The blue line indicates if the cable is in deep enough. If it is in, press the white things down, and do the same thing for the other cable.
* Ok, now you're ready to go back to your car, and do some adjustments. Make sure the towel is still in place, and you bring your screwdriver with you!!
* Go back to the car, and, before you plug the 2 plugs back in, make sure the screen is exactly in the right place. BEWARE!!! As soon as the plugs are connected, the monitor will try to 'close'. If you're not holding the screen correct, you might jam your "kupferfarbenen cables". I warned you! But relax, I didn't expect that, and mine isn't broken either zzzzz
* Ok, now, put the key in the ignition, and turn it to position 1 (or any position where the monitor will work). Now plug in the 2 plugs. Pay attention for the closing monitor!!
* Now, put the monitor in about the same position as when it is installed (see picture 13). Make sure you SEE anything. If the screen remains black, you didn't connect the "kupferfarbenen cables" correct. Unplug everything, go back inside, and reconnect the cables.
Ok, assuming you can see anything on the screen, lift it up, and do some adjustment. Do small adjustments, 1/8 of a turn at once (the complete range is about 1 complete turn). Put the screen back in the right position, and check if it is better or worse. MAKE SURE YOU'RE IN THE CORRECT POSITION while looking at the screen (or you end up like me, and have to do it all over).
* Once satisfied with the adjustments, take the monitor back out, disconnect the plugs, and go back inside, to put everything back together.
* Leave the top cover open. This allows you play with the "kupferfarbenen cables" if there is a problem when you install the monitor again.
* First put the back cover on the screen (make sure the "kupferfarbenen cables" are routed through the opening, and make sure no spare piece of these cables is left inside the cover, you'll need all the cable at the other end, for reconnecting it).
* Then put the front cover back on. First you'll have to attach the sensor again (picture 11). Then add the 4 screws again in the back.
* Now the "kupferfarbenen cables" should be routed to the white 'things' again. This time they should be routed correctly! Once the cables are routed, you should place the screen in it's correct location. If it's in the correct location, you won't have to hold it all the time, and you'll have your 2 hands for connecting the "kupferfarbenen cables". Make sure they are connected very good this time, because now it is for real!!
* Now go back to the car, and take every spare part with you.
* Plug the monitor back in. Make sure it works (otherwise, go back inside, and fix these "kupferfarbenen cables")
* Press the eject button, and disconnect again. (mind your "kupferfarbenen cables"!!)
* Fit the screws at the sides again (picture 8)
* If you feel more comfortable, connect again, to test if it still works.
* Put the top cover back on.
* Connect, and see if it works.
* Put it in the correct place, and fir the 4 'yellow' screws again.
* Put the finishig cover back on.
* Smile!! You're ready!
cherrsagai Have a drink, you deserve one :cheers:


 the perspective mode is so much more cool.

