Hey everyone, I've had an account here for a while but never posted much. I've always enjoyed making these threads to share ideas and learn from each other so figured I'd start one here.
In late 2023 I bought a nicely optioned but somewhat high mileage 2000 M5 in silverstone over black extended leather on one of the popular auction sites, and surprise surprise, it is a complete piece of ****. "Well sorted" my behind...but anyways I get what I deserve buying an old BMW site unseen. So follow along as I spend more money than I paid for the car just to make it decent again.
The overall goal for this car is to be a sort of daily driver for the next couple years before getting an EV to take over that role once the tech matures a bit more and I have a decent option that isn't a Tesla, then the M5 can be a garage queen next to my 1994 NSX. I go into the office 2 days a week so don't drive all that much to begin with.
I had been driving a 2003 540i/6 daily since 2018 and put more than 60,000 miles on it, and I recently sold it in late 2024 and have been daily driving the NSX since then due to all the issues this car has. I daily drove this car for about 6 months in early 2024 after overhauling the suspension as a sort of shake down to see what problems would pop up with the drivetrain and how much oil it would burn (roughly a quart every 1500 miles, not too bad) and it has been mostly parked since then when most of the dash lights came on and the diff started leaking pretty badly.
Where I'm at currently is part way through a full restoration/rebuild of the drivetrain with the engine stripped down to the bare block, but here's some pics of what has happened up to this point.
Day of delivery. Pretty sure the truck driver scraped up the bottom of the front bumper during the unloading process but I didn't get outside in time to see it happen. Cosmetically the car is quite good, mechanically, not so much.
![Image]()
Interior
The extended leather interior is in decent shape except for one splitting seem on the driver seat. The 4:3 nav system absolutely needs to go though, I'm not sure what to replace it with...maybe just a 16:9 nav and Bluebus which is what the 540 had. The Android units, even the pricey ones, just seem sort of glitchy and problematic.
![Image]()
One of the first things I did was swap the nearly perfect birch anthracite trim over from the 540, it's always been my favorite E39 trim. Also installed the reupholstered facelift steering wheel and recall-replaced airbag from the 540.
![Image]()
Not pictured, but I grabbed an LCM4 and RLS sensor from a junk yard E53 X5, automatic light switch from eBay, and brand new cluster trim piece from FCP. The existing RS sensor was busted so I removed it and installed a new "RLS" prism using this kit http://automotivedesigngroup.com/catalog/i100.html, coded the LCM4 to the car, installed the new sensor, and enabled automatic lights. After some trial and error, this is the process if anyone else has to do it.
1) Install the used LCM in the car.
2) Code the VIN and odometer to match with PASoft.
3) Code the module to the car with NCSExpert.
4) Using NCSExpert or Dummy, set "AUTOM_FAHRL_STEUERG" to "aktiv". PASoft does not seem to expose this option.
5) Code whatever other options you want.
I originally bought the little 3D printed relocation piece for the TPMS button, but it was really ugly so I made my own solution by cutting up both the original button and the blanking plate and gluing them together for a completely OEM look.
![Image]()
The cluster pixels were going out of course, so I replaced the display and ribbon cable. I had swapped an M5 cluster into the 540 years ago and went through this process once already so had the original 540 cluster as a spare for parts, which came in handy when the white display housing crumbled when I took it apart. Some people don't like it but I use the drill method to get to the screws to bypass the risk of removing the cluster needles. Display back to 100% working.
I originally wasn't a fan of the black cluster face and was considering swapping the grey one from my 540, but it grew one me and I kept the black.
![Image]()
I've never cared for the light up shift knob or integrated boot, so new leather boot and ZHP knob.
![Image]()
The driver door control panel was missing most of the paint on the switches so I got a junk yard one to swap the switches over only to find that it was a completely different design. Apparently BMW redesigned these switches between MY2000 and MY2001, so I found a newer panel with the mirror button on Ebay and swapped it out. The buttons on the new version have a nicer tactile feedback than the old design which feels kind of mushy.
![Image]()
Suspension
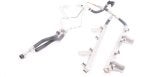
The M5 was lowered on blown out Koni shocks and Dinan springs and felt like it was about to flip over if you hit a decently sized bump at highway speeds and generally just rode terribly. So I ordered new OEM everything except for some control arms which had already been replaced and were still ok. (The Dinan springs were probably fine, but I don't care to lower this car so I gave them away on FB market)
![Image]()
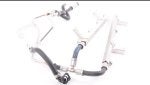
Rear suspension done and everything cleaned, also replaced the fender liners.
![Image]()
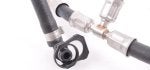
The car originally came with Moosehead monoballs, so I replaced them with the GAS sealed units instead. I know Moosehead is quality stuff but I don't care for the unsealed bearing. Taking them apart, they look perfect internally so if anybody wants a set of Moosehead bushings DM me.
![Image]()
The center link and tie rods had been replaced at some point but weren't in great shape so I ended up replacing those too. After an alignment everything checked out good except for the driver side front castor which read 5.8*, to the 6.1* on the passenger side. The driver side strut tower is mushroomed a bit and the car pulls ever so slightly so taking that shock off and using an air hammer to beat the strut tower back into shape is on the to do list still, along with swapping in E38 strut mounts which are steel instead of aluminum and should provide motor support to the strut tower to prevent mushrooming.
In late 2023 I bought a nicely optioned but somewhat high mileage 2000 M5 in silverstone over black extended leather on one of the popular auction sites, and surprise surprise, it is a complete piece of ****. "Well sorted" my behind...but anyways I get what I deserve buying an old BMW site unseen. So follow along as I spend more money than I paid for the car just to make it decent again.
The overall goal for this car is to be a sort of daily driver for the next couple years before getting an EV to take over that role once the tech matures a bit more and I have a decent option that isn't a Tesla, then the M5 can be a garage queen next to my 1994 NSX. I go into the office 2 days a week so don't drive all that much to begin with.
I had been driving a 2003 540i/6 daily since 2018 and put more than 60,000 miles on it, and I recently sold it in late 2024 and have been daily driving the NSX since then due to all the issues this car has. I daily drove this car for about 6 months in early 2024 after overhauling the suspension as a sort of shake down to see what problems would pop up with the drivetrain and how much oil it would burn (roughly a quart every 1500 miles, not too bad) and it has been mostly parked since then when most of the dash lights came on and the diff started leaking pretty badly.
Where I'm at currently is part way through a full restoration/rebuild of the drivetrain with the engine stripped down to the bare block, but here's some pics of what has happened up to this point.
Day of delivery. Pretty sure the truck driver scraped up the bottom of the front bumper during the unloading process but I didn't get outside in time to see it happen. Cosmetically the car is quite good, mechanically, not so much.
Interior
The extended leather interior is in decent shape except for one splitting seem on the driver seat. The 4:3 nav system absolutely needs to go though, I'm not sure what to replace it with...maybe just a 16:9 nav and Bluebus which is what the 540 had. The Android units, even the pricey ones, just seem sort of glitchy and problematic.
One of the first things I did was swap the nearly perfect birch anthracite trim over from the 540, it's always been my favorite E39 trim. Also installed the reupholstered facelift steering wheel and recall-replaced airbag from the 540.
Not pictured, but I grabbed an LCM4 and RLS sensor from a junk yard E53 X5, automatic light switch from eBay, and brand new cluster trim piece from FCP. The existing RS sensor was busted so I removed it and installed a new "RLS" prism using this kit http://automotivedesigngroup.com/catalog/i100.html, coded the LCM4 to the car, installed the new sensor, and enabled automatic lights. After some trial and error, this is the process if anyone else has to do it.
1) Install the used LCM in the car.
2) Code the VIN and odometer to match with PASoft.
3) Code the module to the car with NCSExpert.
4) Using NCSExpert or Dummy, set "AUTOM_FAHRL_STEUERG" to "aktiv". PASoft does not seem to expose this option.
5) Code whatever other options you want.
I originally bought the little 3D printed relocation piece for the TPMS button, but it was really ugly so I made my own solution by cutting up both the original button and the blanking plate and gluing them together for a completely OEM look.
The cluster pixels were going out of course, so I replaced the display and ribbon cable. I had swapped an M5 cluster into the 540 years ago and went through this process once already so had the original 540 cluster as a spare for parts, which came in handy when the white display housing crumbled when I took it apart. Some people don't like it but I use the drill method to get to the screws to bypass the risk of removing the cluster needles. Display back to 100% working.
I originally wasn't a fan of the black cluster face and was considering swapping the grey one from my 540, but it grew one me and I kept the black.
I've never cared for the light up shift knob or integrated boot, so new leather boot and ZHP knob.
The driver door control panel was missing most of the paint on the switches so I got a junk yard one to swap the switches over only to find that it was a completely different design. Apparently BMW redesigned these switches between MY2000 and MY2001, so I found a newer panel with the mirror button on Ebay and swapped it out. The buttons on the new version have a nicer tactile feedback than the old design which feels kind of mushy.
Suspension
The M5 was lowered on blown out Koni shocks and Dinan springs and felt like it was about to flip over if you hit a decently sized bump at highway speeds and generally just rode terribly. So I ordered new OEM everything except for some control arms which had already been replaced and were still ok. (The Dinan springs were probably fine, but I don't care to lower this car so I gave them away on FB market)
Rear suspension done and everything cleaned, also replaced the fender liners.
The car originally came with Moosehead monoballs, so I replaced them with the GAS sealed units instead. I know Moosehead is quality stuff but I don't care for the unsealed bearing. Taking them apart, they look perfect internally so if anybody wants a set of Moosehead bushings DM me.
The center link and tie rods had been replaced at some point but weren't in great shape so I ended up replacing those too. After an alignment everything checked out good except for the driver side front castor which read 5.8*, to the 6.1* on the passenger side. The driver side strut tower is mushroomed a bit and the car pulls ever so slightly so taking that shock off and using an air hammer to beat the strut tower back into shape is on the to do list still, along with swapping in E38 strut mounts which are steel instead of aluminum and should provide motor support to the strut tower to prevent mushrooming.