

DISCLAIMER: Sanding glass is an inherently risky undertaking and I take no responsibility for any personal or property damage that may arise as a consequence of or during the course of this process. This thread is purely for informational purposes!
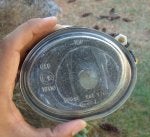
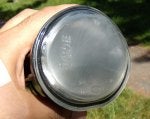
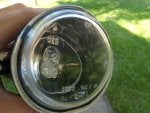
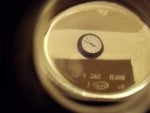
Since our fog lights are glass, the general consensus is that refinishing them when they get all pitted and gross is next to impossible. I decided to tackle it this weekend so I thought I'd write up a little DIY for anyone thinking about doing this. New fogs are $200 from Tischer but I refinished mine for $40 in materials and a lot of my time. Here is the sorry state my foglights were in when I started:
![]()
![]()
![]()
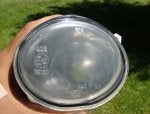
I originally went with the headlight refinishing process that worked very well for me of wetsanding with progressively finer sandpaper but the wetsanding just doesn't cut it (sorry for the pun) with a material as hard as glass. Here is the very disappointing result of 6 hours of wetsanding + cerium oxide polishing:
![]()
It is clear that a more drastic approach is needed for glass, here's what I did:
What I used:
-Stick'n'Sand 5 inch Sanding Discs - 40 grit, 80 grit, 120 grit, 220 grit, 320 grit, 400 grit, 600 grit (I couldn't find any SnS discs finer than 220 grit so I used 3M WetorDry Sandpaper that I cut into 5" circles for the 320, 400, and 600 grits, works the same)
-Stick'n'Sand backing plate for Electric Drills
![]()
-Cerium Oxide powder with 3" Felt Polishing Wheel (a "glass polishing kit" that works with any drill, I purchased here: GLASS POLISHING KIT - CarParts Quality Discount Parts and Accessories
![]()
-Microfiber towels to periodically wipe and check sanding/polishing progress
-Spray bottle with water to keep cerium polish moist during polishing
Start by removing your foglights from your car. Just (gently) pry off the black plastic cover from the outside of the car side with a small screwdriver wrapped in tape to keep from scratching your paint. Then remove the 8mm bolt holding the foglight to the bumper and pull the foglight housing out. Twist the bulb holder 1/4 turn and remove the bulb. Next, thoroughly clean your foglights with a solvent/degreaser and then wipe down with rubbing alcohol and let the lens dry completely.
THE SANDING PROCESS
Next, start by dry sanding the glass with the 40 grit with the drill until you can no longer see any of the pitting. If your lenses are severely pitted, you may not be able to sand down deep enough to eliminate all of the pits without cracking your lens. Use common sense and if you see your glass getting too thin, stop sanding and move on to the next grit. Since we are DRY sanding, you MUST MUST MUST be careful not to heat up the glass too much. I was only able to sand for about 5-10 seconds at a time in one area of the lens before it got too hot and I had to stop to let it cool down for 2-3 minutes. I can't emphasize this enough, dry sanding generates a lot of heat so you MUST take your time!!!
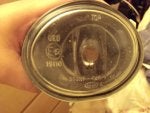
Here is what my lenses looked like after about 1 hour of dry sanding with the 40 grit (I got all the pitting out except for 1 pit which was just too deep but it's too small to really see anyway):
![]()
![]()
The 40 grit will take the longest because you have to keep going until you've corrected the surface. Next I did 80 grit for about 10 mins:
![]()
I kept going, using the edge of the sanding pad to sand down trouble spots until I had removed each preceding grit's sanding marks with the next finer grit. Since you'll be looking at semi-circular sanding marks, I rotated the lens 90 degrees each time I switched grits so I could make sure I saw nothing but the latest grit's sanding marks before I moved to the next grit. Periodically wipe down the lens with a damp microfiber to check your progress. Glass is very hard so it'll take 6-10 times more sanding time than plastic would. I had planned on going up to 2000 grit, but after 600 grit, the sandpaper just fell apart, it couldn't sand the glass any more. Doesn't matter anyway, the cerium oxide took care of the rest.
THE POLISHING PROCESS
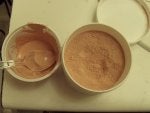
After sanding, clean the glass with alcohol and let it dry. Next, you'll need to mix the cerium oxide with water to make a paste for polishing. Other people say mix it 50/50, but I achieved the best results by mixing the cerium 60/40 water:cerium into a paste the consistency of yogurt.
![]()
Apply to the lens and start polishing with the 3" felt polishing wheel hooked up to your drill. The paste will fling a little at first so start slow and work your way up to max speed. Once the polish starts to dry/chalk up, add a spritz of water to the face of the felt wheel to keep things lubed. After about 2 mins of polishing, wipe off the lens with a damp cloth and check your progress. Cerium is the best thing for polishing glass but it still took about 8 passes of 2-4 mins each to get the clarity I wanted. The main thing was to keep the cerium paste on the lens moist and not chalky b/c the paste is what does the cutting.
RESULTS
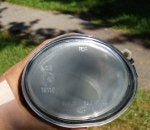
Here's what I was left with after polishing:
![]()
![]()
![]()
![]()
A shot from the inside of the housing NCIS style:
![]()
BEFORE/AFTER
![]()
Hope this helps anyone tired of staring at pitted foglight lenses!")
Since our fog lights are glass, the general consensus is that refinishing them when they get all pitted and gross is next to impossible. I decided to tackle it this weekend so I thought I'd write up a little DIY for anyone thinking about doing this. New fogs are $200 from Tischer but I refinished mine for $40 in materials and a lot of my time. Here is the sorry state my foglights were in when I started:
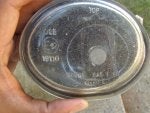

I originally went with the headlight refinishing process that worked very well for me of wetsanding with progressively finer sandpaper but the wetsanding just doesn't cut it (sorry for the pun) with a material as hard as glass. Here is the very disappointing result of 6 hours of wetsanding + cerium oxide polishing:
It is clear that a more drastic approach is needed for glass, here's what I did:
What I used:
-Stick'n'Sand 5 inch Sanding Discs - 40 grit, 80 grit, 120 grit, 220 grit, 320 grit, 400 grit, 600 grit (I couldn't find any SnS discs finer than 220 grit so I used 3M WetorDry Sandpaper that I cut into 5" circles for the 320, 400, and 600 grits, works the same)
-Stick'n'Sand backing plate for Electric Drills

-Cerium Oxide powder with 3" Felt Polishing Wheel (a "glass polishing kit" that works with any drill, I purchased here: GLASS POLISHING KIT - CarParts Quality Discount Parts and Accessories

-Microfiber towels to periodically wipe and check sanding/polishing progress
-Spray bottle with water to keep cerium polish moist during polishing
Start by removing your foglights from your car. Just (gently) pry off the black plastic cover from the outside of the car side with a small screwdriver wrapped in tape to keep from scratching your paint. Then remove the 8mm bolt holding the foglight to the bumper and pull the foglight housing out. Twist the bulb holder 1/4 turn and remove the bulb. Next, thoroughly clean your foglights with a solvent/degreaser and then wipe down with rubbing alcohol and let the lens dry completely.
THE SANDING PROCESS
Next, start by dry sanding the glass with the 40 grit with the drill until you can no longer see any of the pitting. If your lenses are severely pitted, you may not be able to sand down deep enough to eliminate all of the pits without cracking your lens. Use common sense and if you see your glass getting too thin, stop sanding and move on to the next grit. Since we are DRY sanding, you MUST MUST MUST be careful not to heat up the glass too much. I was only able to sand for about 5-10 seconds at a time in one area of the lens before it got too hot and I had to stop to let it cool down for 2-3 minutes. I can't emphasize this enough, dry sanding generates a lot of heat so you MUST take your time!!!
Here is what my lenses looked like after about 1 hour of dry sanding with the 40 grit (I got all the pitting out except for 1 pit which was just too deep but it's too small to really see anyway):
The 40 grit will take the longest because you have to keep going until you've corrected the surface. Next I did 80 grit for about 10 mins:
I kept going, using the edge of the sanding pad to sand down trouble spots until I had removed each preceding grit's sanding marks with the next finer grit. Since you'll be looking at semi-circular sanding marks, I rotated the lens 90 degrees each time I switched grits so I could make sure I saw nothing but the latest grit's sanding marks before I moved to the next grit. Periodically wipe down the lens with a damp microfiber to check your progress. Glass is very hard so it'll take 6-10 times more sanding time than plastic would. I had planned on going up to 2000 grit, but after 600 grit, the sandpaper just fell apart, it couldn't sand the glass any more. Doesn't matter anyway, the cerium oxide took care of the rest.
THE POLISHING PROCESS
After sanding, clean the glass with alcohol and let it dry. Next, you'll need to mix the cerium oxide with water to make a paste for polishing. Other people say mix it 50/50, but I achieved the best results by mixing the cerium 60/40 water:cerium into a paste the consistency of yogurt.
Apply to the lens and start polishing with the 3" felt polishing wheel hooked up to your drill. The paste will fling a little at first so start slow and work your way up to max speed. Once the polish starts to dry/chalk up, add a spritz of water to the face of the felt wheel to keep things lubed. After about 2 mins of polishing, wipe off the lens with a damp cloth and check your progress. Cerium is the best thing for polishing glass but it still took about 8 passes of 2-4 mins each to get the clarity I wanted. The main thing was to keep the cerium paste on the lens moist and not chalky b/c the paste is what does the cutting.
RESULTS
Here's what I was left with after polishing:

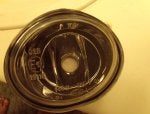

A shot from the inside of the housing NCIS style:
BEFORE/AFTER

Hope this helps anyone tired of staring at pitted foglight lenses!


