First, once again, big ups to the M5board as I found answers to my questions doing a little searching here and there. Also, big thanks to previous and current owners that documented some of their trouble-shooting procedures with regards to the aux fan (particularly 68FB :cheers") . Thanks to this board I precluded from spending, I'm guessing, somewhere around $600-800 at the $tealer :byebye:
. Thanks to this board I precluded from spending, I'm guessing, somewhere around $600-800 at the $tealer :byebye:
BACKGROUND: My aux fan gave up the ghost earlier this year. It was a non-issue as the highest temps were in the high 70s. Now that summer is here, having the aux fan is crucial for proper cooling air flow to the condenser. My oil temps were reading slightly hotter than normal (one needle's width) on the gauge and the car had stored the 35 peake code (aux fan relay). After doing some reading and inquiring, there isn't really a relay for the fan. I'm not an EE by any stretch, but the way I understand it is that the DME sends a constant signal to the fan and the speed varies depending on the temperature sensed sent back to the DME by a sensor in the lower coolant hose. So, you can go all out and measure volts and trons, but at the end of the day, if the fan ain't turning you'll just need to get a new one.
TOOLS: If you have a basic tool set (ratchet set, varying length Phillips screw drivers, small wire brush, etc) you can do this easily. On a scale of 1 to 3 wrenches, this is at one wrench. 8mm and 10mm sockets is you'll mainly be using. SPECIAL TOOL NEEDED: T50 six-point key. This is to remove the bolts that hold the bumper.
This thread helped give me a jump start: http://www.m5board.com/vbulletin/e3...letin/e39-m5-e52-z8-discussion/166622-diy-instructions-aux-fan-replacement.html
There weren't really any proper steps hence the reason for this thread, just looking to help future owners. Also, the photos are in sequence so hopefully it should be easy to do just by looking at the pictures, if you're more a visual kind of person :thumbsup:
PROCEDURES:
Step 1 - Turn car on, turn the steering wheel full lock to either side and remove the three screws toward the front end of the wheel well. These hold the side-rear bumper liners to the wheel well liners.
Step 2 - My car is lowered so I put it up on rhino ramps for easier access to the screws holding the front belly pan and bumper side-rear liners. Even if you're not lowered, you'll want to raise the car to save yourself some trouble and have greater access. Remove the screws underneath that hold the bumper side-rear liners. On the passenger side you'll need to disconnect the outside temp sensor. After, remove the belly pan using a Phillips screw driver.
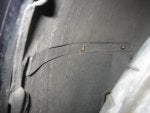
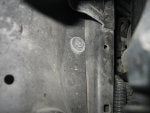
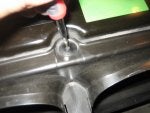
Step 3 - Remove bumper. Use the T50 six-point key and it should attach to a standard ratchet. The bumper bolts are long as they drop down. The bumper slides on to small rails at the sides. The bumper essentially slides forward and off. Remove one side first, then the other. Disconnect the fog lamps/lights as you remove each side. Then, you can hold the bumper at the center as you work your way along and remove the water hoses held on by pliable metal clips - these will be obvious. The ends of the water hoses have nozzles that clip in so be careful not to break the small horse-shoe shaped plastic clip that holds them in place (see picture) when they are inserted.
Step 4 - Remove headlamps. I recommend this step because 1) you'll need access to an aux fan shroud screw behind each headlamp and 2) it'll be easier to put bumper back on without headlamps in place. The headlamps are held on by four screws, two at the front top and two at the lower rear. A magnetic grabber is handy when you remove the lower rear screws.
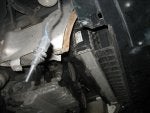
Step 5 - Remove aux fan shroud. On my car, the shroud is held in place by three screws and a plastic push-pin type rivet (see picture). This was removed using needle nose pliers by pulling out on the head of the plastic pin and the plastic rivet just came out. The other three screws are easy. At the top of the shroud, to remove the 3 plastic expanding rivets, just use a small centre punch or similar to punch the center plastic pin downwards and clear of the rivet, then the rivets pull out. Be sure to catch the center punch as you push it down and clear of the rivet - you'll need it to place the rivets back in place! With the shroud removed, you now have access to the aux fan.
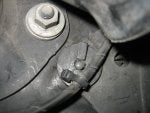
Step 6 - Remove aux fan. The fan is held on by four large screws at each corner, should be obvious. First, disconnect the fan connection on the left hand side. The connector mounting may break so be careful as you remove the connector. If it breaks on the fan itself, no big deal as the new fan should have a new mounting. With aux fan removed, you'll see all the crud that piles up on the bottom corners and behind the aux fan main center element. Mine was covered with crap (see picture) . I believe this is why mine went dead. With all the crap behind the main center element, and no proper air flow, the center element overheats and craps out. I took the time to clean it up as best I could.
Step 7 - Mount new aux fan and connect it. Re-install fan shroud. Double check all mounting points and fan connection. Before mounting bumper back on, it would be worth it to turn car on and see if the new fan turns on. If not, you may have to check the wires coming from the DME. If all is well, proceed with mounting bumper, water hoses, and liners back on. Done! :checkeredflag:
Step 8 - Chug a beer, as I did, as it was hot as Hades in my garage! cherrsagai
. Thanks to this board I precluded from spending, I'm guessing, somewhere around $600-800 at the $tealer :byebye:BACKGROUND: My aux fan gave up the ghost earlier this year. It was a non-issue as the highest temps were in the high 70s. Now that summer is here, having the aux fan is crucial for proper cooling air flow to the condenser. My oil temps were reading slightly hotter than normal (one needle's width) on the gauge and the car had stored the 35 peake code (aux fan relay). After doing some reading and inquiring, there isn't really a relay for the fan. I'm not an EE by any stretch, but the way I understand it is that the DME sends a constant signal to the fan and the speed varies depending on the temperature sensed sent back to the DME by a sensor in the lower coolant hose. So, you can go all out and measure volts and trons, but at the end of the day, if the fan ain't turning you'll just need to get a new one.
TOOLS: If you have a basic tool set (ratchet set, varying length Phillips screw drivers, small wire brush, etc) you can do this easily. On a scale of 1 to 3 wrenches, this is at one wrench. 8mm and 10mm sockets is you'll mainly be using. SPECIAL TOOL NEEDED: T50 six-point key. This is to remove the bolts that hold the bumper.
This thread helped give me a jump start: http://www.m5board.com/vbulletin/e3...letin/e39-m5-e52-z8-discussion/166622-diy-instructions-aux-fan-replacement.html
There weren't really any proper steps hence the reason for this thread, just looking to help future owners. Also, the photos are in sequence so hopefully it should be easy to do just by looking at the pictures, if you're more a visual kind of person :thumbsup:
PROCEDURES:
Step 1 - Turn car on, turn the steering wheel full lock to either side and remove the three screws toward the front end of the wheel well. These hold the side-rear bumper liners to the wheel well liners.
Step 2 - My car is lowered so I put it up on rhino ramps for easier access to the screws holding the front belly pan and bumper side-rear liners. Even if you're not lowered, you'll want to raise the car to save yourself some trouble and have greater access. Remove the screws underneath that hold the bumper side-rear liners. On the passenger side you'll need to disconnect the outside temp sensor. After, remove the belly pan using a Phillips screw driver.
Step 3 - Remove bumper. Use the T50 six-point key and it should attach to a standard ratchet. The bumper bolts are long as they drop down. The bumper slides on to small rails at the sides. The bumper essentially slides forward and off. Remove one side first, then the other. Disconnect the fog lamps/lights as you remove each side. Then, you can hold the bumper at the center as you work your way along and remove the water hoses held on by pliable metal clips - these will be obvious. The ends of the water hoses have nozzles that clip in so be careful not to break the small horse-shoe shaped plastic clip that holds them in place (see picture) when they are inserted.
Step 4 - Remove headlamps. I recommend this step because 1) you'll need access to an aux fan shroud screw behind each headlamp and 2) it'll be easier to put bumper back on without headlamps in place. The headlamps are held on by four screws, two at the front top and two at the lower rear. A magnetic grabber is handy when you remove the lower rear screws.
Step 5 - Remove aux fan shroud. On my car, the shroud is held in place by three screws and a plastic push-pin type rivet (see picture). This was removed using needle nose pliers by pulling out on the head of the plastic pin and the plastic rivet just came out. The other three screws are easy. At the top of the shroud, to remove the 3 plastic expanding rivets, just use a small centre punch or similar to punch the center plastic pin downwards and clear of the rivet, then the rivets pull out. Be sure to catch the center punch as you push it down and clear of the rivet - you'll need it to place the rivets back in place! With the shroud removed, you now have access to the aux fan.
Step 6 - Remove aux fan. The fan is held on by four large screws at each corner, should be obvious. First, disconnect the fan connection on the left hand side. The connector mounting may break so be careful as you remove the connector. If it breaks on the fan itself, no big deal as the new fan should have a new mounting. With aux fan removed, you'll see all the crud that piles up on the bottom corners and behind the aux fan main center element. Mine was covered with crap (see picture) . I believe this is why mine went dead. With all the crap behind the main center element, and no proper air flow, the center element overheats and craps out. I took the time to clean it up as best I could.
Step 7 - Mount new aux fan and connect it. Re-install fan shroud. Double check all mounting points and fan connection. Before mounting bumper back on, it would be worth it to turn car on and see if the new fan turns on. If not, you may have to check the wires coming from the DME. If all is well, proceed with mounting bumper, water hoses, and liners back on. Done! :checkeredflag:
Step 8 - Chug a beer, as I did, as it was hot as Hades in my garage! cherrsagai