BMW M5 Forum and M6 Forums banner

Diy m5 thrust arm bushings install

28K views 18 replies 11 participants last post by  jholzherr  
#1 · (Edited)
I INSTALLED THESE STOCK OEM M5 BUSHINGS JUST THE OTHER DAY AND DESIDED I WOULD TAKE PICS AS I WENT ALONG TO POST. NOW I HAD THE ASSISTACE OF A LIFT TO GET MY BEAST IN THE AIR AND THOUGH IT MADE THE JOB MUCH EASIER, YOU COULD JUST DO THIS IN YOUR DRIVE WAY. ( JUST MAKE SURE YOU HAVE A RIDE TO GET YOU TO SOMEONE WITH A PRESS TO REMOVE THE BUSHINGS ) IT WOULD A BIT SILLY STANDING IN YOUR DRIVE HOLDING ON TO YOUR THRUST ARMS IN EACH HAND WITH TEARS IN YOUR EYES :crying:.


ONCE YOU HAVE THE CAR IN THE AIR, MAKE SURE IT'S SECURE, NOW START TO REMOVE THE PLASTIC NOISE DAMPNER.
THEN REMOVE THE SWAYBAR BUSHING BRAKETS 13MM BOLTS...YOU WILL NEED TO DO THIS TO DROP DOWN THE BAR TO GET TO THE 21MM BOLT HOLDING THE THRUST BUSHING.


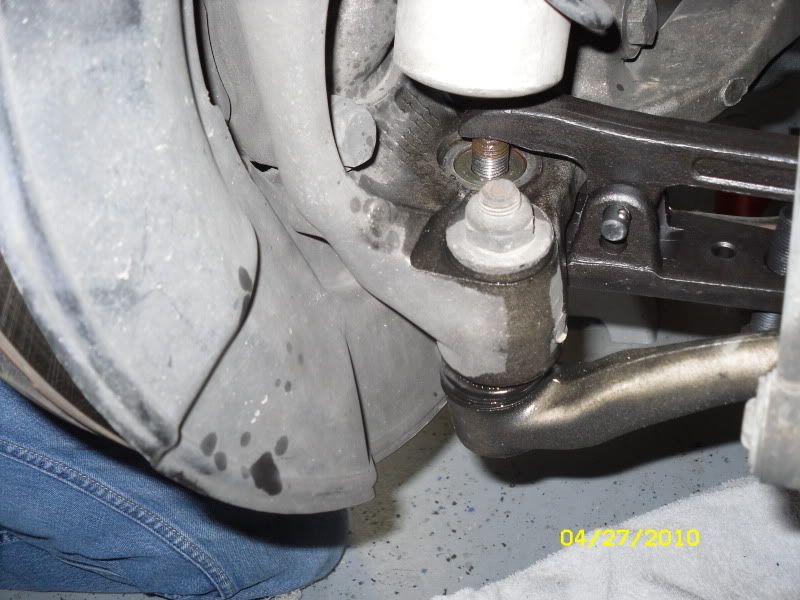
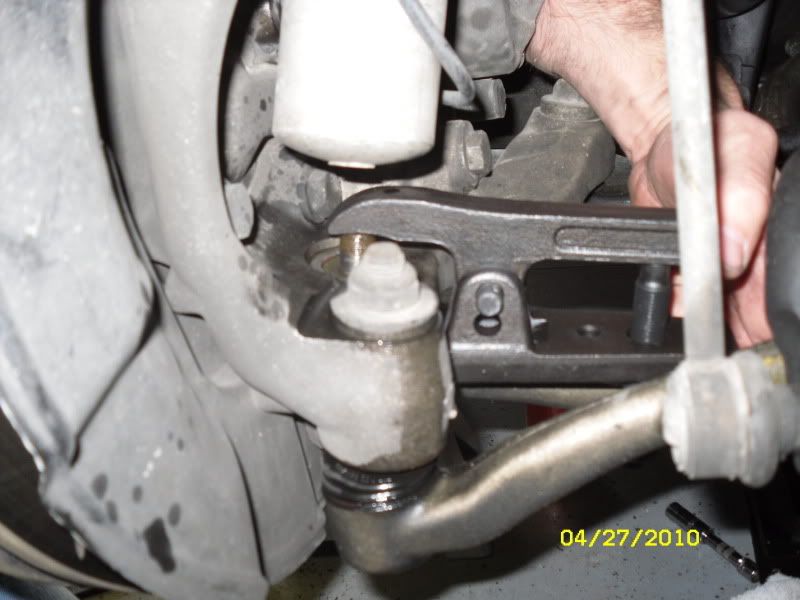
THEN TAKE TWO 21MM WRENCHES TO REMOVE THE BOLT HOLDING THE THRUST BUSHING IN, ONCE THE NUT IS REMOVED YOU WILL NEED TO MOVE THE WHEEL SIDE TO SIDE TO GET THE BOLT OUT OF THE WAY SO THE ARM COMES STRAIGHT DOWN. THE BOLT WILL NOT NEED TO BE COMPLETELY REMOVED. ONCE THIS IS DOWN THEN MOVE TO THE BALL JOINT.


TAKE A 21MM WRENCH AND START REMOVING THE BALL JOINT NUT, IN MY CASE THE BALL JOINT NEVER SPUN. BUT LIKE ON EVERYONES MIND, THERE IS NO ROOM FOR THE NUT TO COME OFF BECAUSE THE STRUT IS IN THE WAY..RIGHT??? WELL A LITTLE TRICK HERE, I KEPT REMOVING THE NUT UNTIL IT STARTED PRESSURE ON THE STRUT, THEN I TOOK A HAMMER AND TAPPED FIRMLY ON THE HOUSING (IN BETWEEN THE NUT AND THE BALL JOINT) TO BREAK IT LOOSE FROM THE HOUSING. THEN TURNING THE NUT A COUPLE MORE TIMES THE BALL JOINT JUST POPPED RIGHT OUT.


ONCE THE TWO ENDS ARE OUT THE RESULT IS, YOU CAN NOW EXAMINE THE DAMMAGED BUSHING. AND NOW START THE PROCESS OF REMOVING THE BUSHING.


REMOVING THE BUSHINIG IS A BREEZE, JUST MAKE SURE YOU ARE USING THE PROPER SIZE GUIDES SO YOU DONT DRAG IT ALONG THE SIDES WALLS OF THE BUSHING HOUSING. NOTE: HOW THE BUSHING IS IN PLACE BEFORE YOU REMOVE IT, YOU WILL PUT THE NEW ONE THE SAME WAY. ONCE THIS IS DONE THE BUSHING COMES OUT LIKE BUTTER.


NOW ADDING THE NEW BUSHING, MAKE SURE THE ALIGNMENT MARK (ON THE TOP OF THE BUSHING) MATCHES THE ARROW THAT IS MARKED ON THE ARM, BASICLY PUT THE BUSHING BACK THE WAY IT CAME OUT. TAP THE BUSHING TO MAKE SURE IT IS SECURE BEFORE PRESSING, ONCE ITS STARTED IT WILL GUIDES IT'S WAY PERFECTLY...BUTTER. REPEAT OTHER ARM.


HERE IS THE FINISHED PRODUCT ... B E A UTIFUL!!!
NOW INSTALL IN REVERSE.
NO LIE THE INSTALL ONLY TOOK ME 1.5 HOURS.
cherrsagai

 
#4 ·
Neat trick: I have two arms ready to go in with the Solid rubber bushes (Aea or something like that) with new ball joints included...When you say you whacked the ball joint, what do you mean? from the side? The bottom?

Curious...
 
#6 · (Edited)
Neat trick: I have two arms ready to go in with the Solid rubber bushes (Aea or something like that) with new ball joints included...When you say you whacked the ball joint, what do you mean? from the side? The bottom?

Curious...
If you see the pic above you would use your hammer and hit the housing ( smack between the nut and ball joint ) I wish I could point it out
Please tell me if this helps
I HAVE EDITED THE INSTRUCTION.

Can you tell us roughly how many miles were on the old bushings, and how much vibration you were sensing at that photograph's degree of cracking? Thanks.
Well I put new tires on the car in July and notice some light rattling then.. the car had 90K..but notice alot of tireware at about 95K. rattling was getting worse and the road bumps,pot holes, cracks in the street were getting louder and more intense... very ruff ride. I thought alignment at first , got it check everything was good. Then at about 100K when I noticed much much more tire wear this was getting stupid. So I had my buddy put it on a lift thinking maybe tie rods?? I looked them over and they were good. We moved the tire from right to left, no movement. Then realized that moving the tire front to back there was crazy movement and noticed the thrust bushing was torn to ****. I finally replaced them at 102K.:( I wont be making that mistake again. But if they do break again I will go with POWERFLEX.
When I bought the car it had 78K and everything seemed fine but I ENJOY driving this car if you know what I mean. :flag:
Konis are coming up next.
 
#9 ·
sorry, i didn't mean to infer you hadn't considered that.

Maybe these don't wear as much as the e46, just that it seems while we are doing this maybe its worth changing the whole arm?


also are the ball joints replaceable?

if not, and bearing in mind the bushes are, that suggests they do wear slower that the actual bushes.

k
 
#10 ·
sorry, i didn't mean to infer you hadn't considered that.

Maybe these don't wear as much as the e46, just that it seems while we are doing this maybe its worth changing the whole arm?


also are the ball joints replaceable?

if not, and bearing in mind the bushes are, that suggests they do wear slower that the actual bushes.

k
Oh, no I did not take it take way..the ball joints looked as if they could pressed out , though I havent reserched if there sold separately.
 
#14 ·
TAKE A 21MM WRENCH AND START REMOVING THE BALL JOINT NUT, IN MY CASE THE BALL JOINT NEVER SPUN. BUT LIKE ON EVERYONES MIND, THERE IS NO ROOM FOR THE NUT TO COME OFF BECAUSE THE STRUT IS IN THE WAY..RIGHT??? WELL A LITTLE TRICK HERE, I KEPT REMOVING THE NUT UNTIL IT STARTED PRESSURE ON THE STRUT, THEN I TOOK A HAMMER AND TAPPED FIRMLY ON THE HOUSING (IN BETWEEN THE NUT AND THE BALL JOINT) TO BREAK IT LOOSE FROM THE HOUSING. THEN TURNING THE NUT A COUPLE MORE TIMES THE BALL JOINT JUST POPPED RIGHT OUT.

Instead of using a hammer on the "housing" and hoping the balljoint comes loose, which I am AMAZED it did, here is another method taken from this thread:

http://www.m5board.com/vbulletin/e3...-discussion/156407-powerflex-thrust-arm-bushings-installed-plenty-pictures.html

3.Here you can see the front side of the arm that attaches to the knuckle. The nut that needs to be removed is covered by the bottom of the shock. I just loosened the shock mount and slid it down a bit so I could work on it. Of course I marked everything so I could put it back correctly.
Image


5. I loosened up the ball joint at the front of the thrust arm first. (22mm wrench)
Image


6. I then used my handy dandy ball joint press I bought at Harbor Freight for $17.99 to remove it from the knuckle.
Image


7.
Image


8.
Image
 
#13 ·
Thanks for this write up and pics. I find it much easier to understand DIY posts when pics are included. Although the ALL CAPS tend to be hard to read.

I have had a pretty bad vibration when braking at high speeds for a few months now. I bought a set of X5 bushings last November and have been putting this off since then. I finally decided to tackle this last weekend. What a b!tch it was! Took me all weekend.

This post is part rant and part caution for people doing this in the future. I felt like Alexander in Alexander and the Terrible, Horrible, No Good, Very Bad Day, lol.

First I tried removing the thrust arms with the car on ramps. I removed the nuts on the bushing bolt and the ball joint, but was not able to get either side out. So, I jacked it up and put it on jack stands and let the front wheels hang. After playing with the steering a little left and right I was able to remove the bushing bolts and then the ball joint side came out as well.

Now to press out the old bushings and press in the new... I thought I was prepared with my handy dandy Ball Joint Press - Great Deals On Ball Joint Presses & 1 Ball at Harbor Freight.

Well, the C-Clamp was not big enough to get the necessary collars in to press out the bushing. grrrrrrr So, I went to a local Munro Muffler that had a hydraulic press to have get it done. First of all, he warns me that he is not liable if he destroys my delicate aluminum arm. Ok, fine, that is a risk I'm willing to take. Then he asks why I want to do this, my bushings look fine. Ugh, now I'm thinking, maybe the bushings are not causing my vibration. Damn it. I say I want to replace the bushings regardless to rule them out if nothing else. So I ask him how much to do this and he says an hour labor - $95. FFFFFFFFUUUUUUUU------- No thanks, I'll try somewhere else.

This is a Sunday (I started this debacle Saturday morning), so the (only) reputable machine shop is closed. So, plan C: I'll try the DIY Home Depot bushing press (http://www.m5board.com/vbulletin/e3...tin/e39-m5-e52-z8-discussion/172613-steering-wheel-vibration-5.html#post2030174). Well I bought steel deck brackets to press the collar into the bushing, but they were not strong enough and bowed in when I compressed the tool.

Now it's Sunday night and I'm exhausted. I ended up taking the thrust arms to my local indy Monday morning and they pressed the old bushings out and the new bushings in for less than half of what the other shop wanted.

Installing the arms turned out to be a PITA as well. I had a hard time getting a hex wrench into the ball joint bolt to tighten the nut. I tried removing the driver side front wheel and loosening the steering knuckle as described in Tim's Powerflex thread (http://www.m5board.com/vbulletin/e3...-discussion/156407-powerflex-thrust-arm-bushings-installed-plenty-pictures.html), but couldn't get the assembly to move up or down to provide some clearance for the ball joint bolt. Eventually, I just jammed it in there enough to keep it from rotating as I tightened the ball joint nut. Hopefully I didn't strip it in the process...

Onto torquing down the TAB bolts. I put the car back on the ramps to get some weight on the front end. I didn't add the 500 lbs of weight recommended by the dealer. Hopefully that will not cause premature wear on the bushings. Well, I had destroyed my 1/2 inch ratchet when trying to press out the bushings and there was not enough room to use an adapter for the 21mm socket to tighten the bushing bolt, so now it's Monday night and I'm making a run to Walmart to get a 1/2 inch ratchet. Got the ratchet, torqued down the bolts, finally done!

/rant

Moral of the story is be sure you are prepared for all steps of a project before beginning. Hopefully I have learned a lesson and my experience will help someone in the future.

After a few days of moderate driving, I have not felt the vibration when braking at high speeds, so I'm happy about that.
 
#17 · (Edited)
For everyone out there reading this DIY, I hope you do find it useful... and thanks to those that replied with gratitude , of course we all sign on to sites like this one to get insight on what repairs we can do on our own, without having to pay out the $75-$95 dollar an hour shop charges that may be out there. Not everyone will perform their repairs the same and that’s ok, some people has good ideas and some not so good, but that’s their opinion you can make up your own minds...<?xml:namespace prefix = o ns = "urn:schemas-microsoft-com<img src=" /><o:p></o:p>