I've searched on the FAQ section and couldn't find the DIY for the belts replacement.
So thought I'd post some pictured I took yesterday when I replaced mine.
It started the week before where I was cleaning the leak from the Intensive Cleaning washer pump (apparently leaked and also a well known issue on E46 as well (same part)).
So I had to take the under belly cover off so I can take a look underneath and to make sure I clean all the sticky residue all the way to the bottom.
While I was down there I noticed the AC belt has some cracking, I didnt seem that major at the time.
So I ordered the part and few days later I got the new parts, and been reading some horror story with a seized fan clutch so I decided to replace the fan clutch as well (very cheap insurance to me considering the alternative).
One thing I notice when I try to perform the cold start test with newspaper to stop the fan, I can't even stop the fan with either old or new parts.
Make me wonder if there is a better way to check if the fan clutch still in a good condition ?
Enough chit chat,
so anyway let me start with the DIY.
I've decided to follow TIS procedure on this (from the top)
Some DIY can be very intimidating regardless how simple they are.
This job is very straight forward, and I hope after reading this DIY some of you who are having doubt will see how simple this is.
I have included a lot of picture to make sure each step is clearly understood.
To start this job I got the following parts:
V-belt - AC compressor (11287833266)
V-belt - Alternator/waterpump (11287833264)
Fan clutch (11527830486)
![Image]()
![Image]()
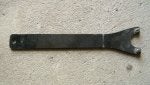
And here are the tools needed for this job:
1. BMW fan clutch tools (11 5 050)
2. 15mm socket with long handle (a breaker bar will do)
3. flat screw driver
4. 32mm open wrench
5. 5mm hex drive
![Image]()
1. Remove the Fan assembly
Using the 32mm open wrench and the BMW tools I loosen the nut in 2 sec")
(At first I've spent 2 min trying to loosen the nut without the BMW tools and finally I gave up. I was going to see how easy to do with the BMW tools).
![Image]()
Closer look at the location of the nut and where the BMW tools is used.
![Image]()
![Image]()
2. Remove plumbing for the Air-Intake including the MAF and top part of the air box (per TIS)
I also wrapped the edges of the fan shroud using masking tape
![Image]()
3.Remove the V-belts
a. Remove the V-belt for the alternator & waterpump first, then
b. Remove the V-belt for the AC
I've included the mock up picture below for a better illustration.
You need to turn clock-wise to compress the tensioner so that you could remove/install the belt.
![Image]()
Here is another picture on the pulley-tensioner for the AC (I didn't snap one for the alternator since I couldn't find a good angle for it).
![Image]()
![Image]()
4. Install the new belts
The AC belts is very easy and more straight-forward.
The alternator belt is a bit tricky to install. The best way I find to install this is: to align the belt on everything except for the pulley-tensioner last.
![Image]()
5. Check and make sure all the belts are aligned to the pulley groove.
Use your hand to check if the belt is right on the pulley groove. (make sure you feel this all around).
![Image]()
![Image]()
After I tripple-checked everything, I want to make sure everything can spin freely as it suppose to so I started the car (Don't do this if you don't have a PEAKE tools, as it will trigger SES since I have the MAF disconnected at this point).
6. Replace the old fan clucth from the fan and put it the new.
The old fan assembly ready to be dismantled.
![Image]()
Using the 5mm hex drive remove the 3 screw hold the fan clutch and the fan together
![Image]()
The new fan clutch is in and ready to go
![Image]()
7. Install the Fan assembly
Try to rotate (counter-clockwise) it slowly (by hand !!!) and make sure it bites the thread. (It tooks me only 2 tries).
![Image]()
And make sure you tighten it
![Image]()
Now all is done and put together the intake plumbing, MAF and the airbox cover back
![Image]()
Some observation:
If you look at this pictures you will see that my AC belts is cracked pretty bad. Considering the car has never been tracked and only has approx 48K I expect the belt would last longer.
The Alternator belt is in better condition
AC Belt
![Image]()
![Image]()
Alternator Belt
![Image]()
![Image]()
Lesson Learned:
1. Regardless a low mileage it is obvious that rubber material cannot withstand the test of time.
So if you haven't already, go out there and check your belt.
Considering the beast is a high powered car, I can't imagine what would be the consequences if these belts completely shredded.
2. Use masking tape around the fan shroud (it has fairly sharp edges which can cut your skin). I taped the top parts but not on the bottom, so I got minor cut on 2 of my fingers when checking the new belts alignment.
Hope this helps.
Regardz,
J Irwan
So thought I'd post some pictured I took yesterday when I replaced mine.
It started the week before where I was cleaning the leak from the Intensive Cleaning washer pump (apparently leaked and also a well known issue on E46 as well (same part)).
So I had to take the under belly cover off so I can take a look underneath and to make sure I clean all the sticky residue all the way to the bottom.
While I was down there I noticed the AC belt has some cracking, I didnt seem that major at the time.
So I ordered the part and few days later I got the new parts, and been reading some horror story with a seized fan clutch so I decided to replace the fan clutch as well (very cheap insurance to me considering the alternative).
One thing I notice when I try to perform the cold start test with newspaper to stop the fan, I can't even stop the fan with either old or new parts.
Make me wonder if there is a better way to check if the fan clutch still in a good condition ?
Enough chit chat,
so anyway let me start with the DIY.
I've decided to follow TIS procedure on this (from the top)
Some DIY can be very intimidating regardless how simple they are.
This job is very straight forward, and I hope after reading this DIY some of you who are having doubt will see how simple this is.
I have included a lot of picture to make sure each step is clearly understood.
To start this job I got the following parts:
V-belt - AC compressor (11287833266)
V-belt - Alternator/waterpump (11287833264)
Fan clutch (11527830486)


And here are the tools needed for this job:
1. BMW fan clutch tools (11 5 050)
2. 15mm socket with long handle (a breaker bar will do)
3. flat screw driver
4. 32mm open wrench
5. 5mm hex drive

1. Remove the Fan assembly
Using the 32mm open wrench and the BMW tools I loosen the nut in 2 sec
(At first I've spent 2 min trying to loosen the nut without the BMW tools and finally I gave up. I was going to see how easy to do with the BMW tools).

Closer look at the location of the nut and where the BMW tools is used.


2. Remove plumbing for the Air-Intake including the MAF and top part of the air box (per TIS)
I also wrapped the edges of the fan shroud using masking tape

3.Remove the V-belts
a. Remove the V-belt for the alternator & waterpump first, then
b. Remove the V-belt for the AC
I've included the mock up picture below for a better illustration.
You need to turn clock-wise to compress the tensioner so that you could remove/install the belt.

Here is another picture on the pulley-tensioner for the AC (I didn't snap one for the alternator since I couldn't find a good angle for it).


4. Install the new belts
The AC belts is very easy and more straight-forward.
The alternator belt is a bit tricky to install. The best way I find to install this is: to align the belt on everything except for the pulley-tensioner last.

5. Check and make sure all the belts are aligned to the pulley groove.
Use your hand to check if the belt is right on the pulley groove. (make sure you feel this all around).


After I tripple-checked everything, I want to make sure everything can spin freely as it suppose to so I started the car (Don't do this if you don't have a PEAKE tools, as it will trigger SES since I have the MAF disconnected at this point).
6. Replace the old fan clucth from the fan and put it the new.
The old fan assembly ready to be dismantled.

Using the 5mm hex drive remove the 3 screw hold the fan clutch and the fan together

The new fan clutch is in and ready to go

7. Install the Fan assembly
Try to rotate (counter-clockwise) it slowly (by hand !!!) and make sure it bites the thread. (It tooks me only 2 tries).

And make sure you tighten it

Now all is done and put together the intake plumbing, MAF and the airbox cover back

Some observation:
If you look at this pictures you will see that my AC belts is cracked pretty bad. Considering the car has never been tracked and only has approx 48K I expect the belt would last longer.
The Alternator belt is in better condition
AC Belt


Alternator Belt


Lesson Learned:
1. Regardless a low mileage it is obvious that rubber material cannot withstand the test of time.
So if you haven't already, go out there and check your belt.
Considering the beast is a high powered car, I can't imagine what would be the consequences if these belts completely shredded.
2. Use masking tape around the fan shroud (it has fairly sharp edges which can cut your skin). I taped the top parts but not on the bottom, so I got minor cut on 2 of my fingers when checking the new belts alignment.
Hope this helps.
Regardz,
J Irwan