I thought I would try and beat Raikku to the punch on a DIY, so here's my attempt.
This vacuum line, as we've seen discussed in several threads, can get brittle with heat and stop providing accurate vacuum signal to the fuel pressure regulator located near the fuel filter. Part no. 13-53-1-407-717 (Vacuum pipe). It had to be special ordered from BMW in Germany, so it took a while to get. Cost: US$9.40.
To access this vacuum line, you have to remove the plenum. Then you need to locate the vacuum line, remove it from the connector at the throttle bodies on bank 2, and the connector underneath the cabin filter on the US driver's side.
This project took me two hours, total, including a test drive at the end. It was my second time to have the plenum off, and that helped speed things along, so if you've never had the plenum off, plan on three hours. If you also want to change out that pesky fuel evap canister that gives the E8 code, it's right next to the vacuum line. Add another 45 minutes and some foul language, and you can knock that out at the same time.
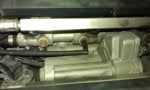
Step 1: The beginning. Note: Anytime you remove the plenum, it's a great idea to use a magnetic tray (blue item on right) to hold the nuts and bolts. Also, have a magnetic pickup tool as well for the nuts or bolts you drop. And you will drop some.
![Image]()
Step 2: Plenum cover off
![Image]()
Step 3: Velocity stacks off (Note the accumulation of nuts and bolts in the tray). You may also note the presence of my cordless drill at the bottom of the image. I used that for nut and bolt removal (not installation) and it makes the job go by lots faster.
![Image]()
Step 4: Plenum almost ready for removal. Still need to get the oil separators, air intake hoses, and a couple of hoses off the bottom.
![Image]()
Step 5: After getting the intake hoses off and out of the way, you will see these two hoses under the plenum that need disconnecting. The large one is already disconnected and the smaller one behind it is yet to be. Both are easy to get to by slightly lifting the plenum.
![Image]()
Step 6: Plenum off, baby. To remove the oil separators, unbolt the funnels from the plenum and pull them straight out.
![Image]()
Step 7: Old vacuum line removed. To access the line, look under the bank 2 fuel rail for a rubber line that connects to an elbow connector and then runs towards the back of the engine. The line runs behind the cylinder head, resting in a clip, and up to it's other end, located underneath the cabin air filter on the U.S. driver's side. Remove the cabin filter for much easier access.
As you can see, my line appears to be okay, but it's unclear whether the elbow could be cracked or the line deteriorated in some way.
![Image]()
Here is a closeup of the connector under the cabin filter. I've removed the cabin filter for access. The connector is to the lower right of the brass fitting. The hose has been removed at this point.
![Image]()
Step 8: New hose in place. Now, you can probably see the connector better.
![Image]()
Step 9: This is the other end, at the throttle body. You can see the connector, viewed from U.S. passenger side towards U.S. driver's side (Bank 2).
![Image]()
New hose in place. You can see the elbow connection here as well.
![Image]()
At this point, you can button everything up and you are done. When reattaching the plenum, it's a good idea to follow the TIS instructions for installation, which essentially say tighten everything from the inside to the outside, using a two-step tightening process. First, tighten everything to 5Nm, then to 10Nm.
Hope this helps someone, as I've been helped so many times by the people on the board.
Cheers,
Mike
This vacuum line, as we've seen discussed in several threads, can get brittle with heat and stop providing accurate vacuum signal to the fuel pressure regulator located near the fuel filter. Part no. 13-53-1-407-717 (Vacuum pipe). It had to be special ordered from BMW in Germany, so it took a while to get. Cost: US$9.40.
To access this vacuum line, you have to remove the plenum. Then you need to locate the vacuum line, remove it from the connector at the throttle bodies on bank 2, and the connector underneath the cabin filter on the US driver's side.
This project took me two hours, total, including a test drive at the end. It was my second time to have the plenum off, and that helped speed things along, so if you've never had the plenum off, plan on three hours. If you also want to change out that pesky fuel evap canister that gives the E8 code, it's right next to the vacuum line. Add another 45 minutes and some foul language, and you can knock that out at the same time.
Step 1: The beginning. Note: Anytime you remove the plenum, it's a great idea to use a magnetic tray (blue item on right) to hold the nuts and bolts. Also, have a magnetic pickup tool as well for the nuts or bolts you drop. And you will drop some.

Step 2: Plenum cover off

Step 3: Velocity stacks off (Note the accumulation of nuts and bolts in the tray). You may also note the presence of my cordless drill at the bottom of the image. I used that for nut and bolt removal (not installation) and it makes the job go by lots faster.

Step 4: Plenum almost ready for removal. Still need to get the oil separators, air intake hoses, and a couple of hoses off the bottom.

Step 5: After getting the intake hoses off and out of the way, you will see these two hoses under the plenum that need disconnecting. The large one is already disconnected and the smaller one behind it is yet to be. Both are easy to get to by slightly lifting the plenum.

Step 6: Plenum off, baby. To remove the oil separators, unbolt the funnels from the plenum and pull them straight out.

Step 7: Old vacuum line removed. To access the line, look under the bank 2 fuel rail for a rubber line that connects to an elbow connector and then runs towards the back of the engine. The line runs behind the cylinder head, resting in a clip, and up to it's other end, located underneath the cabin air filter on the U.S. driver's side. Remove the cabin filter for much easier access.
As you can see, my line appears to be okay, but it's unclear whether the elbow could be cracked or the line deteriorated in some way.

Here is a closeup of the connector under the cabin filter. I've removed the cabin filter for access. The connector is to the lower right of the brass fitting. The hose has been removed at this point.

Step 8: New hose in place. Now, you can probably see the connector better.

Step 9: This is the other end, at the throttle body. You can see the connector, viewed from U.S. passenger side towards U.S. driver's side (Bank 2).

New hose in place. You can see the elbow connection here as well.

At this point, you can button everything up and you are done. When reattaching the plenum, it's a good idea to follow the TIS instructions for installation, which essentially say tighten everything from the inside to the outside, using a two-step tightening process. First, tighten everything to 5Nm, then to 10Nm.
Hope this helps someone, as I've been helped so many times by the people on the board.
Cheers,
Mike
")