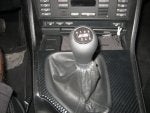
Ok, so most previous threads of this type of DIY were mainly before and after with a brief explanation. I'm more of a visual learner so hopefully this helps others like me. And like I've said before, everything is better with pictures! This is a DIY for a ZHP knob installation using the OEM shifter boot.
Tools needed: 1) Small wire cutters 2) Single zip tie 3) Blow dryer 4) Heat shrink tubing 5) X-acto knife
I've yet to figure out how to type between pictures, so all the steps are first and the pictures after in sequence.
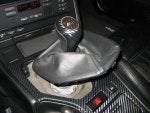
Step 1 - Lift stock shifter boot from the console and over the stock shifter knob. You should see the wire that lights up the knob - disconnect it.
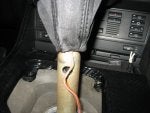
Step 2 - With the blow dryer, apply some heat to the knob and metal shifter [rod] for 10 minutes or so.
Step 3 - Believe it or not, after doing Step 2, I was able to remove the stock knob with my right hand and with very little force. I was actually very surprised at how easy it came off! Just pull straight up.
Step 4 - On a flat surface (dinning room table), cut the stock shifter boot from the stock knob using an X-acto knife. I recommend cutting from the outside. With your finger, feel for the bottom edge of the stock knob where the leather boot meets the bottom edge of the stock knob. This will give you the cleanest, straight cut of the leather boot. I screwed up a bit and cut with the boot inside out and it wasn't the cleanest. It wasn't terrible either, but lesson learned (you can't see the cut leather anyway since it'll be folded over).
Step 5 - Set the stock shifter boot (still attached to the ring) aside and you should now have the stock knob with the wire still attached.
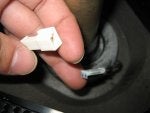
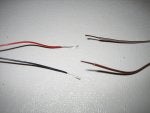
Step 6 - The knob I ordered (off eBay from Germany) came with wires attached to it. With a wire stripper I exposed about an inch of wire for each (red and black, so positive and negative).
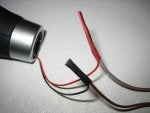
Step 7 - I cut the wire coming from the bottom of the stock knob at around 2 inches, stripped about an inch for each and made the connection of these wires to the ZHP knob wires (see pictures below). I used heat shrink tubing to hold the wire connections in place. I tested it and it worked like a charm!
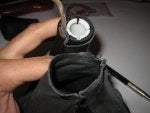
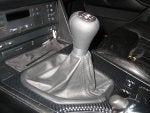
Step 8 - Now you can take the stock shift boot assembly and feed the ZHP knob through it. Place the ZHP knob on the metal shifter (shaft) but do not completely seat it. Zip tie the leather boot just below where the knob sits once you are comfortable with how much of the boot to zip tie. Then make the final push on the ZHP knob to completely seat it on the metal shifter.
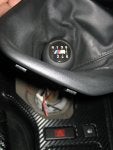
Step 9 - Bring the leather boot down around the new knob and reseat the plastic ring to the center console.
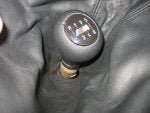
Step 10 - Enjoy the new shifter!!
It sits straight (not crooked) and has even illumination!
Tools needed: 1) Small wire cutters 2) Single zip tie 3) Blow dryer 4) Heat shrink tubing 5) X-acto knife
I've yet to figure out how to type between pictures, so all the steps are first and the pictures after in sequence.
Step 1 - Lift stock shifter boot from the console and over the stock shifter knob. You should see the wire that lights up the knob - disconnect it.
Step 2 - With the blow dryer, apply some heat to the knob and metal shifter [rod] for 10 minutes or so.
Step 3 - Believe it or not, after doing Step 2, I was able to remove the stock knob with my right hand and with very little force. I was actually very surprised at how easy it came off! Just pull straight up.
Step 4 - On a flat surface (dinning room table), cut the stock shifter boot from the stock knob using an X-acto knife. I recommend cutting from the outside. With your finger, feel for the bottom edge of the stock knob where the leather boot meets the bottom edge of the stock knob. This will give you the cleanest, straight cut of the leather boot. I screwed up a bit and cut with the boot inside out and it wasn't the cleanest. It wasn't terrible either, but lesson learned (you can't see the cut leather anyway since it'll be folded over).
Step 5 - Set the stock shifter boot (still attached to the ring) aside and you should now have the stock knob with the wire still attached.
Step 6 - The knob I ordered (off eBay from Germany) came with wires attached to it. With a wire stripper I exposed about an inch of wire for each (red and black, so positive and negative).
Step 7 - I cut the wire coming from the bottom of the stock knob at around 2 inches, stripped about an inch for each and made the connection of these wires to the ZHP knob wires (see pictures below). I used heat shrink tubing to hold the wire connections in place. I tested it and it worked like a charm!
Step 8 - Now you can take the stock shift boot assembly and feed the ZHP knob through it. Place the ZHP knob on the metal shifter (shaft) but do not completely seat it. Zip tie the leather boot just below where the knob sits once you are comfortable with how much of the boot to zip tie. Then make the final push on the ZHP knob to completely seat it on the metal shifter.
Step 9 - Bring the leather boot down around the new knob and reseat the plastic ring to the center console.
Step 10 - Enjoy the new shifter!!
It sits straight (not crooked) and has even illumination!


")