BMW M5 Forum and M6 Forums banner

Steering angle sensor DIY fix - it worked

5 reading
431K views 144 replies 60 participants last post by  Deleteduser  
#1 · (Edited by Moderator)
A few weeks ago, my car exhibited classic steering angle sensor (SZL) failure symptoms - at the first instance of turning the steering wheel after starting the car, I'd get errors indicating falts with the DSC and the FTM. I'd read about this fix My $0.02 Steering Angle Sensor Fix - BMW 3-Series (E90 E92) Forum - E90Post.com a while back, and decided to try some aspects of it before giving my car up to a mechanic for a day or so.

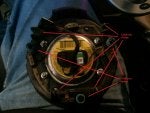
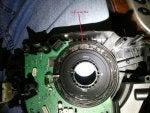
Specifically, I pulled the steering angle sensor, opened it up, and cleaned the top side of the optical disk with glasses cleaning solution and a lint-free, super fine weave, microfiber glasses cleaning cloth. One of the posts recommended isopropyl alcohol, which I did not use because alcohol can craze some types of plastic and the optical disk is plastic. The glasses cleaning solution said it was safe for plastic lenses.

There was, in fact, a nasty brown film on the disk. I thought about cleaning the bottom side of the disk (the side with the pattern deposited on it), but I was worried about damaging the pattern, so I didn't. I also unscrewed the clear block that transmits light from the LED (it needs a tiny, maybe T-8 Torx driver). It was a bit yellowed (not crystal clear looking), and the cleaning didn't seem to change that.

I did not try to reflow any of the solder connections.

I put it all back together and drove it around on and off Sunday and to work this morning. I've not got the error again. I'm not saying that it was the cleaning that fixed it. It could have been that I'd had a loose connector. However, whatever I did seemed to have fixed it.

Some things to know:
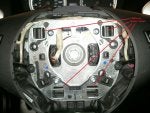
  • The DIY linked above is for an e90. Our e60s are a bit different. The steering angle sensor looks the same and is in the same place, but getting to it is a little different. If you're mechanically inclined, it is not hard.
  • You don't have to re-code the steering angle sensor to the car if you do this, because you're changing anything.
  • Some early e60s had the clear block over the LED changed.

Therefore, you can order a new one. If my issues come back, I might do that.
 
#2 · (Edited)
Interesting.

Now instead of being a tease, post step by step instructions (with pics) on how to remove the SZL for an e60 since you have our attention.

Once you do, have it posted in the DIY thread at the top of this forum page.

:)
 
#3 ·
+1
 
  • Like
Reactions: MIGHTY5
#6 ·
added to sticky (somewhat reluctantly since it is not for E60 specifically, but better than nothing)
 
#7 · (Edited)
I'm glad I found this post, it really works! First I was using already mentioned above 'My $0.02 Steering Angle Sensor Fix'. When I took the circuit board out, it seemed ok to me and I did not want to solder the connectors. Then I found this thread, cleaned the disk and everything worked!

Saved me 950$ (quote from a smaller repair place), dealership wanted about 1200$.

I took the pictures when putting it all back together. Will post them with my notes shortly. Clyde says he used T-9 - it was too big, I used T-8. As for cleaning, I tried Windex first, it did not help much. But Oil-eater did the job.
 
#8 ·
...Clyde says he used T-9 - it was too big, I used T-8.
I'm certain on my car some of the screws were T-9, but would not be surprised if other screws have been used over the various models and years.

In any case, both T-9 and T-8 are rather uncommon sizes. I had a set of small torx screwdrivers (T-6, 7, 8, 9, 10) used for electronics repair :M5thumbs:
 
#9 · (Edited)
95% credit goes to $0.02 post.

1) Park the car. Make sure the wheels are strait. Disconnect the battery in the trunk.
2) Remove horn/airbag. There's a hole under the steering wheel. Insert a screwdriver or allen key (size 15-20). Find correct position, slightly moving the screwdriver back and forth. Then push the screwdriver upward to release the inside spring. First time it took me several minutes - I did not want to break anything.
Image


3) Disconnect the horn/airbag. Gently push the tab with you finger or screwdriver, then pull to disconnect.
Image


4) Remove the steering wheel bolt. Use 15mm 6 point socket (12 point socket is not very good for this). I don't know how to lock the steering wheel, so I needed second person to hold it while I was undoing the bolt.
Image


5) Remove the steering wheel. Disconnect the wires by pulling the connector out
Image


6) Remove the cover from the cowling. I did not use any metal tools here. Apply finger pressure and pull the cover towards yourself.
Image


7) Using T10 Torx key remove turning signal, cruise control and windshield wipers controls.
Image


8) Remove the bottom cover of the cowling. There's plastic screw on the bottom, be careful when removing it. Then apply finger pressure to the top cover and pull the bottom cover down. Do left and right sides separately, one at a time. Leave the bottom cover hanging down. Don't remove the top cover.
Image

Image


9) Using T15 Torx remove 6 screws. Then carefully pry big tabs on each side to release the big round module. I could not remove it completely until later, as the wires on the back hold it.
Image


10) Remove SRS module ($545+tax at the dealership) from the brackets. First pull the bottom part out, but not completely. The wires behind it at the bottom are still holding it. Then wiggle the module out from the brackets. Don't rush - find a way that works.
Image


11) Disconnect the wires from the back.
Image

Image


12) Now I was able to separate completely big round module from the SRS module.
Using T8 Torx remove 4 screws. Note the arrow alignment for later - when you're putting it back together.
Image

Image


13) At this point you could clean the disk. I took it out completely - wanted to inspect the board and it is more convenient this way.
Remove two T6 torx screws to disconnect ID Led cover. It's slightly yellow-ish. Cleaning did not help.
Image


14) Release the tabs from behind to remove the disk. Use your fingers to slightly push several of the inward at the same time.
Image


15) You probably can feel some sticky goo on the top of the disk with your fingers. Clean in (I used oil-eater with water), wipe it dry (I used cloth that comes with eye glasses).

16) Put everything back together. Don't forget to align arrows from step 12. Connect the battery, start the car. After the dreaded yellow AWD, break, stability control lights come up, turn the wheels all the way to the left, then all the way to the right. The messages disappear. It's been almost a week for me and the message has not re-appeared.
 
#10 · (Edited)
Great write up and pics, thanks. Two comments:
- I see a couple broken picture links at the bottom. Can you check those?
- Are you able to upload the pics directly to this site? That way if your host goes away we don't lose the pics.

Will link this to DIY thread.
 
#13 ·
Use the paperclip icon to attach images, rather than the landscape icon which just links to an external hosting site.
 
#12 · (Edited)
Thank you so much for posting this DIY repair. I used this to replace my sensor and put all back together. I am an E60 driver but not an M5 but no one had put any info like this on the non-M5 boards so I was very thankful to have this.

Yesterday, I took my E60 to the BMW dealer for them to turn out my SZL light. They tried but the light would not turn off so I'm still having some type of issue.

Has anyone else had any experience with lights not turning off once the replaced their sensor? What about the original poster? Did you have to have dealer re-program?

I did not clean the disc on the circuit board as I was a bit afraid I might make things worse. I also did not take that circular piece out of the SZL module.

Any more feedback is appreciated. David in NC. :applause:
 
#16 ·
I had the warning light reset before doing this repair, but it was coming back. Cleaning the disk is the whole reason for taking it apart. My disk was covered in goo and would not let the light through properly. Clean the disk, then reset the warning light light yourself by turning the wheels left and right (the very last step of the instructions). How much worse can it get?
 
#22 ·
I did this about 2 weeks ago and have not had a light since. On my car, I had a transparent film over the top of the disc. I had some spots under the film that looked like hardwater but kind of "crystallized". I was unable to get them off but it still worked. I took it apart once and cleaned with microfiber and Windex but still got the fault. I took it apart a second time and really scrubbed it with isopropyl alcohol and a q-tip and it has been great ever since.
 
#26 ·
Thank you, Thank you, Thank you.
Took me an hour showing a friend how to do it. Definitely need a T6. I used Mequires Plastic Cleaner/Polish and a 100% cotton lint free cloth. It works!! Only part that sucks is that I got accustomed to no traction control, so I went to floor it and I almost ate the steering wheel and the 1-2 shift had DSC hitting hard! LOL

My dealer quoted $1,100 but said it was throwing fault codes to the active sway bars and they where $1,400 a piece so $3,900 total. Crazy!
 
#27 ·
Thank you for the great write up. I did this today and the lights and issues went away. I drove the car around a bit and everything functioned correctly. I will keep my fingers crossed that my issues won't come back. Worst case I will buy the part from the dealer and put it in myself as I have already done the job of taking the wheel apart.

If you are on the fence about trying this do it. It will take you a little of your time but if it works it saves you a ton of money.
 
#29 ·
I am glad to see this is something members are willing to try themselves. It isn't that bad of a job, really and it saves you a ton of money.
 
#30 ·
Excellent DIY write up. While in the process of trying to sell my car, it suddenly developed this code and even with a friend of a friend discounts, the part alone was going to be in the high 400s plus labor. After reading this and about an hour of my time and a quick drive around the neighborhood, the code is gone. As some have stated above, this really isn't that hard of a project so if you are even remotely handy and have some basic tools, I would definitely recommend trying this before chunking down the money for replacement parts.
 
  • Like
Reactions: PilotAce
#31 ·
Another successful fix!

First, thanks for everybody that contributed to this DIY. I was having the exact issue described, and based on the detailed steps and photos given, I was confident I could do this. So, decided to tackle this today. Overall, very straight forward, and so far, it has resolved my issue!!! Can't believe the dealership would charge so much for this. I know they won't 'clean it', but still. Anyway, I am really glad it appears to have fixed my issue!

Actually, for me, my biggest struggle was the first part - pulling the airbag/horn unit off. I was afraid I was 'pushing too hard', and going to break something. In addition, I didn't fully understand how the 'Spring Mechanism' worked. Once I got it off, after several minutes, I understand better how it worked, and you do have to press hard to get all 4 'clamps' free.

I'm a firm believer in having more people working on the DIY, and contributing to it, in order to make it as good as it can be, so I'm attaching a couple extra photos, which might prove helpful for others. Thanks again guys - great find!
 

Attachments

  • Like
Reactions: phizzak and 5soko
#33 ·
Anyone have the step by step pictures that can be added with the steps and then saved to this DIY? I think this is on my 'to do' list this weekend and the pics would be awesome to have with the already great directions.
 
#35 ·
Posts 9 and 31 have steps and pictures...

Sent from my SCH-I905 using Tapatalk 2
 
#37 ·
Everybody I've read said this fixed it up for them. Been weeks and my errors haven't come back. I really cleaned it good. Also, you did follow instructions with the 'arrow', and lining it back up, right? Did you notice the 'grime' that I showed in one of my pictures? Truthfully, if you are getting the exact symptoms (Error codes popping up as soon as you turn the steering wheel the first time you start the car), then I'm 99% sure this is it. I would probably try it again, since it is a fairly easy thing to do (especially the second time). I guess, of course, it could be the part. I don't know what else you have to do to replace the part (maybe 'sync' it up somehow). Good luck, and let us know!
 
  • Like
Reactions: ShowMeM5