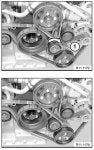
Mottati is correct in that everything can be done from underneath the car.
However, if you only did the "required" steps in the above procedure, you will find that the only part to remove is the fan (takes about 3-5 hits), which you will find takes less time than just getting a jack under the car and lifting it. By the time you have properly supported the front 2 jackpads of the car, the fan would have been off already. The time required to remove and replace the covering pan under the car (a bit longer than it takes on all non-M bumper E39s) does not justify belt replacement from the bottom.
As I recall, the pan itself has 2 10mm screws as well as 10-12 "half-turn" locking screws. Unless you are on a lift or can jact the front of the car up REALLY high, you will need to remove an additional 5 10mm screws on each side to loosen the plastic covers under the fogs to avoid having to force the center pan back in place when reinstalling it.
Add lowering the car and putting the jack and stands away, and you've taken enough time to remove a whole bunch of radiator fans
")
For this reason, BMW has chosen to use this method when replacing belts. The labor allowance is only 0.4 hours for the entire job (under warranty labor allowances), which is why the pan removal is not part of the "official" procedure.
I listed the "optional" steps for those out there who are willing to sacrifice the time of the job for the sake of easier access to the parts. Either way, the system was designed to be serviced from the top.