

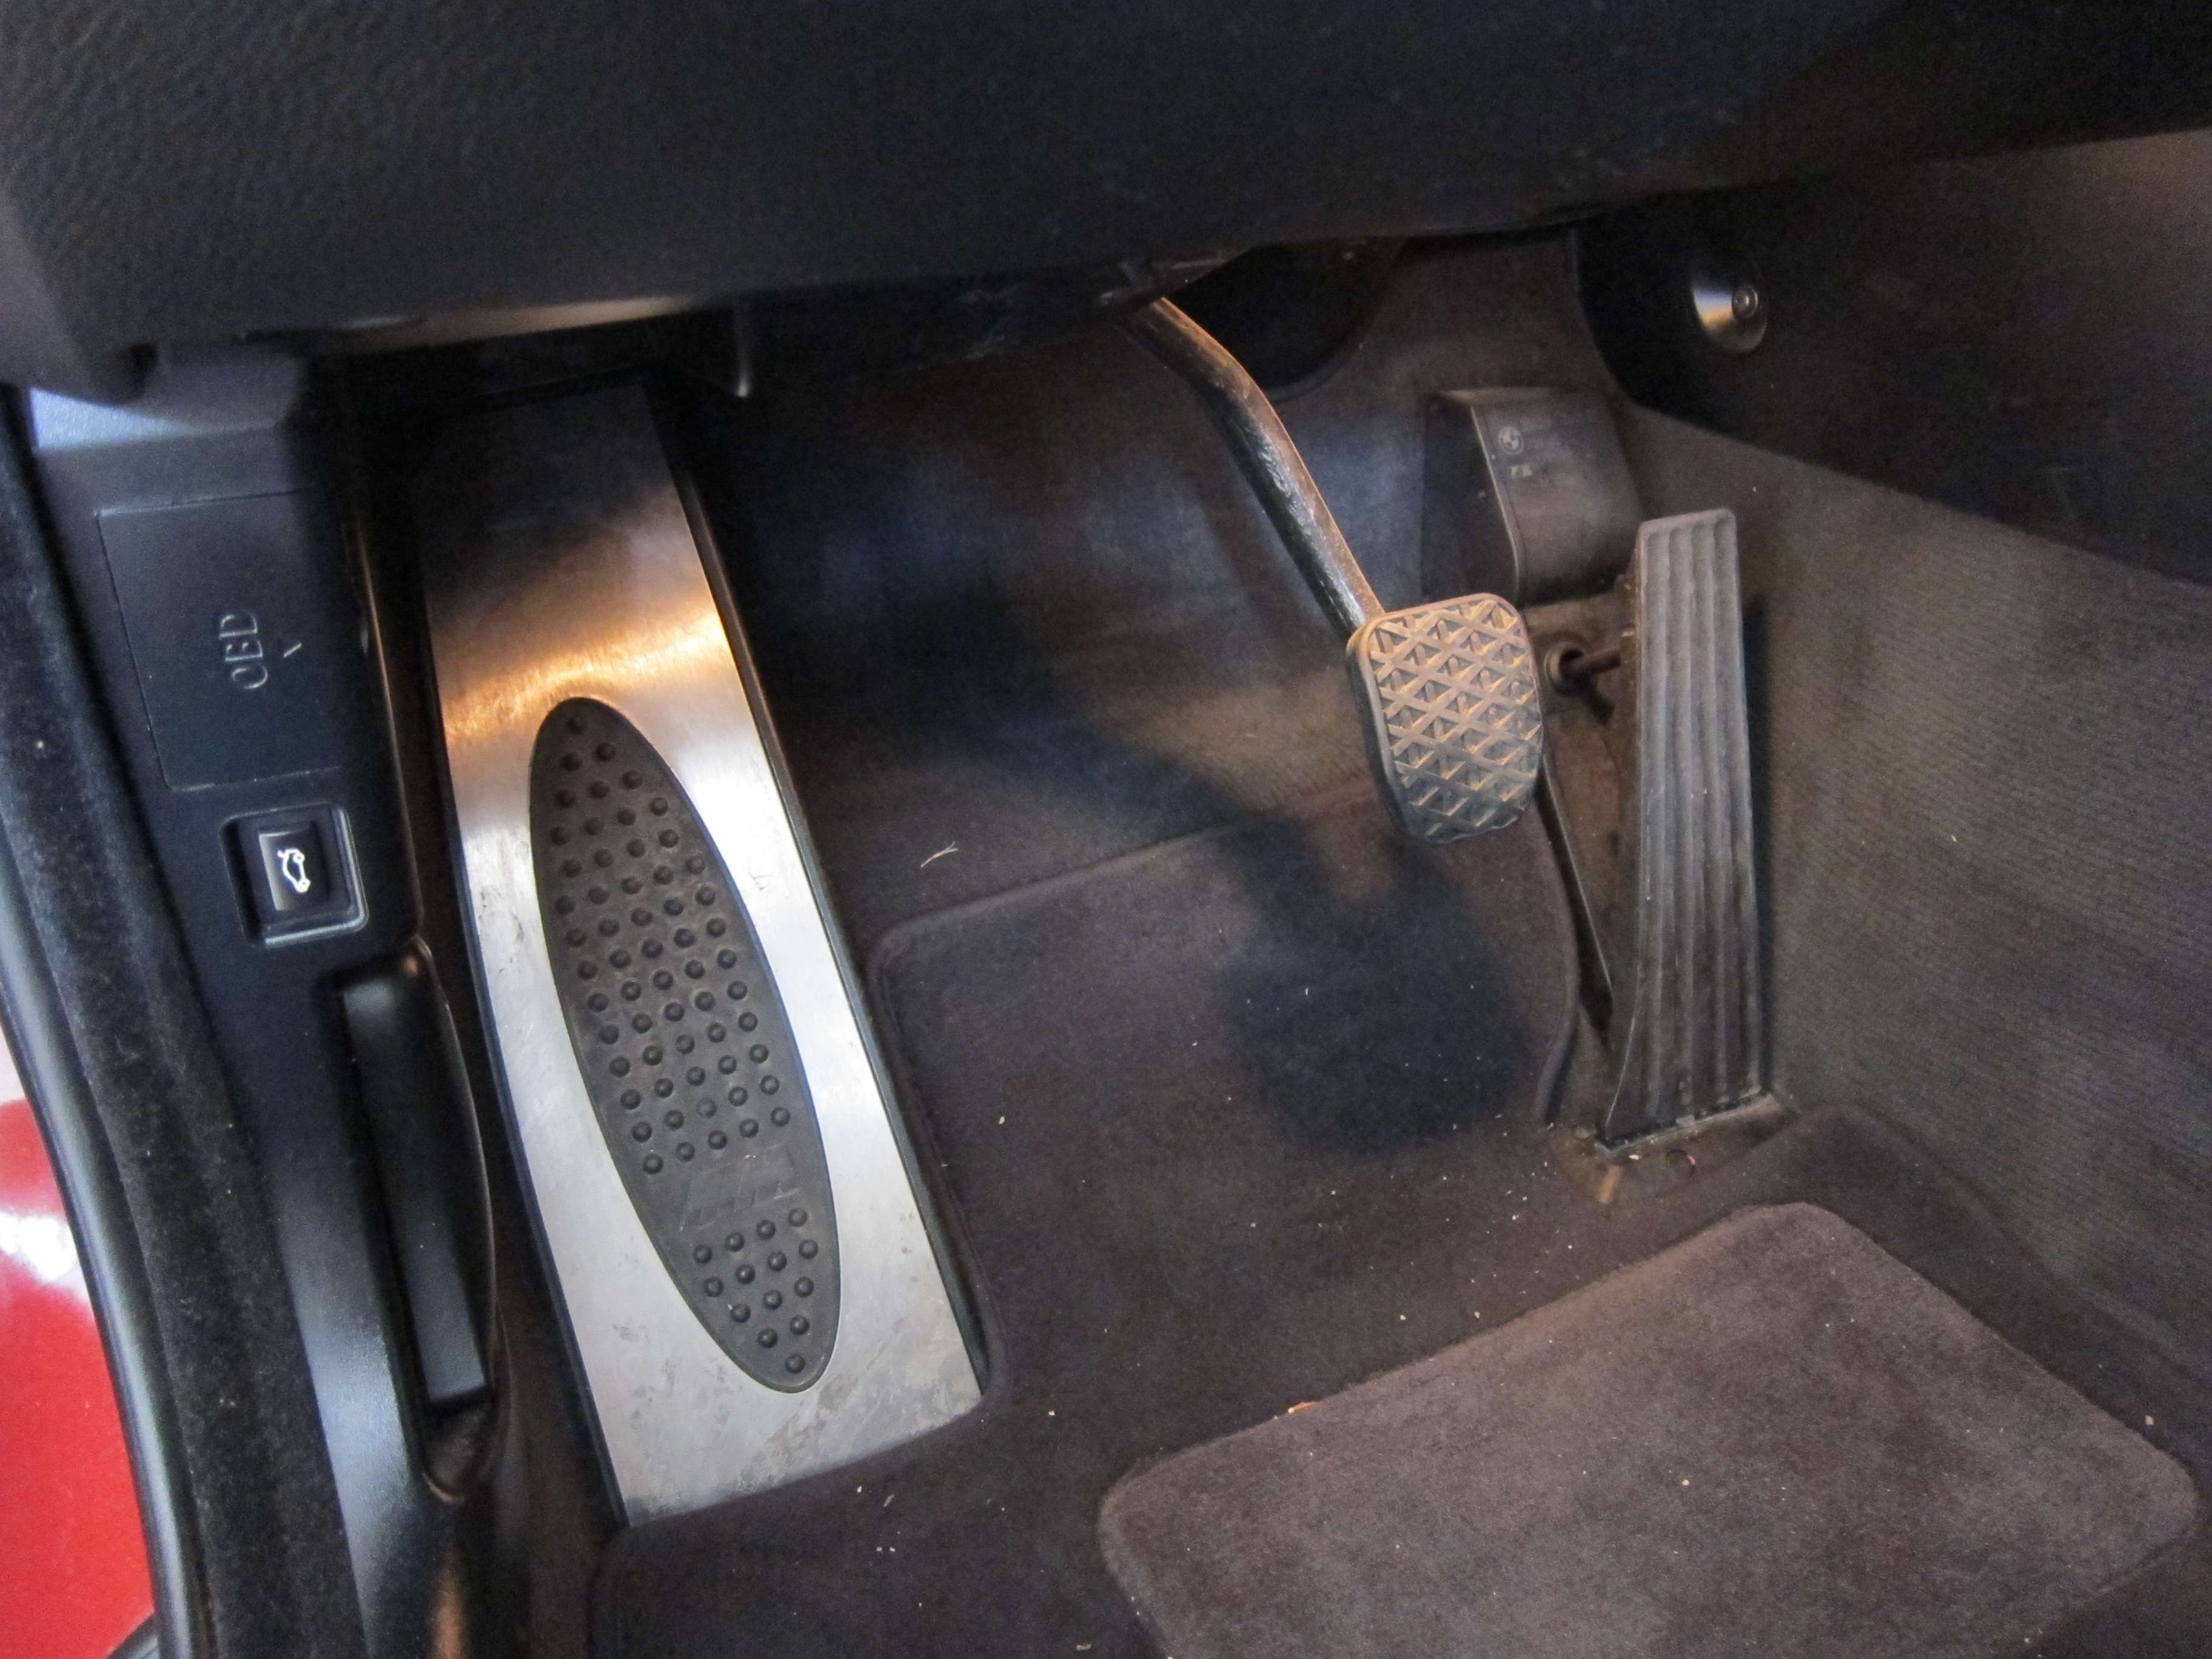
Okay, I recently installed a set of knock-off AC Schnitzer pedals on my M5 and thought I would assemble a brief DIY for the archives around here since I hadn't been able to find a visual walk-thru when I did mine. I'm guessing most existing members have already done this mod, but for future users it might be helpful.
First, assemble the parts and tools you are likeley to need. In my case, the set I was installing used hex-head screws (or Allen head), so I have a complete fold-out set of hex wrenches in addition to a drill, bits, screwdrivers, and my parts to be installed. IMPORTANT - you will be drilling through steel so you should use titanium coated drill bits to make this process go more smoothly:
![Image]()
If you purchased a three piece set, you're going to be working on all three pedals in this picture.
![Image]()
Having done this same mod on my previous Acura, I knew to prep my work area with a towel where I would be leaning over the edge of the car. This keeps from making your abdomen sore from the edges of the car...at least a little. Plus, this is helpful in preventing you from scratching anything if you get careless with a tool:
![Image]()
Starting with the dead pedal - many people on this board have used a screw driver to pry the existing aluminum piece away from the rubber. I chose not to do this, instead drilling straight through the existing aluminum. I did this for two reasons - 1) my aluminum piece was on very tightly and I was likely to damage the underlying rubber portion; and 2) leaving the existing aluminum piece effectively eliminates any gaps you might have underneath your new pedal.
IMPORTANT - in the case of the set I purchased, the dead pedal is slightly smaller than the one I was replacing, so I made the decision to leave a small (about 1/2 inch) portion uncovered at the top of the existing dead pedal since it would be more difficult to see there.
I placed the new pedal on top of the old in the exact spot I wanted in order to drill the holes I needed. Note - use the smaller bit first to avoid damaging your new pedal. You can enlarge the holes after you've done the initial drilling.
![Image]()
Here's what it looks like underneath after you pull your new pedal away. Note, this is where you might consider enlarging the holes a bit if necessary for the new screws that came with the set for the dead pedal.
IMPORTANT - don't enlarge your holes too much or the screws will not hold your new dead pedal in place.
![Image]()
Once you have all four holes drilled and properly sized, place the new pedal back in place, align the holes and install the new screws that came with the set (you'll need a phillips head screw driver).
![Image]()
![Image]()
Moving on to the brake pedal - first, remove and discard the existing rubber pad. Second, place your new pedal on top of the underlying steel to identify where you need to drill.
IMPORTANT - check where this is going to align on the back as well since you need to have room to install the nuts on the back of the new hex-bolts. This is especially important for the upper left corner hole due to the angle of the pedal shaft (see below). Remember - check twice, drill once. Titanium coated bits are crucial here.
![Image]()
These are the parts you are installing, so make sure you leave room to put them together or you're going to be making new holes and re-aligning your new pedal.
![Image]()
Space gets very tight when you are trying to install these nuts and bolts and if you don't have small hands (or even if you do), you might consider getting yourself a set of curved needle nose pliers like the ones in the picture below. These were fantastic for working with the angles you'll be dealing with.
![Image]()
Moving on to the gas pedal - you don't need to do anything to the pedal other than line your new pedal up with the existing one and drill the holes where you want them. You're just going to install your new aluminum gas pedal on top of your existing, plastic, one. Here's what it will look like after you've drilled.
![Image]()
You'll be faced with the same obstacle as before with installing the nuts and bolts here - namely, tight space. The needle nose pliers are really helpful. Also, you'll likely find (as I did) that there's simply no way to install the nut on the back of the bolt on the lower right hand corner. Obviously, three bolts will hold the pedal just fine, but I didn't want to leave an obvious physical gap in the hole so I super glued the lower right bolt into the hole for aesthetic purposes. It was a simple solution to the problem and it's held up just fine.
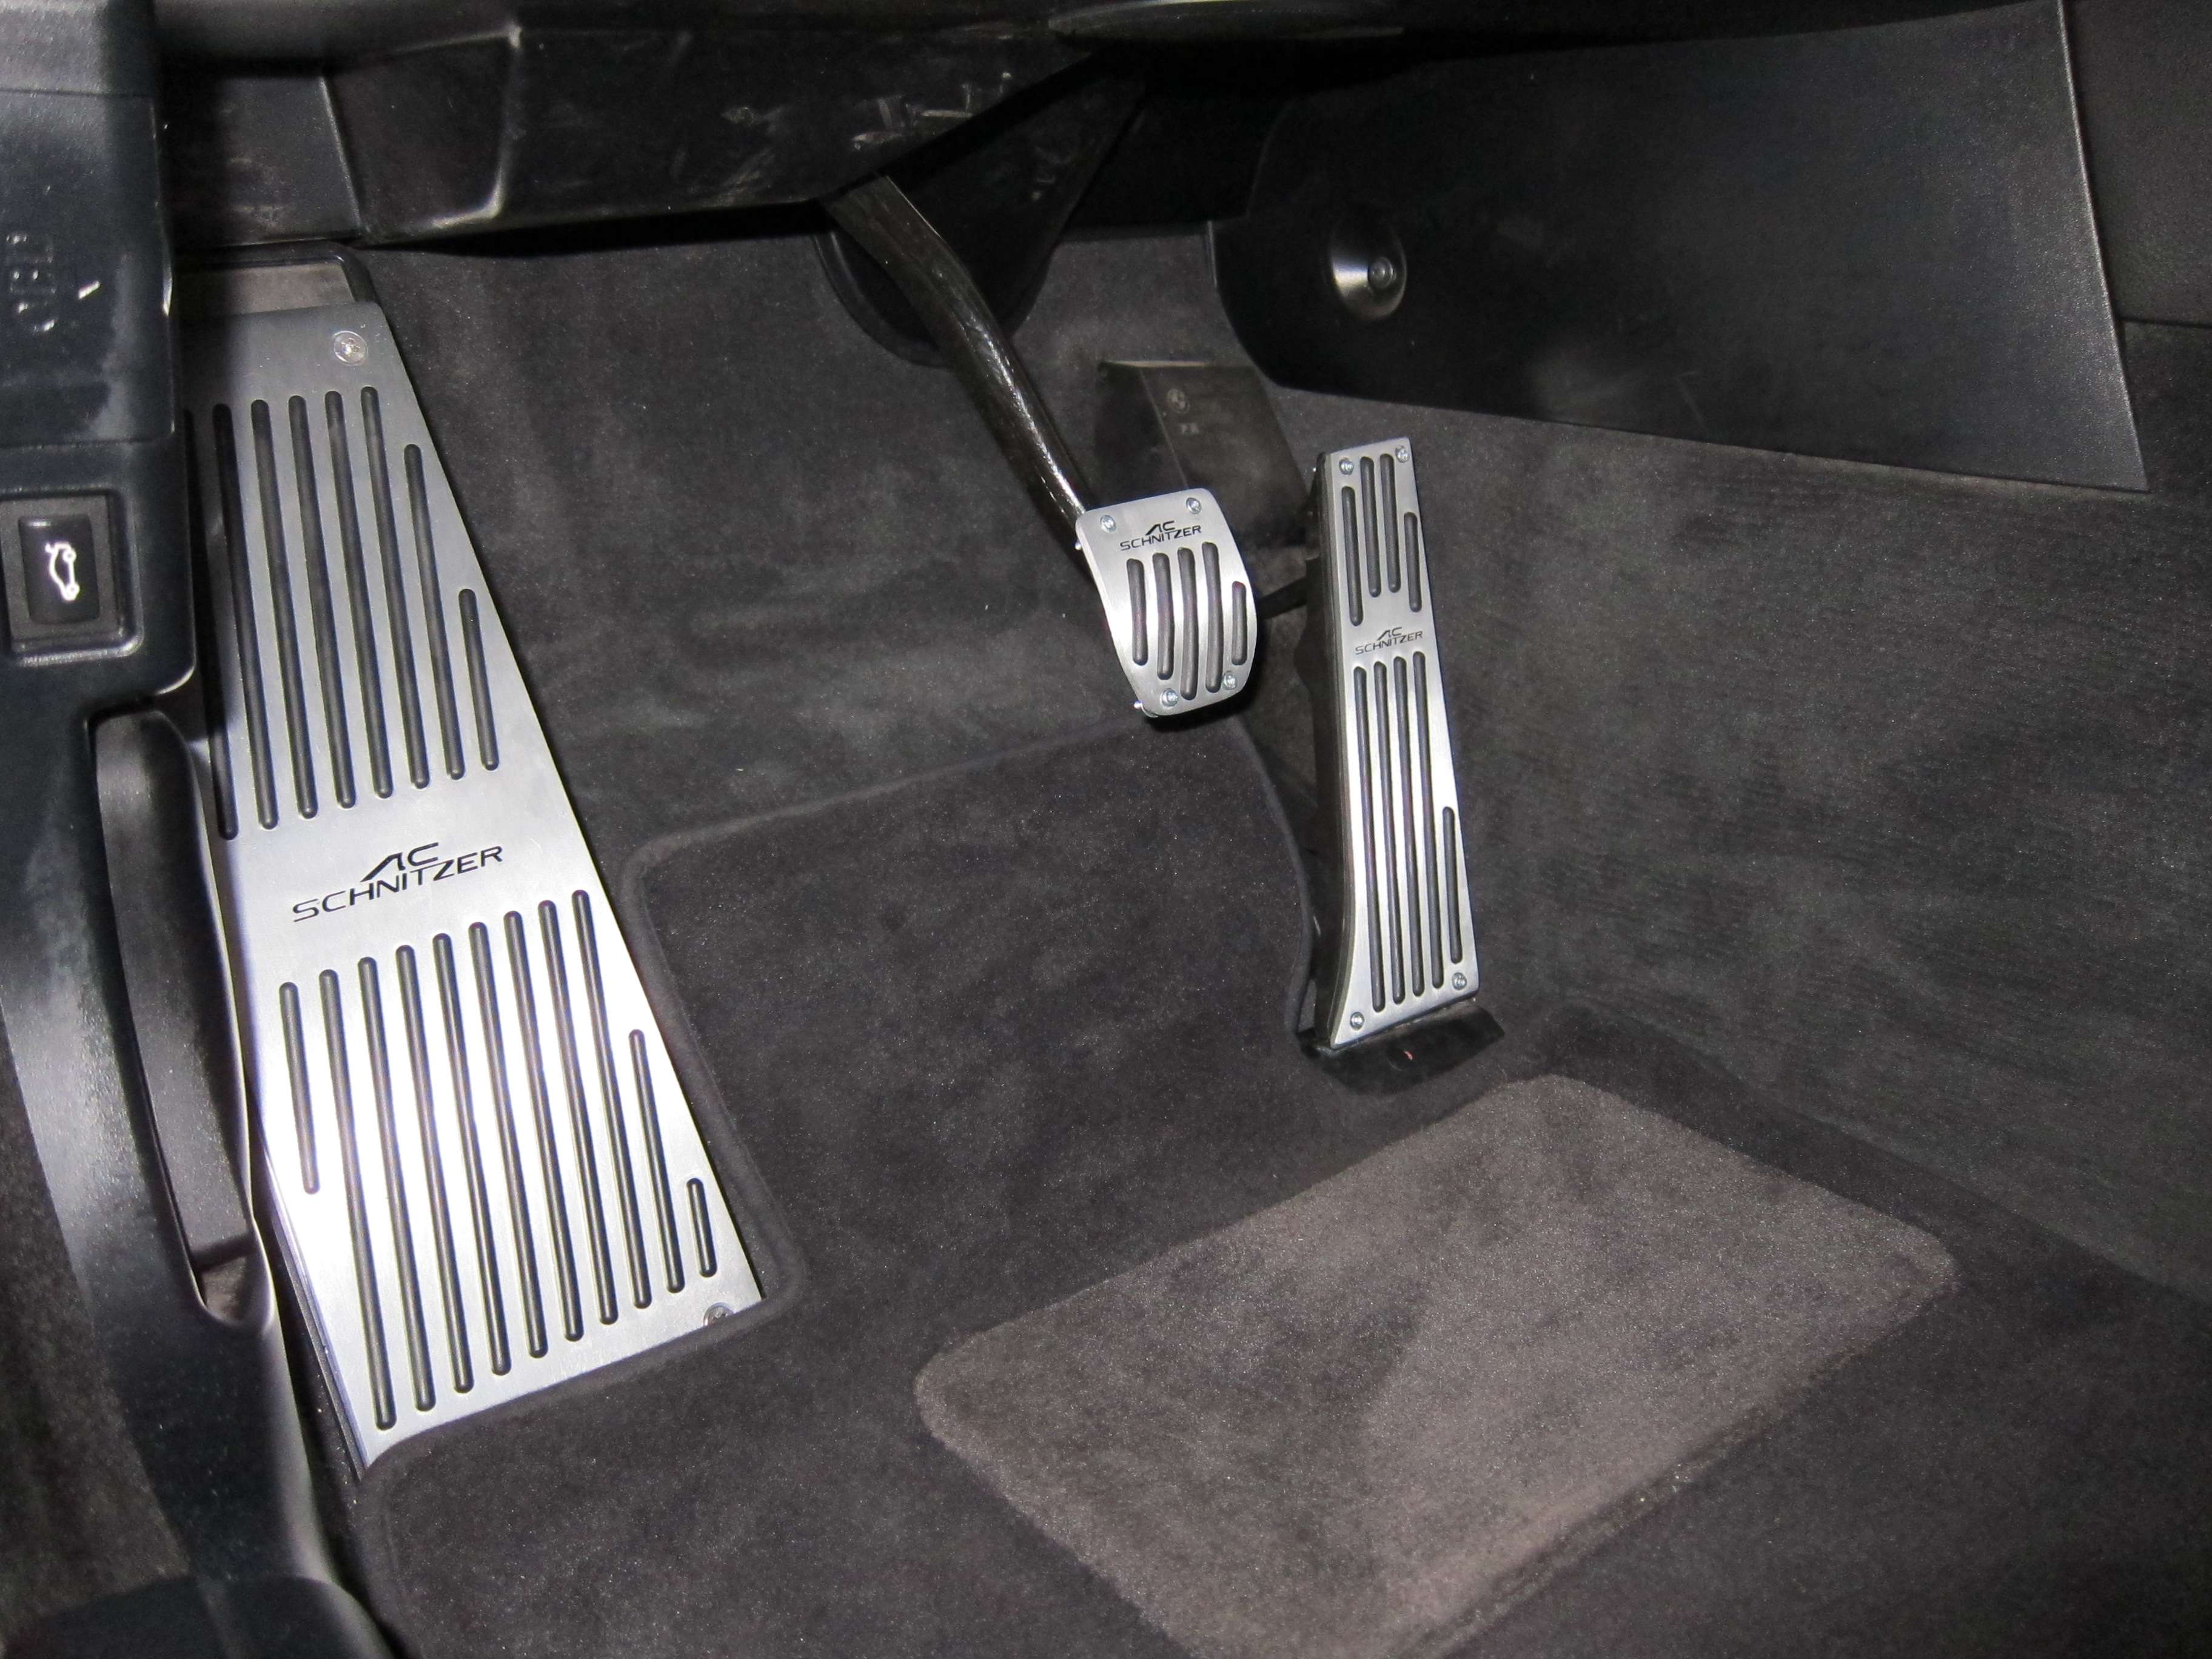
Here's the finished product (complete with vacuum "mod"):
![Image]()
First, assemble the parts and tools you are likeley to need. In my case, the set I was installing used hex-head screws (or Allen head), so I have a complete fold-out set of hex wrenches in addition to a drill, bits, screwdrivers, and my parts to be installed. IMPORTANT - you will be drilling through steel so you should use titanium coated drill bits to make this process go more smoothly:

If you purchased a three piece set, you're going to be working on all three pedals in this picture.
Having done this same mod on my previous Acura, I knew to prep my work area with a towel where I would be leaning over the edge of the car. This keeps from making your abdomen sore from the edges of the car...at least a little. Plus, this is helpful in preventing you from scratching anything if you get careless with a tool:

Starting with the dead pedal - many people on this board have used a screw driver to pry the existing aluminum piece away from the rubber. I chose not to do this, instead drilling straight through the existing aluminum. I did this for two reasons - 1) my aluminum piece was on very tightly and I was likely to damage the underlying rubber portion; and 2) leaving the existing aluminum piece effectively eliminates any gaps you might have underneath your new pedal.
IMPORTANT - in the case of the set I purchased, the dead pedal is slightly smaller than the one I was replacing, so I made the decision to leave a small (about 1/2 inch) portion uncovered at the top of the existing dead pedal since it would be more difficult to see there.
I placed the new pedal on top of the old in the exact spot I wanted in order to drill the holes I needed. Note - use the smaller bit first to avoid damaging your new pedal. You can enlarge the holes after you've done the initial drilling.

Here's what it looks like underneath after you pull your new pedal away. Note, this is where you might consider enlarging the holes a bit if necessary for the new screws that came with the set for the dead pedal.
IMPORTANT - don't enlarge your holes too much or the screws will not hold your new dead pedal in place.

Once you have all four holes drilled and properly sized, place the new pedal back in place, align the holes and install the new screws that came with the set (you'll need a phillips head screw driver).


Moving on to the brake pedal - first, remove and discard the existing rubber pad. Second, place your new pedal on top of the underlying steel to identify where you need to drill.
IMPORTANT - check where this is going to align on the back as well since you need to have room to install the nuts on the back of the new hex-bolts. This is especially important for the upper left corner hole due to the angle of the pedal shaft (see below). Remember - check twice, drill once. Titanium coated bits are crucial here.

These are the parts you are installing, so make sure you leave room to put them together or you're going to be making new holes and re-aligning your new pedal.

Space gets very tight when you are trying to install these nuts and bolts and if you don't have small hands (or even if you do), you might consider getting yourself a set of curved needle nose pliers like the ones in the picture below. These were fantastic for working with the angles you'll be dealing with.

Moving on to the gas pedal - you don't need to do anything to the pedal other than line your new pedal up with the existing one and drill the holes where you want them. You're just going to install your new aluminum gas pedal on top of your existing, plastic, one. Here's what it will look like after you've drilled.

You'll be faced with the same obstacle as before with installing the nuts and bolts here - namely, tight space. The needle nose pliers are really helpful. Also, you'll likely find (as I did) that there's simply no way to install the nut on the back of the bolt on the lower right hand corner. Obviously, three bolts will hold the pedal just fine, but I didn't want to leave an obvious physical gap in the hole so I super glued the lower right bolt into the hole for aesthetic purposes. It was a simple solution to the problem and it's held up just fine.
Here's the finished product (complete with vacuum "mod"):
")


