

I've been living with a really crazed RHS headlamp lens for a while and wondering what my options were. My lights are unbakeables, fitted by a PO with no real known manufacturing date, but what appeared to be black covers and a solid clear/grey looking glue which scuppered my choices somewhat. Also because they are what look like OE xenons, i didn't want to swap out the lights for a pair of new halogens and couldn't justify the stretch to new xenon units for what the issue was
Compound that i found recently that one adjuster was also broken in the same headlight i decided some action was needed. Given its an issue thats not unique to me, i thought i'd share a DIY with you guys and girls with regards to fitting new lenses, new adjusters and making the lights "bakeable" for future access.
No real special tools are needed other than a Dremel or similar with a cut off wheel, a "milling" tool attachment, a box cutter (we call those Stanley Knives!) or similar knife and some patience.
I sourced my lenses from ebay, they are DJ auto items and fit nicely. I paid £80 for the pair which is cheaper than Scheidmann and they are the same lenses. My adjusters were also ebay sourced, i went for standard replacements.
Some of the photography in this DIY are taken with a flash, some without, i simply picked the best photo per step. I'm not a pro photographer but i hope they serve the purpose for this DIY.
I differed the process a little on the second lamp unit so a couple of pics may show continuity error. Don't worry about it, the process described is what i believe the best way to attempt both units.
A final point is don't be beat up if you snap a piece of the black housing tangs as they are easily glued back on.
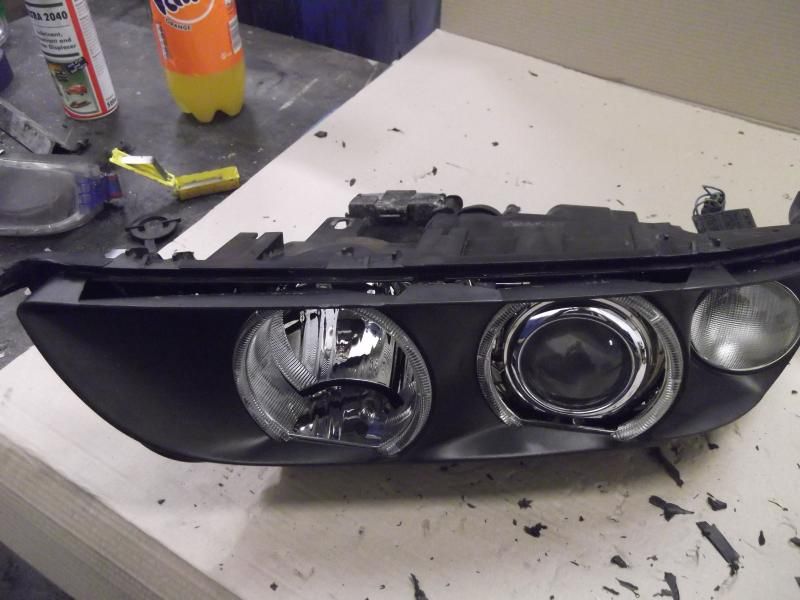
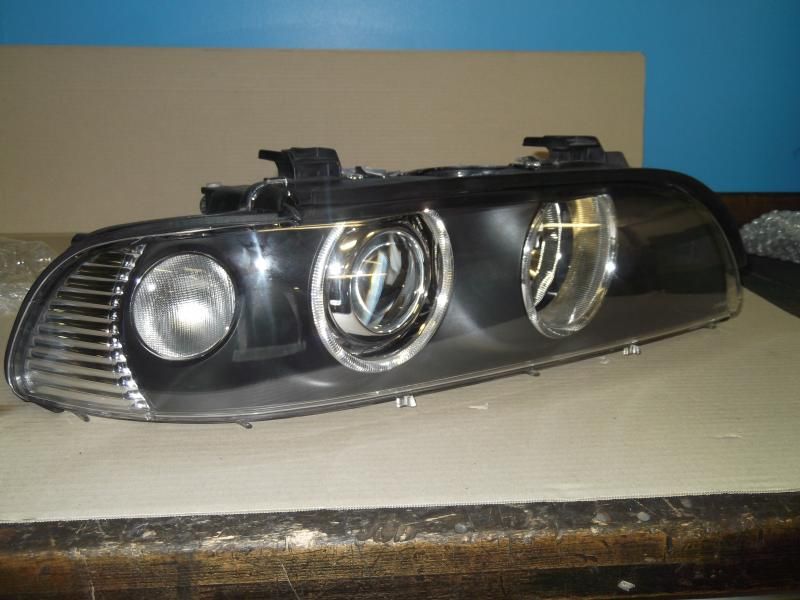
First off my existing lamp unit. You can see the crazing i'm talking about and why i think it wouldn't have come out simply by polishing or sanding

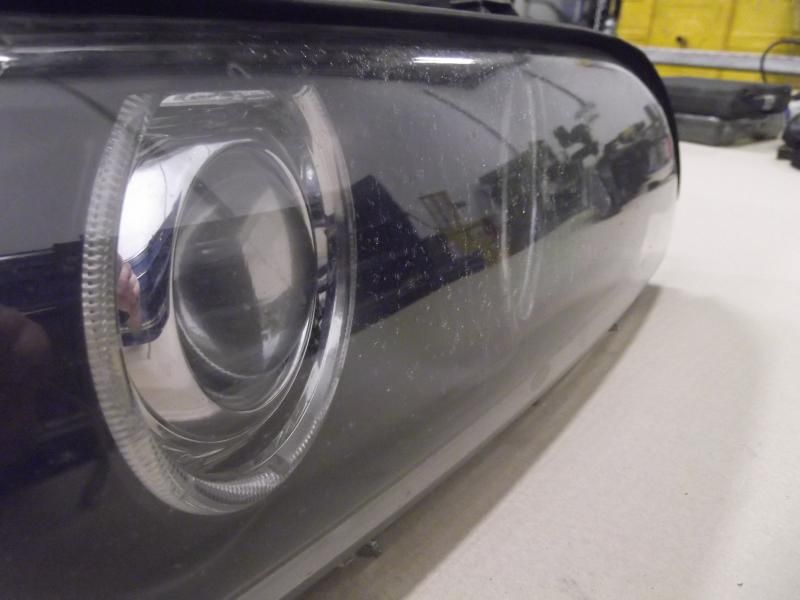
 .
.
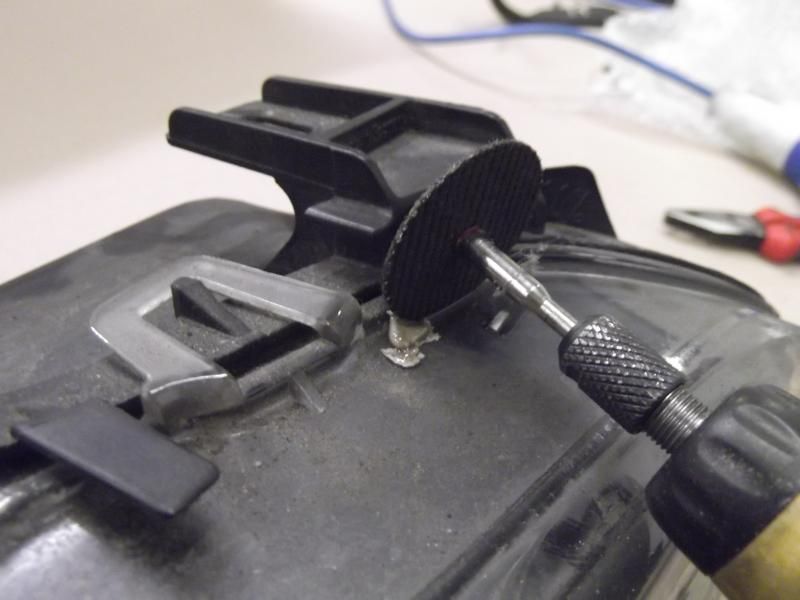
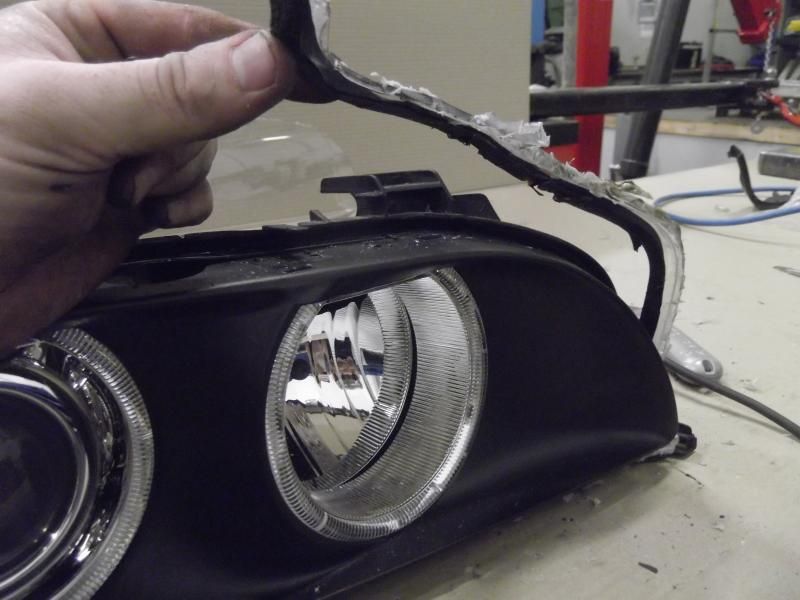
Take the top black cover off your lamp by prising the clips with a screwdriver and put to one side. We'll use this later
Now using the milling attachment in the dremel, remove all of the clear tabs on the lens.

 .
.
Swap attachments for the cutting wheel. You'll see here i used quite a robust wheel. You can use the thinner wheels if you like. I chose this type as i only used one for the 2 lenses, the thinner ones do cut nicere but have a tendency to break easily. your call. Start to cut the lens off right in front of the raised rib on the lens as it meets the black lens housing
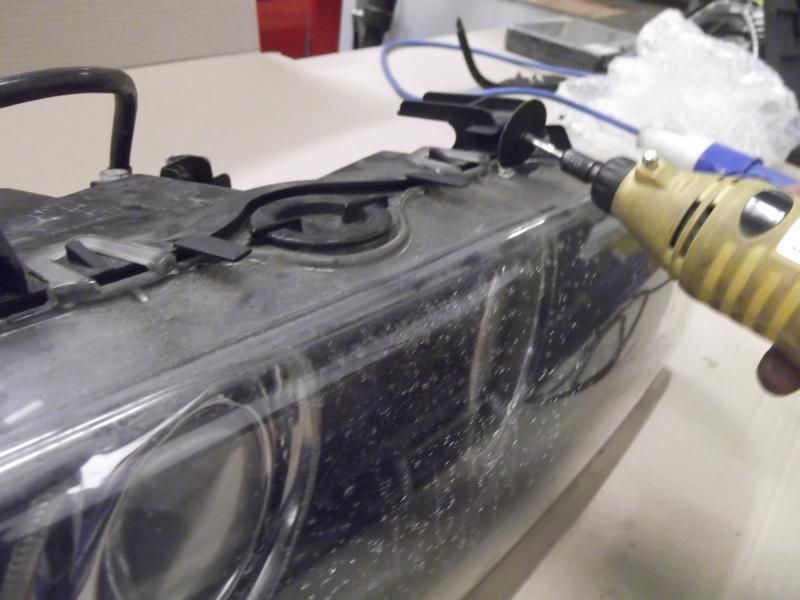
You only want to go deep enough to cut the lens, and do it it steps, you can't cut through and then move the tool along as it will drag

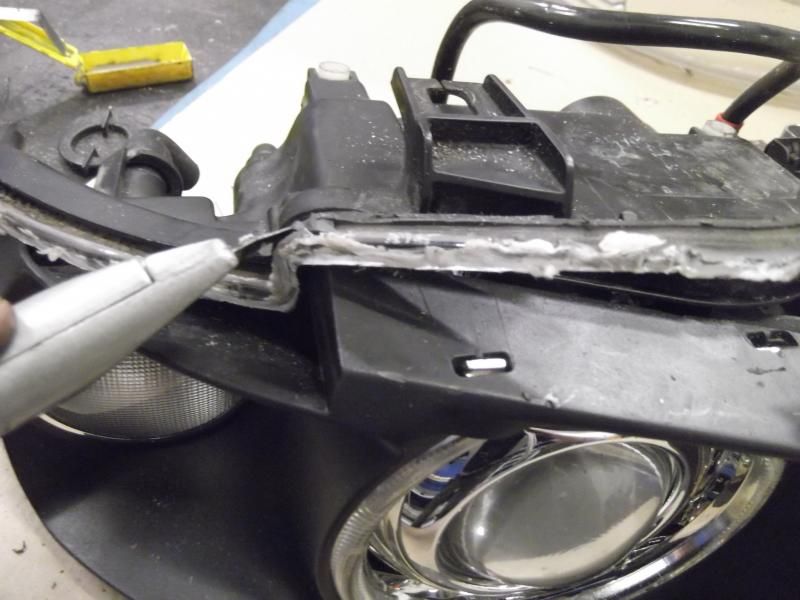
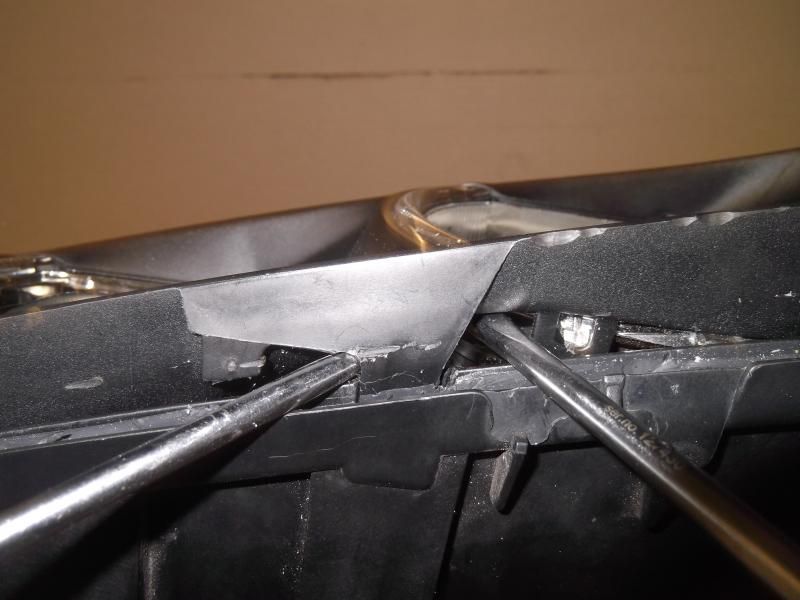
Cut around the to black tangs as so.

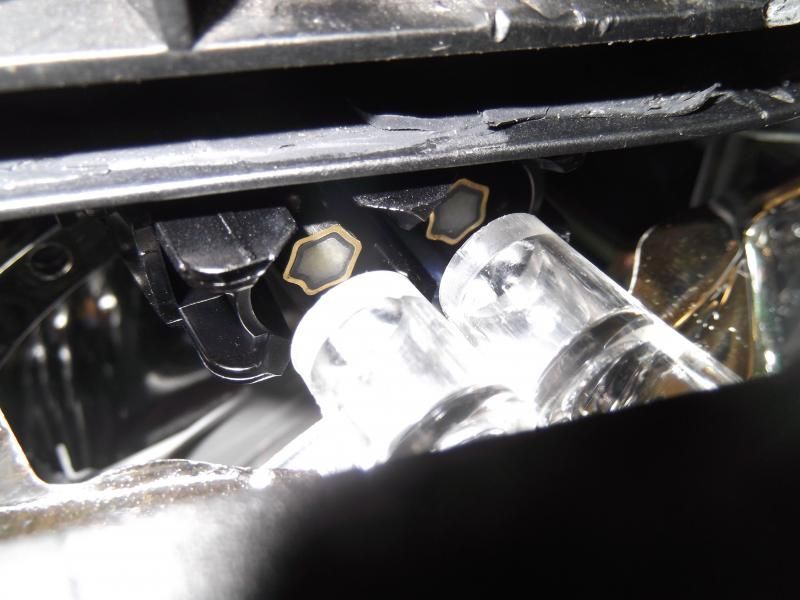
When you've went around the whole lens, remove these torx screws
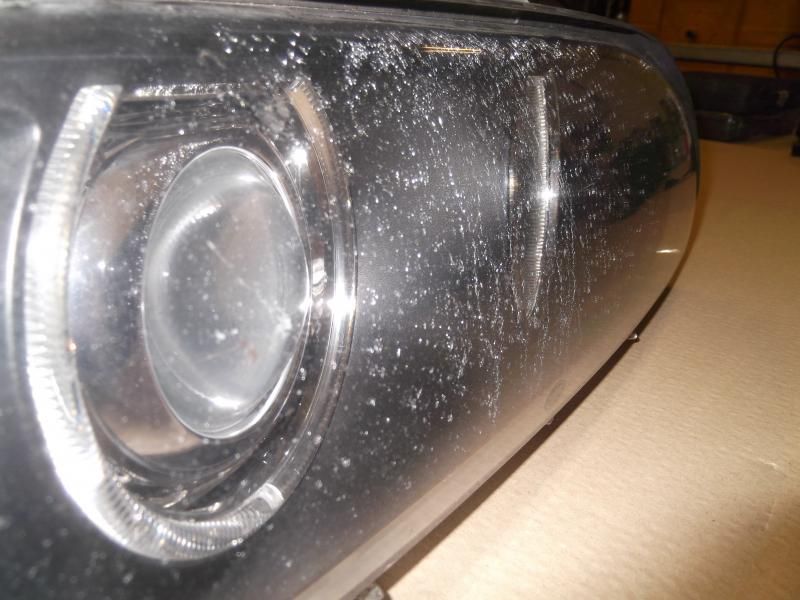
Now lift the front of the lens away from the lights
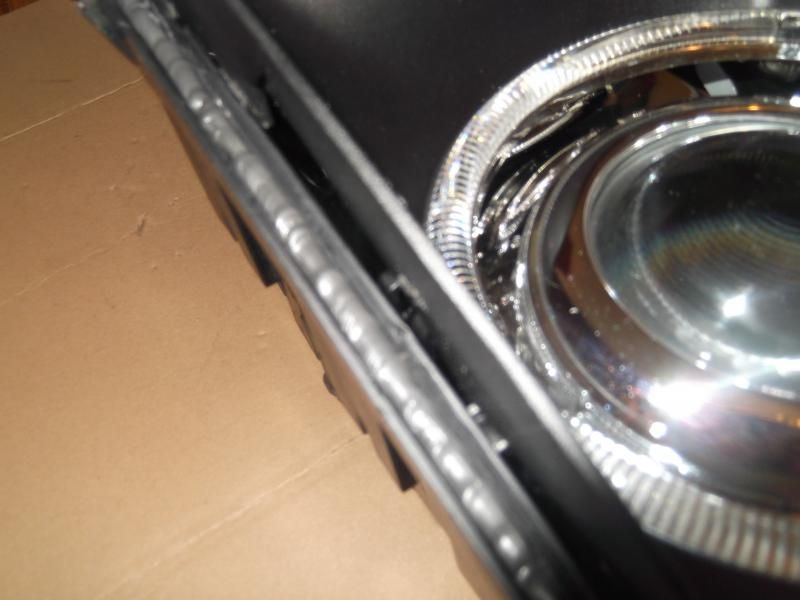
You can see here again the extent of the crazing

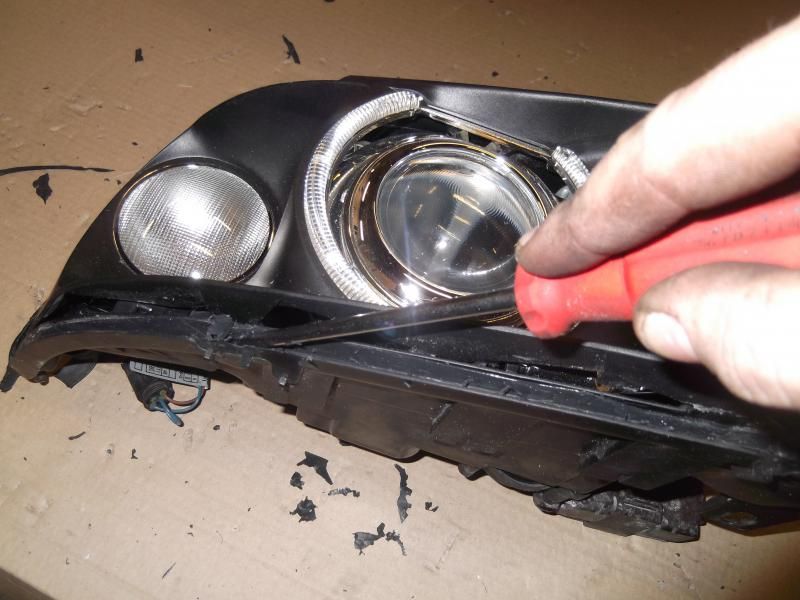
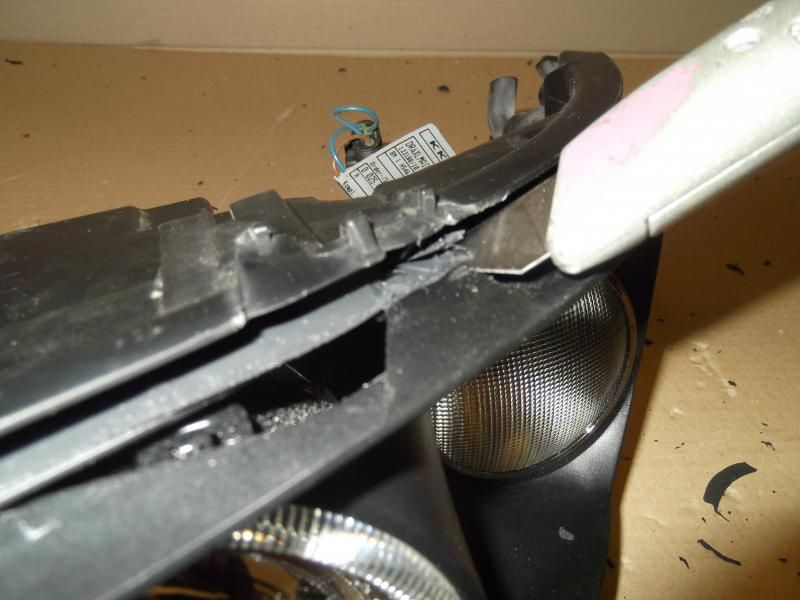
Now using your Stanley knife or similar, cut into the existing bonding holding the lens in.
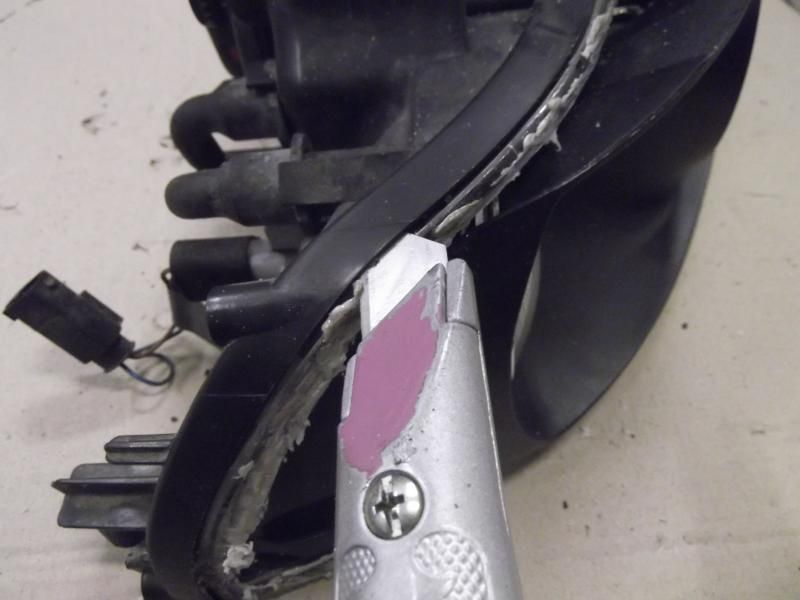
Also, now the lens has been cut off you can access the bonding on what would have been the other side of the lens also in the same manner so do this now. Be patient and go around a couple of times to really cut into the bonding either side of the remaining lens "rib".
Once you have been around the lens, swap attachments in the dremel again and cut the rib as shown to split it.
I find its easier to cut it where i did it at a nice flat piece of the rib at the top of the lamp.
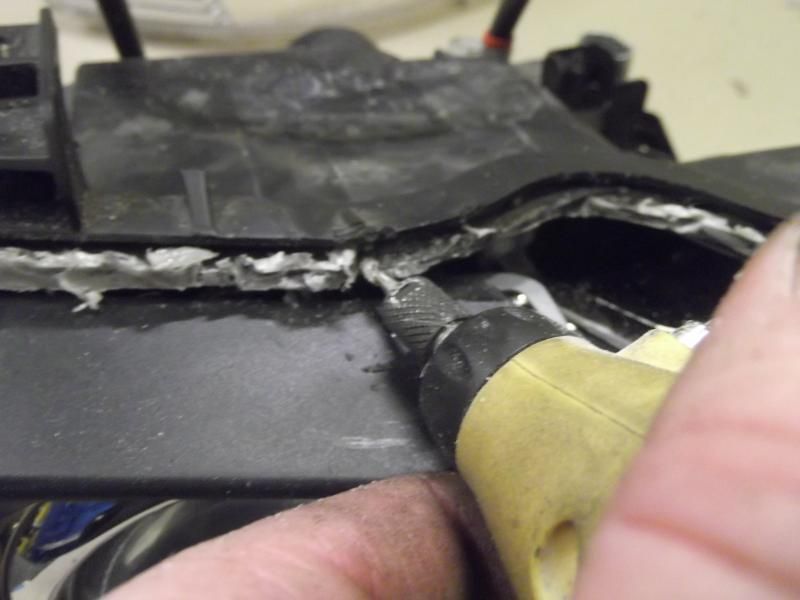
Now grab the rib with pliers. You want to start pulling out the rib from the housing down towards the inner corner of the lamp as this is a good straight run
If you've cut the bonding enough it should start to pull out. you can be quite forceful here but not hell for leather. If it resists too much you can get your knife in as you pull away on the rib as more bonding will be revealed.
Once it gets to the corner of the lens stop.
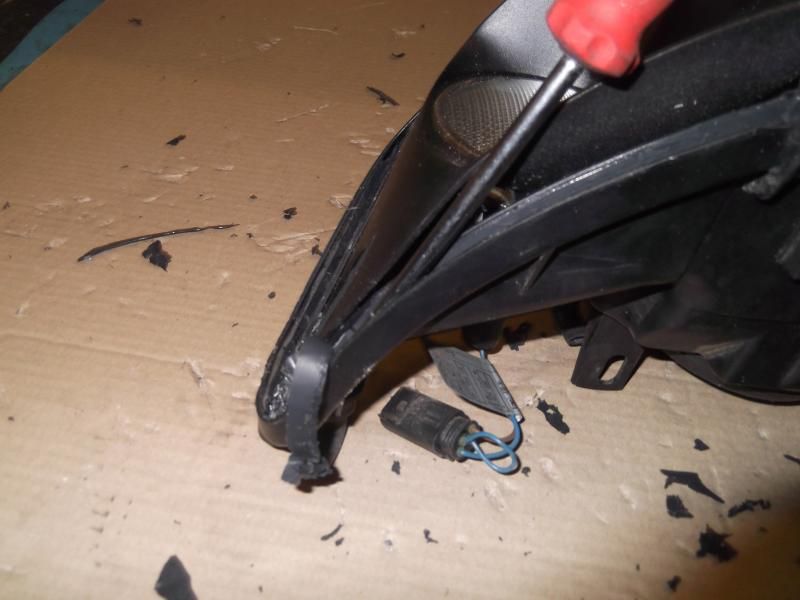
Now use your knife again to getinto this difficult right angle on the top of the lens.
Start pulling the rib with pliers towards this section and then past it as you use your knife and pliers again in the same manner. When you get to the bottom corner by the turn signal, stop again.
Now, no pics for this part but in essence you want to cut the rib again halfway along the bottom of lamp and pull in the direction of the corner for each piece as above. You'll finally have both bottom corners left holding each piece in, and its easier to work the knife and pliers on the bonding with only the corners holding the rib in to minimise risk of damage. Once its out you'll have this.

Note in my pics its out in one piece. I recommend you do it in 2 pieces as i described as i had a tougher time on the first lamp doing it as per my above pic where its held in the corners.
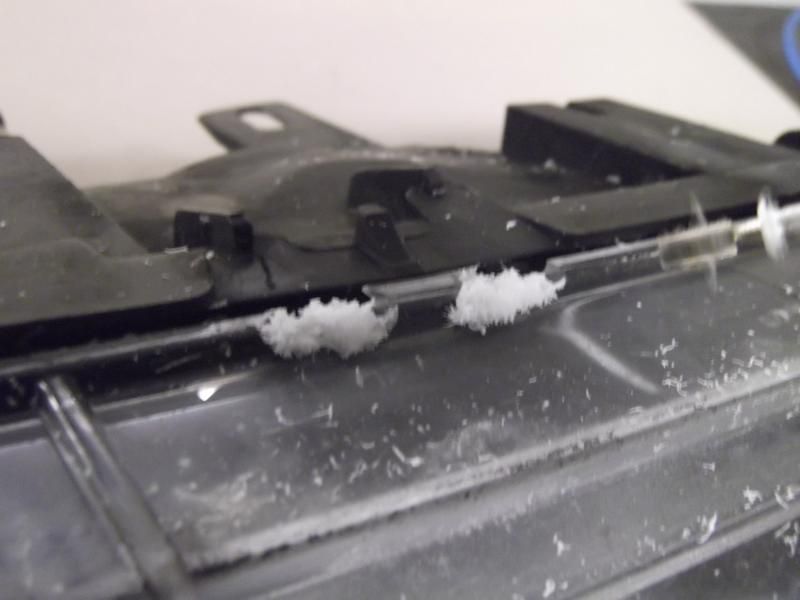
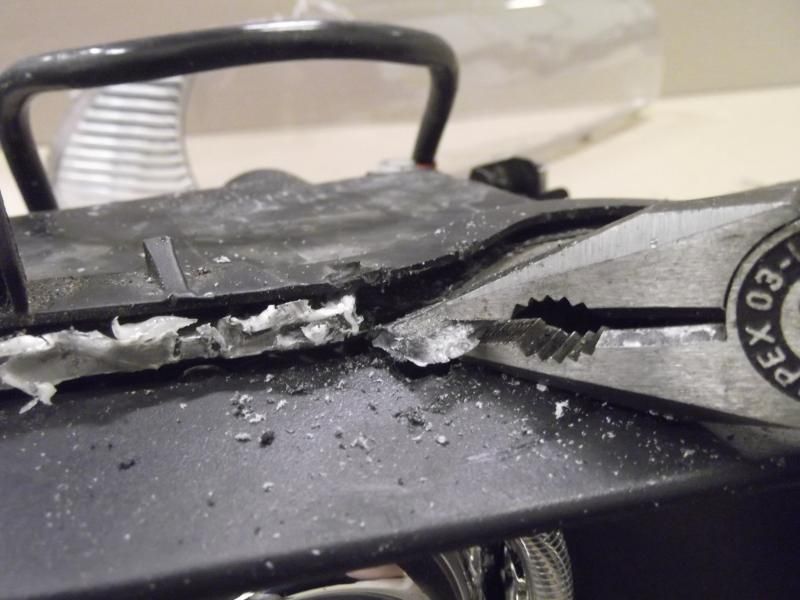
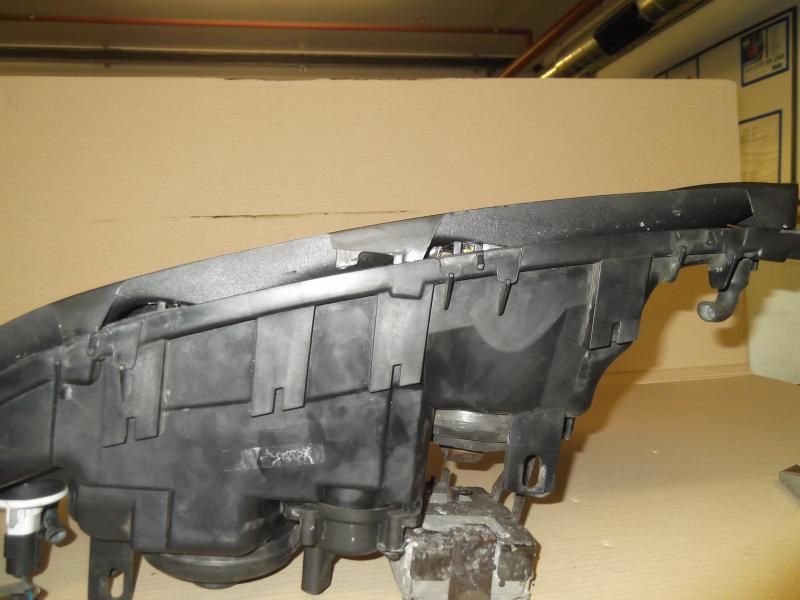
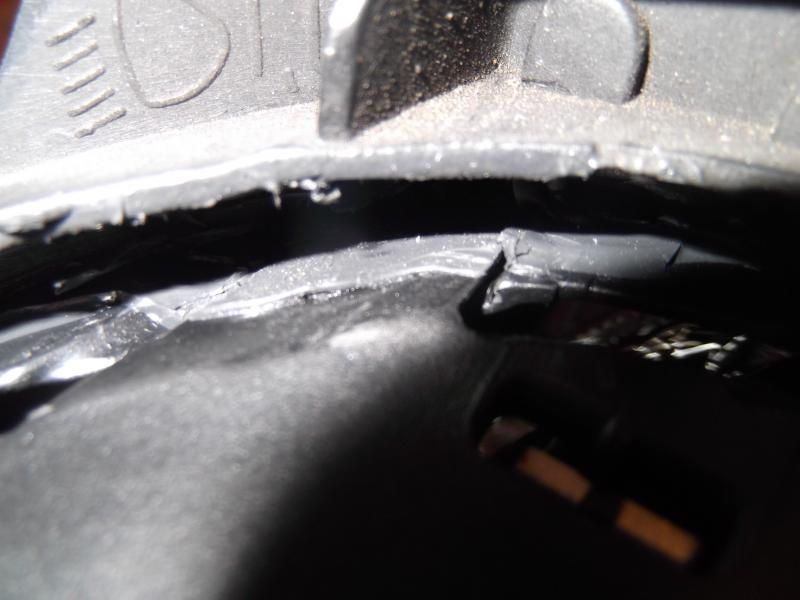
Now scrape what you can of the remaining bonding out of the channel in the lamp housing. It does come away fairly easy with a screwdriver and of course you can access it far easier with your knife now too.
Every last piece doesn't have to come out but looking like this will suffice

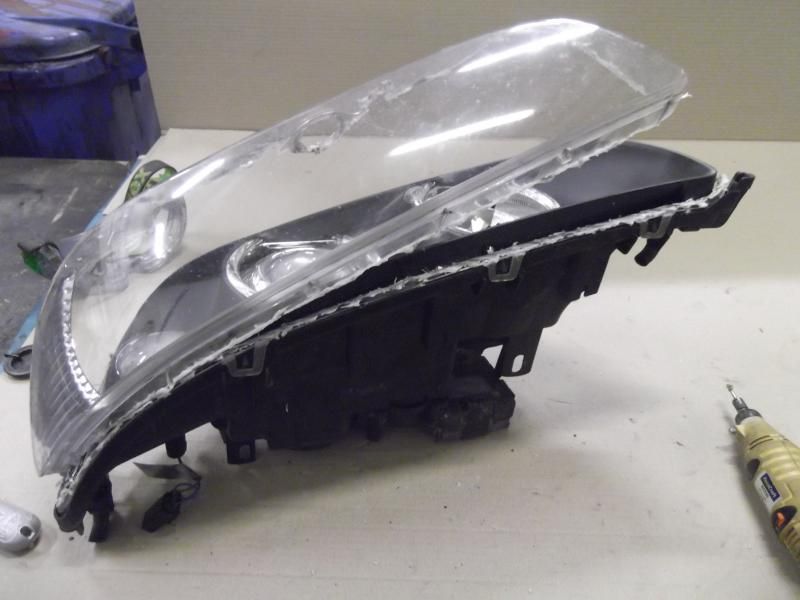
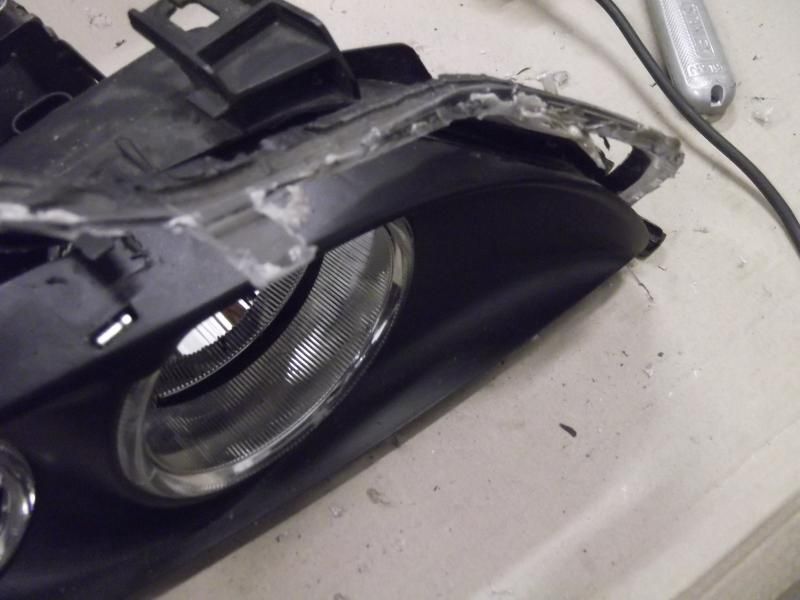
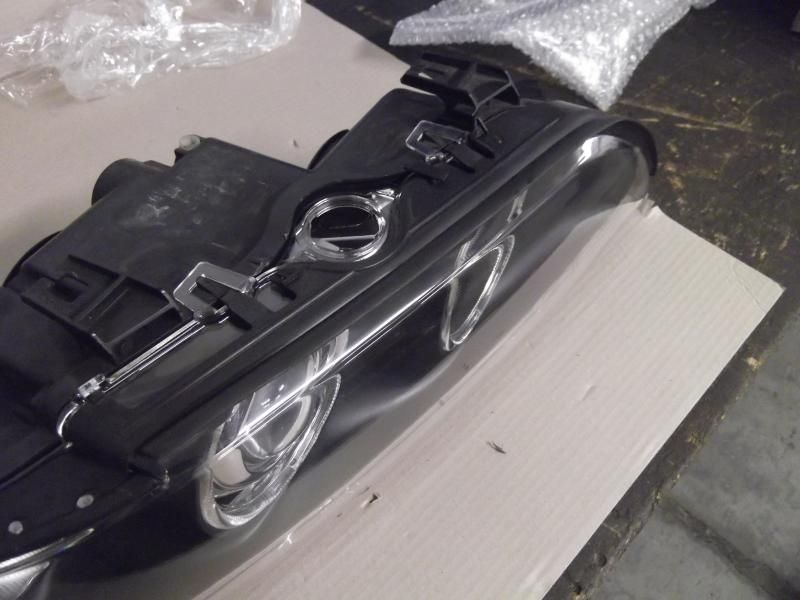
Now your lamp will look like this
If your adjusters are broken you need to follow these extra steps. If not skip this part about removing this fascia
We need to remove the front halo ring fascia from the unit, so you need to again cut the bonding with your knife where they sit into the rear housing
Try and gently prise the fascia tabs away from the unit once cut, a little at a time
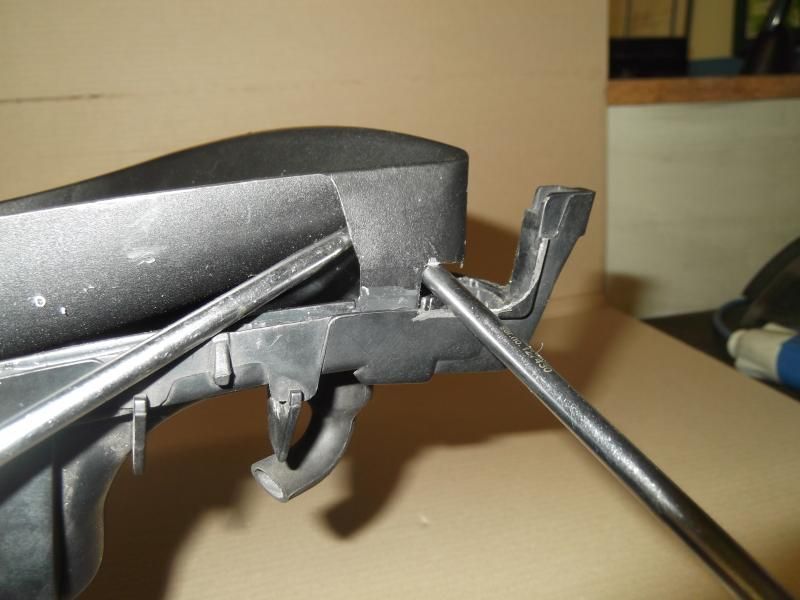
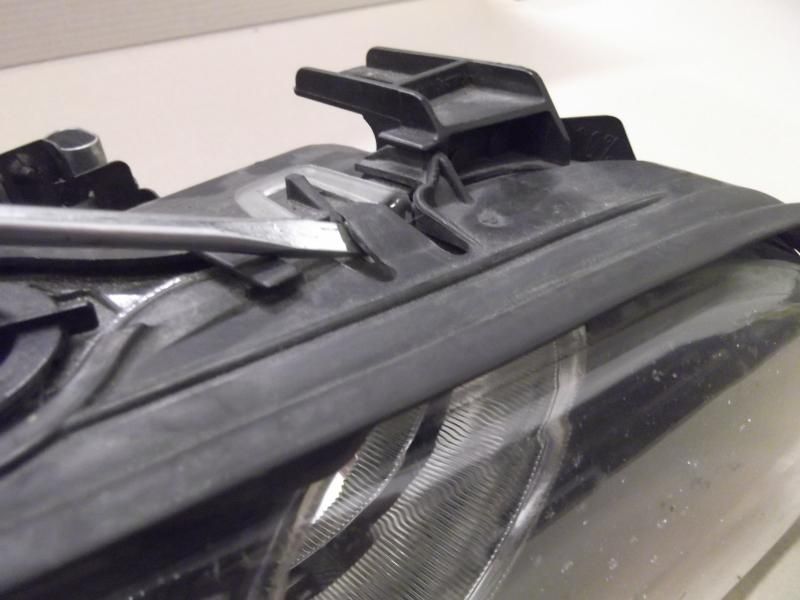
Once done you should be able to pull the fascia out from the housing, the fascia tabs look like this with a little right angle on them

With that removed you'll need to remove your self levelling motor if applicable, via the torx screwd on the rear of the lamp. The ball end slides out of the projector unit as shown here, the pic is for clarity not how it sits once assembled. The ball unit slides out to the left shown here
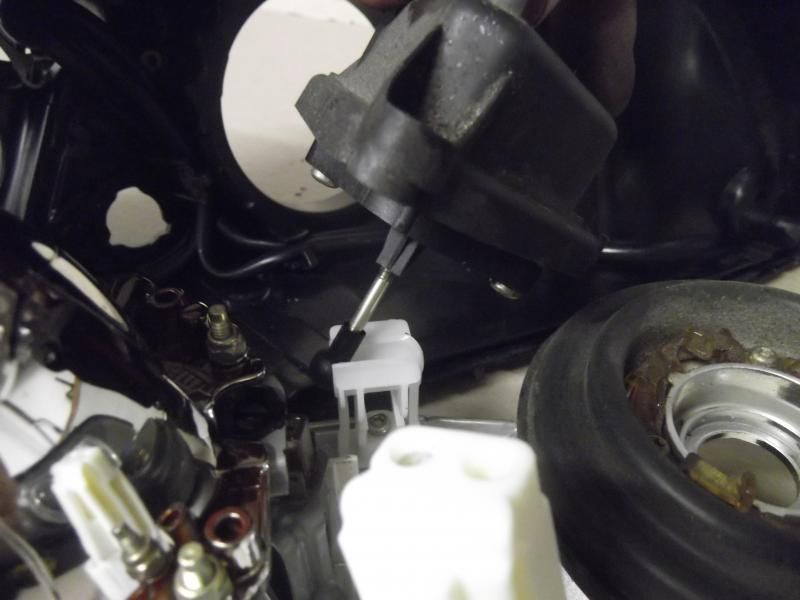
And you should be able to pull the projector housing from the unit by popping off the ball ends of the adusters, or in my case it pulls out easily as the adjusters are broken

If they are broken, pop the broken ball end out from the projector "socket" end. I removed this socket from the projector to fish mine out

Unscrew the adjusters from the housing and screw in your new ones. So your aim isn't way off, note how many turns it takes to unscrew each one and refit the new ones the same number of turns. You can final adjust once fitted to the car.
Refit your self levelling motor linkage, it sits like this in situ

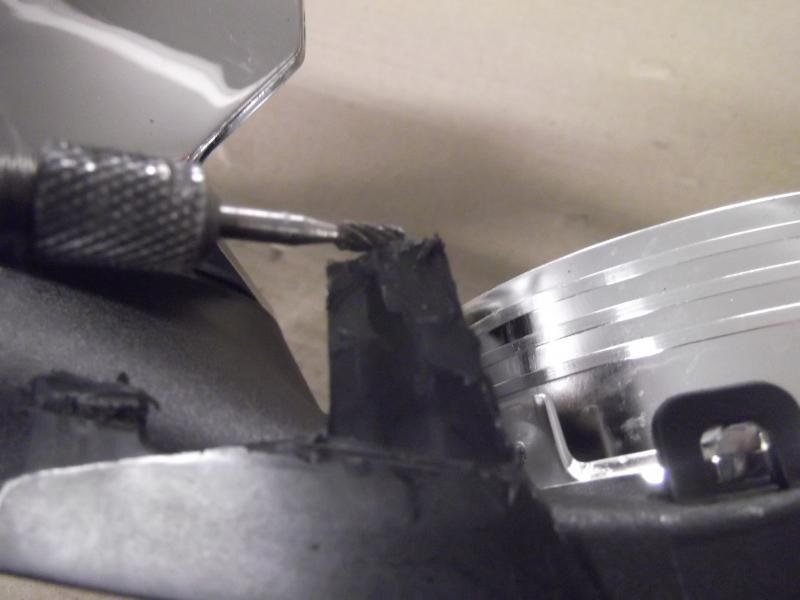
Right, remember the fascia tabs with the right angle on them? Well we need to cut that right angle off and grind alittle material off the end of each of the fascia tabs, i'll tell you why shortly
 .
.
Now we'll test refit everything without new sealer to make sure all fits OK. So refit the fascia.

Be careful to line up the halo points with the housing fibre optics
Ok the reason behind cutting the tabs is this. We want to make sure the fascia sits as far back in the housing as it did originally. Seeing as we cannot get every last piece of bonding from out of the housing or off the fascia tabs, if we make them a little shorter, it will more easily sit in the right position naturally without forcing the delicate tabs.
Use the existing bonding marks from fascia to housing to make sure it all lines up OK

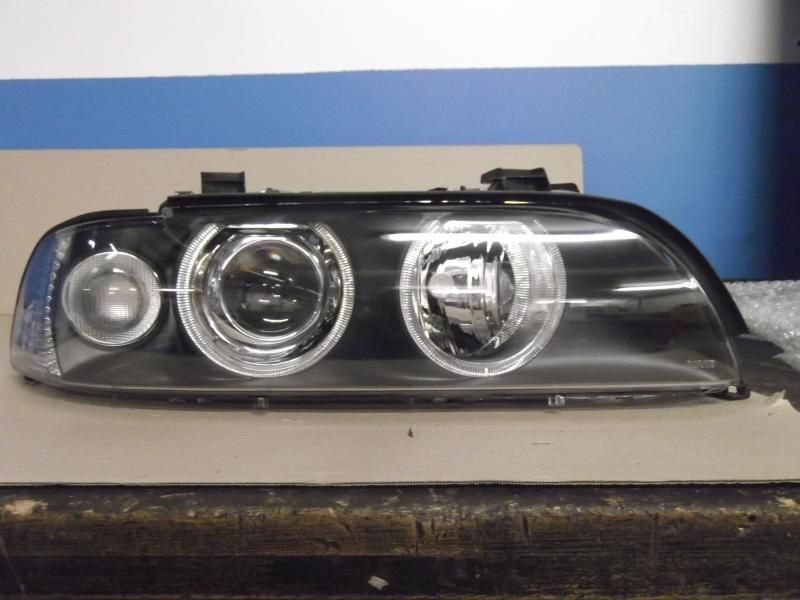
Once this is done, get your new lenses and remove the top seal. Its held on with self adhesive foam strips on the DJ auto lenses.

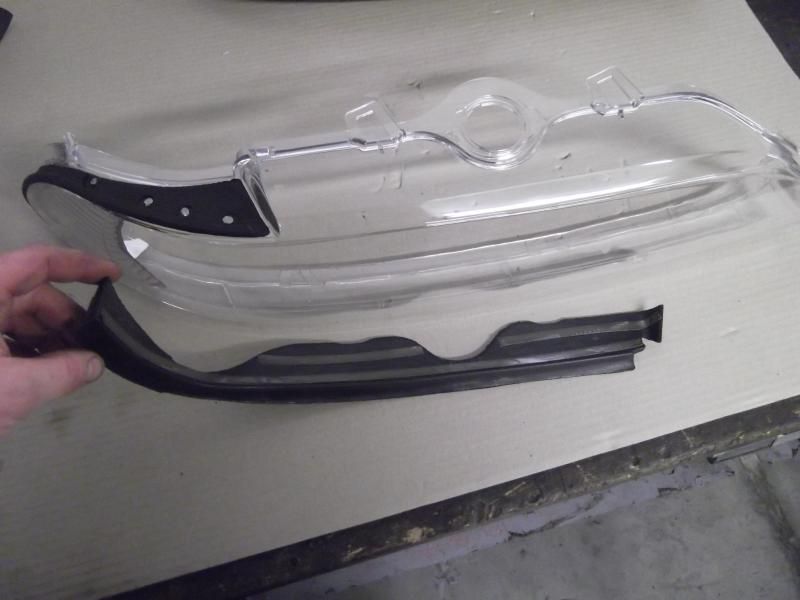
Clip the lens onto the housing and fit the OE top plastic trim that we took off way back in the first steps

Make sure the clear plastic tabs all click securely over the lamp. If its a little tight you can shave a little off the black "fins" on the housing that the clear tabs click over.
Once you're happy all looks well, remove the front lens again.
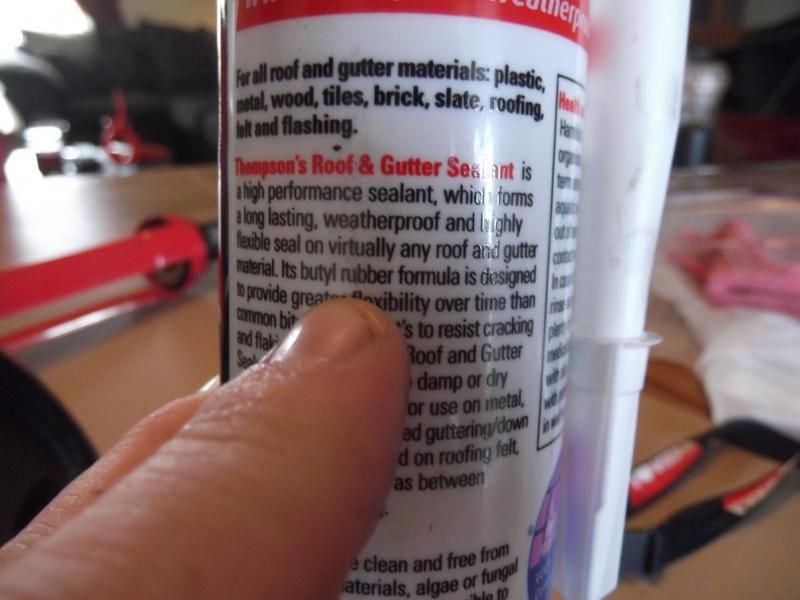
Now we're going to seal the lights and make them so we can reopen them if necessary. You need to use a Butyl based adhesive and you can use any you like, but over in the UK at least, roof and gutter sealant can be bought in a cartridge thats butyl based, just make sure it says on the label

Simply fill the channel on the housing with a good bead of it
And now refit the lens to the housing, clicking the lens home over the tabs

Refit your torx screws in the lens rear and you're done!!!
Compound that i found recently that one adjuster was also broken in the same headlight i decided some action was needed. Given its an issue thats not unique to me, i thought i'd share a DIY with you guys and girls with regards to fitting new lenses, new adjusters and making the lights "bakeable" for future access.
No real special tools are needed other than a Dremel or similar with a cut off wheel, a "milling" tool attachment, a box cutter (we call those Stanley Knives!) or similar knife and some patience.
I sourced my lenses from ebay, they are DJ auto items and fit nicely. I paid £80 for the pair which is cheaper than Scheidmann and they are the same lenses. My adjusters were also ebay sourced, i went for standard replacements.
Some of the photography in this DIY are taken with a flash, some without, i simply picked the best photo per step. I'm not a pro photographer but i hope they serve the purpose for this DIY.
I differed the process a little on the second lamp unit so a couple of pics may show continuity error. Don't worry about it, the process described is what i believe the best way to attempt both units.
A final point is don't be beat up if you snap a piece of the black housing tangs as they are easily glued back on.
First off my existing lamp unit. You can see the crazing i'm talking about and why i think it wouldn't have come out simply by polishing or sanding


 .
.Take the top black cover off your lamp by prising the clips with a screwdriver and put to one side. We'll use this later

Now using the milling attachment in the dremel, remove all of the clear tabs on the lens.

 .
.Swap attachments for the cutting wheel. You'll see here i used quite a robust wheel. You can use the thinner wheels if you like. I chose this type as i only used one for the 2 lenses, the thinner ones do cut nicere but have a tendency to break easily. your call. Start to cut the lens off right in front of the raised rib on the lens as it meets the black lens housing


You only want to go deep enough to cut the lens, and do it it steps, you can't cut through and then move the tool along as it will drag

Cut around the to black tangs as so.

When you've went around the whole lens, remove these torx screws

Now lift the front of the lens away from the lights

You can see here again the extent of the crazing

Now using your Stanley knife or similar, cut into the existing bonding holding the lens in.

Also, now the lens has been cut off you can access the bonding on what would have been the other side of the lens also in the same manner so do this now. Be patient and go around a couple of times to really cut into the bonding either side of the remaining lens "rib".
Once you have been around the lens, swap attachments in the dremel again and cut the rib as shown to split it.

I find its easier to cut it where i did it at a nice flat piece of the rib at the top of the lamp.
Now grab the rib with pliers. You want to start pulling out the rib from the housing down towards the inner corner of the lamp as this is a good straight run


If you've cut the bonding enough it should start to pull out. you can be quite forceful here but not hell for leather. If it resists too much you can get your knife in as you pull away on the rib as more bonding will be revealed.

Once it gets to the corner of the lens stop.
Now use your knife again to getinto this difficult right angle on the top of the lens.

Start pulling the rib with pliers towards this section and then past it as you use your knife and pliers again in the same manner. When you get to the bottom corner by the turn signal, stop again.
Now, no pics for this part but in essence you want to cut the rib again halfway along the bottom of lamp and pull in the direction of the corner for each piece as above. You'll finally have both bottom corners left holding each piece in, and its easier to work the knife and pliers on the bonding with only the corners holding the rib in to minimise risk of damage. Once its out you'll have this.

Note in my pics its out in one piece. I recommend you do it in 2 pieces as i described as i had a tougher time on the first lamp doing it as per my above pic where its held in the corners.
Now scrape what you can of the remaining bonding out of the channel in the lamp housing. It does come away fairly easy with a screwdriver and of course you can access it far easier with your knife now too.


Every last piece doesn't have to come out but looking like this will suffice

Now your lamp will look like this

If your adjusters are broken you need to follow these extra steps. If not skip this part about removing this fascia
We need to remove the front halo ring fascia from the unit, so you need to again cut the bonding with your knife where they sit into the rear housing

Try and gently prise the fascia tabs away from the unit once cut, a little at a time


Once done you should be able to pull the fascia out from the housing, the fascia tabs look like this with a little right angle on them

With that removed you'll need to remove your self levelling motor if applicable, via the torx screwd on the rear of the lamp. The ball end slides out of the projector unit as shown here, the pic is for clarity not how it sits once assembled. The ball unit slides out to the left shown here

And you should be able to pull the projector housing from the unit by popping off the ball ends of the adusters, or in my case it pulls out easily as the adjusters are broken

If they are broken, pop the broken ball end out from the projector "socket" end. I removed this socket from the projector to fish mine out

Unscrew the adjusters from the housing and screw in your new ones. So your aim isn't way off, note how many turns it takes to unscrew each one and refit the new ones the same number of turns. You can final adjust once fitted to the car.
Refit your self levelling motor linkage, it sits like this in situ

Right, remember the fascia tabs with the right angle on them? Well we need to cut that right angle off and grind alittle material off the end of each of the fascia tabs, i'll tell you why shortly
 .
.Now we'll test refit everything without new sealer to make sure all fits OK. So refit the fascia.

Be careful to line up the halo points with the housing fibre optics


Ok the reason behind cutting the tabs is this. We want to make sure the fascia sits as far back in the housing as it did originally. Seeing as we cannot get every last piece of bonding from out of the housing or off the fascia tabs, if we make them a little shorter, it will more easily sit in the right position naturally without forcing the delicate tabs.
Use the existing bonding marks from fascia to housing to make sure it all lines up OK


Once this is done, get your new lenses and remove the top seal. Its held on with self adhesive foam strips on the DJ auto lenses.


Clip the lens onto the housing and fit the OE top plastic trim that we took off way back in the first steps


Make sure the clear plastic tabs all click securely over the lamp. If its a little tight you can shave a little off the black "fins" on the housing that the clear tabs click over.
Once you're happy all looks well, remove the front lens again.
Now we're going to seal the lights and make them so we can reopen them if necessary. You need to use a Butyl based adhesive and you can use any you like, but over in the UK at least, roof and gutter sealant can be bought in a cartridge thats butyl based, just make sure it says on the label


Simply fill the channel on the housing with a good bead of it

And now refit the lens to the housing, clicking the lens home over the tabs


Refit your torx screws in the lens rear and you're done!!!
![IMG_20150602_225246[1].jpg](/d2/attachments/200/200274-36133060ec530716b7f46136960892bb.jpg)
![IMG_20150602_225303[1].jpg](/d2/attachments/200/200397-81af7224691b071fab36074429631fe7.jpg)


