

Okay, so I learned two things the hard way recently: First, if you are going to do the twisted seat repair, do everything possible to get it right the FIRST time because repeating all this 3x is a major PITA. Second, if you are going to do a writeup about it, do it in Word and then copy it into the thread...because if your computer reboots, you lose everything you typed. Ugh.
Enough about all that. I know I took a LOT more photos but I'm having trouble locating some of them now, so I will just have to go with what I've got here. I'm going to go through this procedure as it pertained to me, which is to say that I had to do the full Monty on this repair. There are several places where you may get lucky and not have to do all these steps. Let's just say that a simple "look under the seat, heat up the black wire and pull it out" fix did NOT work for me.
A note about airbags (SRS): I had no issues with this. Make sure you leave the key in the house or whatever and do NOT insert it at any time when your seat is unplugged. Follow that and you'll be fine. Also note that the power seats and such only operate for a certain amount of time, say 15-20 mins, when a door is initially opened and there are no keys in the ignition. So if at any point you are wondering "why don't my seat controls work?", it could be that your doors have been open for too long, just shut them, reopen and resume.
What you will most likely need: A socket wrench and assorted size sockets, a smaller flat-blade screwdriver, various pliers, possibly a cordless drill, an 8mm box wrench (one that ratchets if you have it!), a plastic level, something to heat with (I prefer a small handheld butane torch from Home Depot, works absolutely perfectly for $15 or whatever and looks like a small gun), razor knife, someplace clean to set your seat, and probably a helper elf to pull this heavy-@ss seat out of the Beast.
Summary of the issue: the reason your seat is twisting (half of it is raising, or tilting back, or whatever) is because all of the motions that are available are controlled by motors underneath. Each silver motor has two black cables running into it (one on each side) and each cable does half the seat. Inside the black, plasticky insulation is actually a mechanical cable with ridges in it. Something inside the motor clamps onto those ridges and physically spins the cable (inside the black insulation), creating a winding motion and moving the seat. One of your motors has lost half of its spinning, which means the mechanical cable has become "disconnected". What you are looking to do now is to pull that cable out, cut back the insulation to allow more of the cable to push into the motor, and reinsert so that the motor spins both halves of the seat together again. Sounds easy, right??
First, try to manipulate the controls of the seat such that everything is in "normal" position. In other words, the seat bottom and seat back are level. Sure, they may not be where you want them (since you were trying to move the seat in the first place, right?) but just get them level.
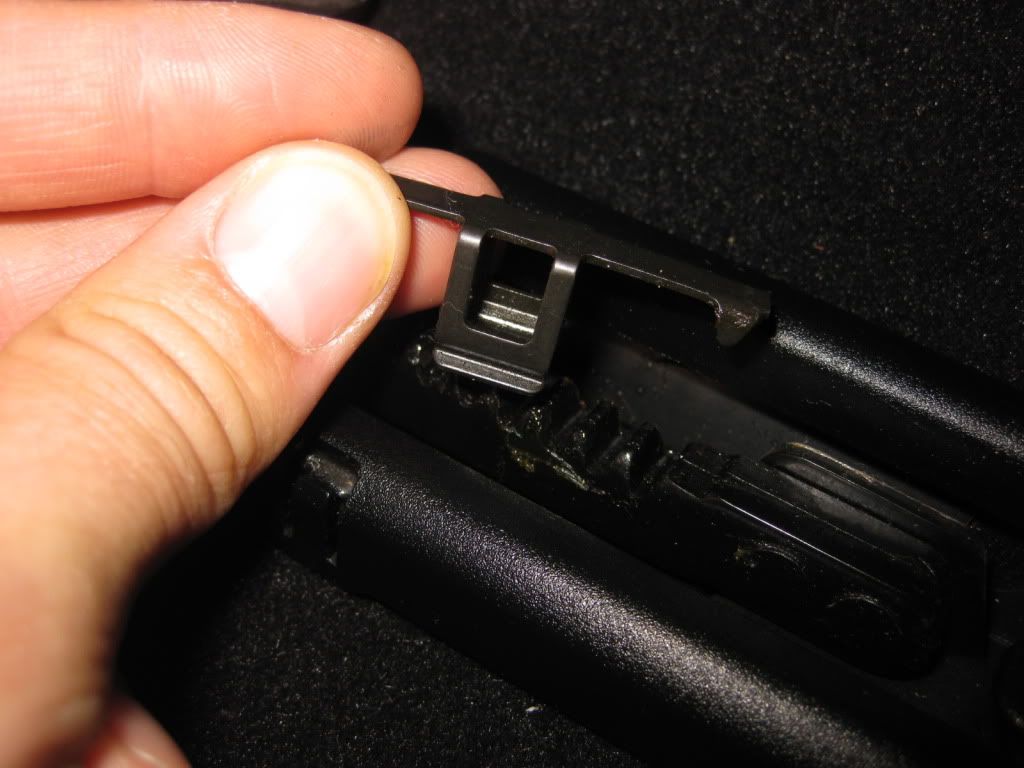
Step 1: Seat Removal - Raise the seat vertically to allow easier access to removing it. If you have never removed your seat before, you need to take out the metal stopper piece in the seat track behind the driver's seat. Ignore this if you are working on your passenger seat. The stopper is in the right side track, here is a pic:
![Image]()
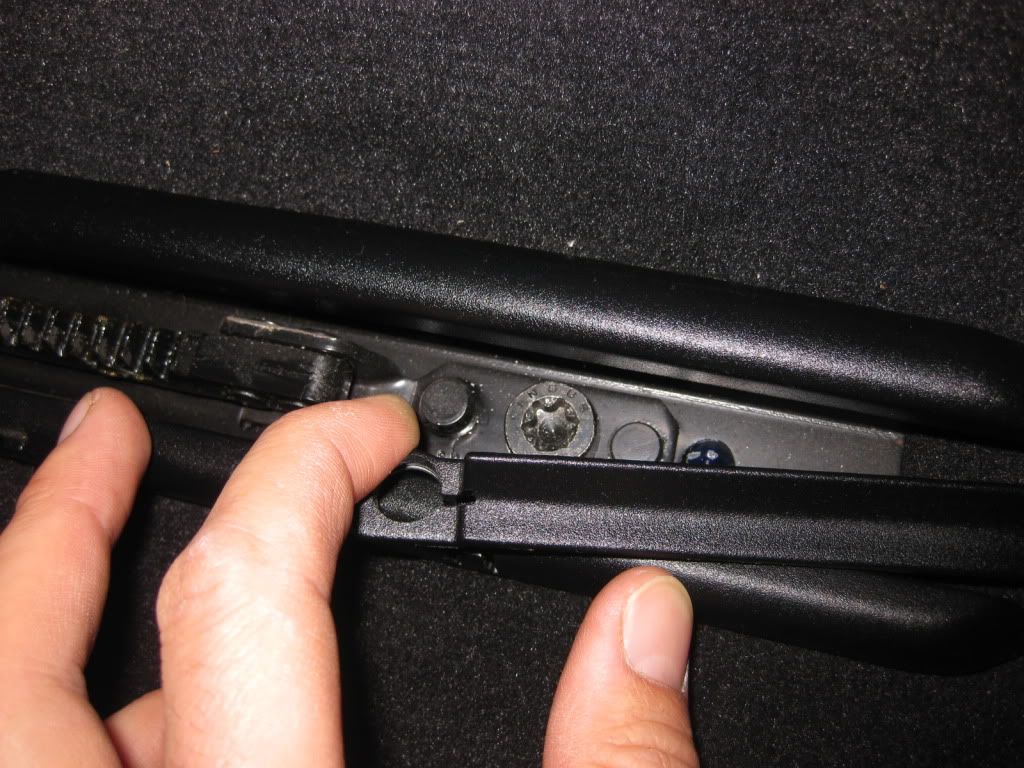
Now you can move the seat all the way back to access the bolts in the front. There are two in the front and two in the back, all size 13mm or whatever it is. The ones in the back are protected, pull aside the plastic like this:
![Image]()
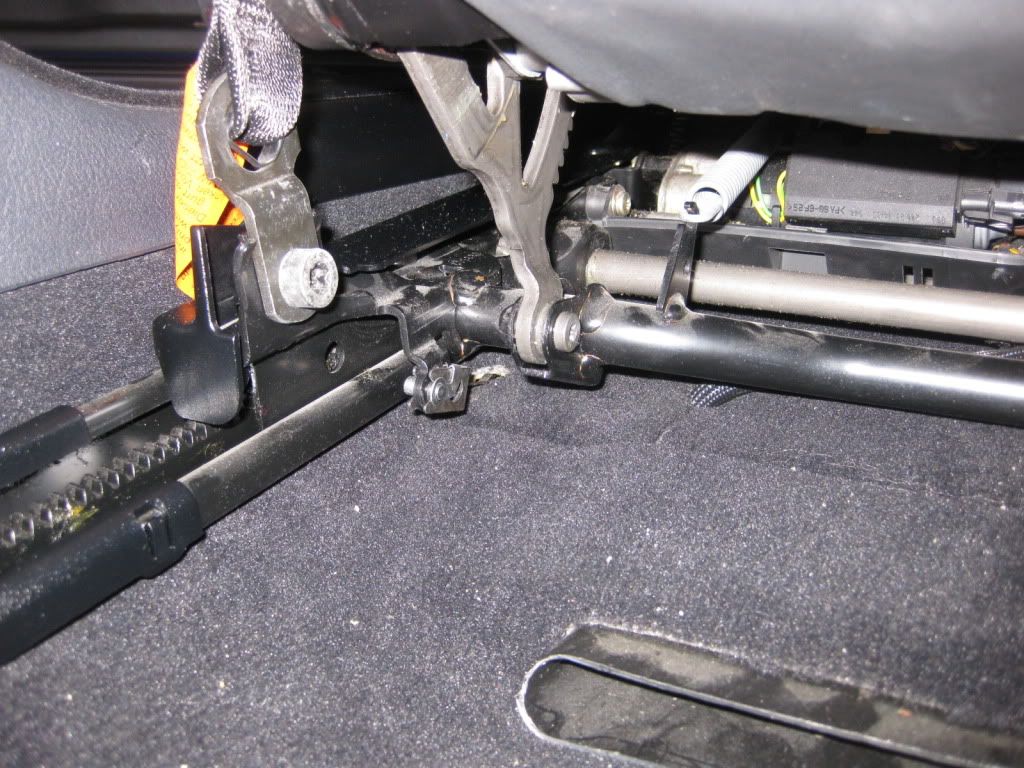
While you are underneath there, you need to disconnect the seat belt. Here is a photo of the bolt you need to remove, after which the belt will pull up through the plastic trim and separate from the seat (it stays hanging in the car):
![Image]()
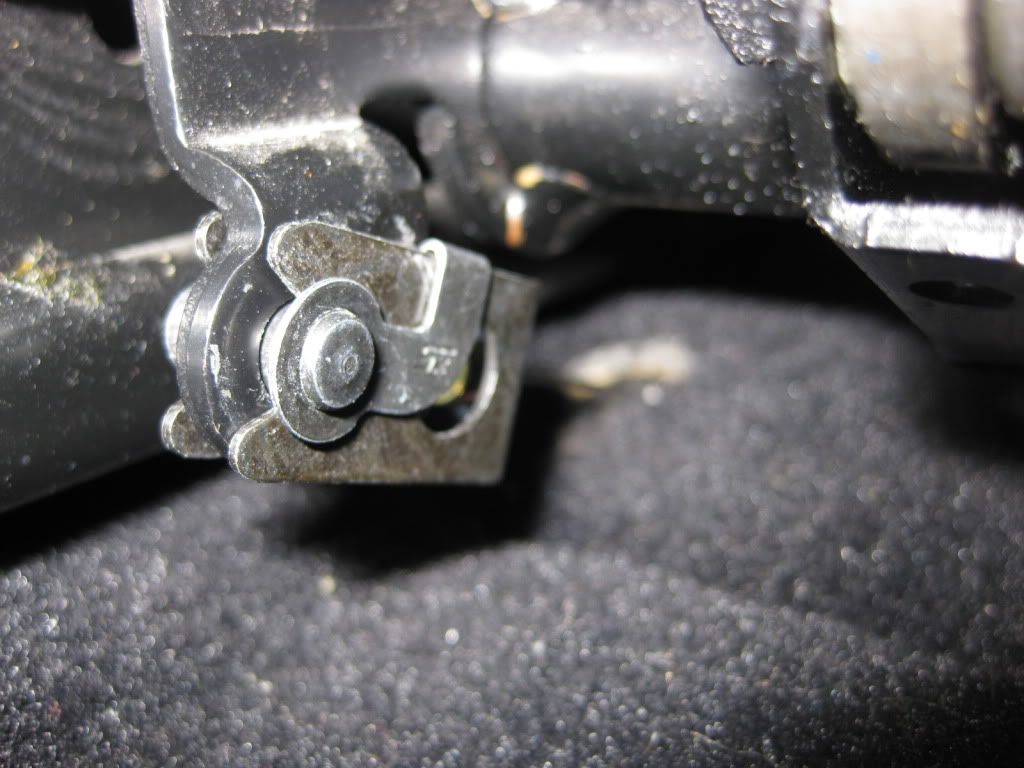
Now, in the same area (lower left behind seat, for the driver side) you need to remove the seat belt tensioner pin. It's sort of like a cotter-pin, you'll figure it out. This thing is what keeps tension on the seatbelt as the seat moves forward and back. Here's a closesup:
![Image]()
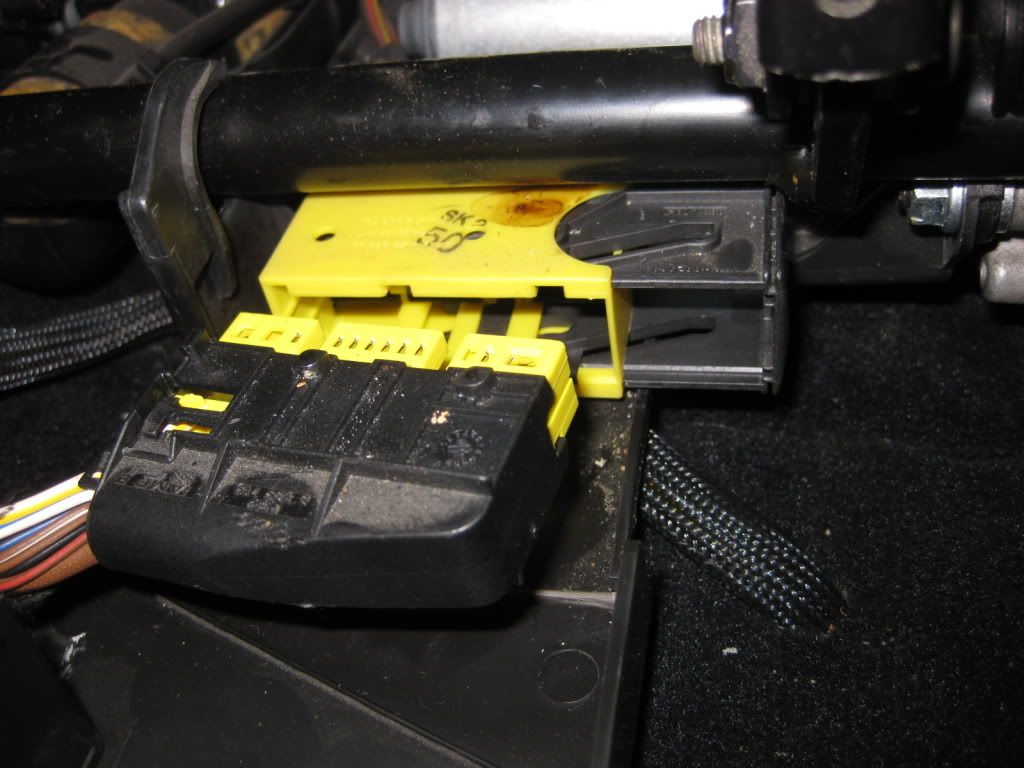
Okay, there is only one more thing to do in order to get the seat out of the car (or, if you are feeling lucky and want to attempt it, you can try to do the repair while your seat is merely laying all the way back so you can access underneath it while working in the footwell area. Personally, I don't recommend it. Anyhow, the one thing is to disconnect the power cable to the seat. This will erase your memory seat settings, as they are kept in the seat, not in the buttons on the door.") Here is a picture of the cable:
Here is a picture of the cable:
![Image]()
![Image]()
Before you pull this cable out and disconnect seat power, let me say this: you really prefer to have the seat raised to max vertical height before taking it from the car. It will make your work on the motors easier. Also, it may be good to tilt the seat back and disconnect a motor or two to figure out which one operates the seat function that is messed up. Do this now before you pull power and take the seat out.
Step 2: Motors and cables
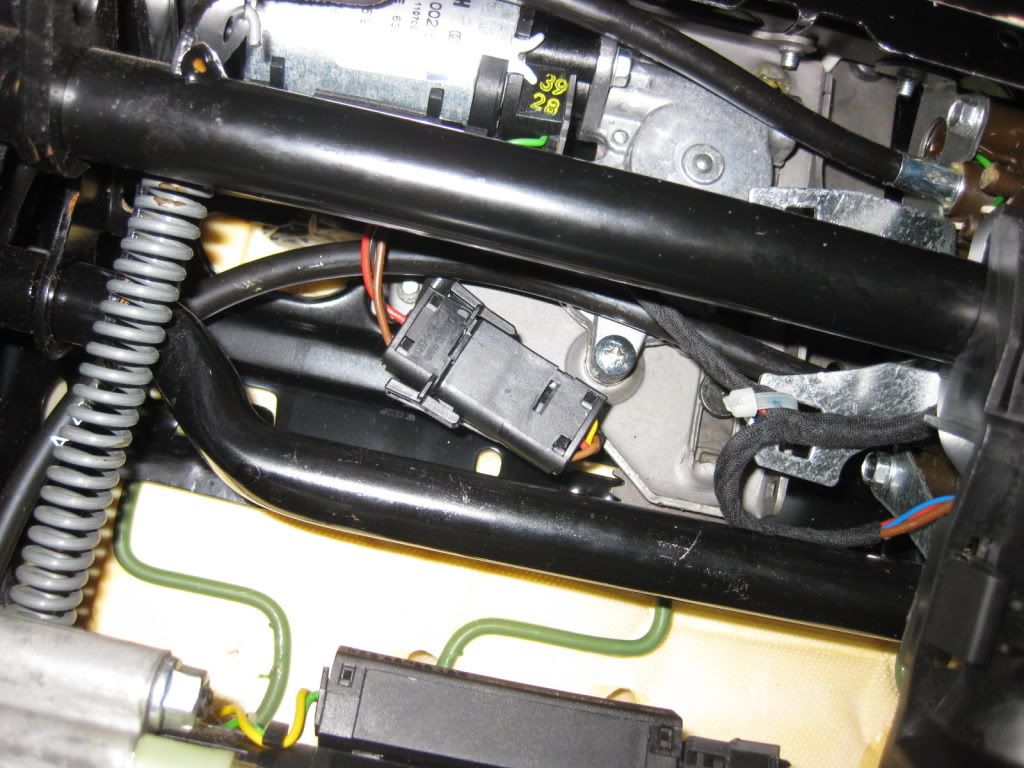
I def wish I had those other pics, they were much better at showing the entire bottom side of the seat. If I find them later, I'll edit this thread. Anyways, now you have the seat out and flipped upside down. You need to know which motor of the 3 is controlling the seat function that is twisting up. I'm running out of time for now so I'll assume you found out which one it is. Here is a pic, there are two motors in this one: one is middle right side, between the two large black support bars and the other is in the upper right corner. You can see the black cable going into it pretty clearly.
![Image]()
Each motor has 4 screws, they are 8mm I think. They will be very difficult to get at, in some cases. Those screws HAVE to be loosened at least somewhat in order to pull the black cable (with metal tip) out of the motor. Having those 4 screws tightened down is what locks the cable into the motor. You will need to bend some of the seat's metal tabs out of the way to access some screws, you'll see what I mean. The alternative is that if you want to try to heat up the black cable near the motor, and pull it out to work on it while leaving the metal tip embedded in the motor, you can try. It's going to be difficult but some people got lucky with that, aka anyone that was able to just get under their seat, heat it up with a lighter and do the repair. Good luck with that.
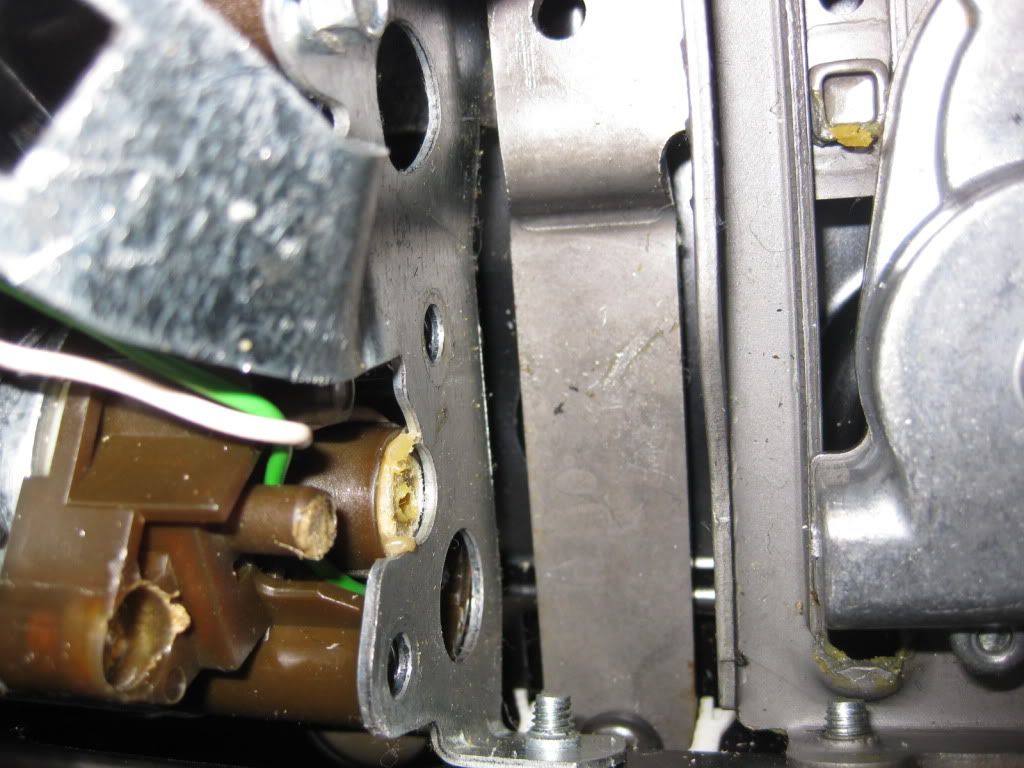
Here is a photo where I have bent a tab, removed some screws and pulled out the cable:
![Image]()
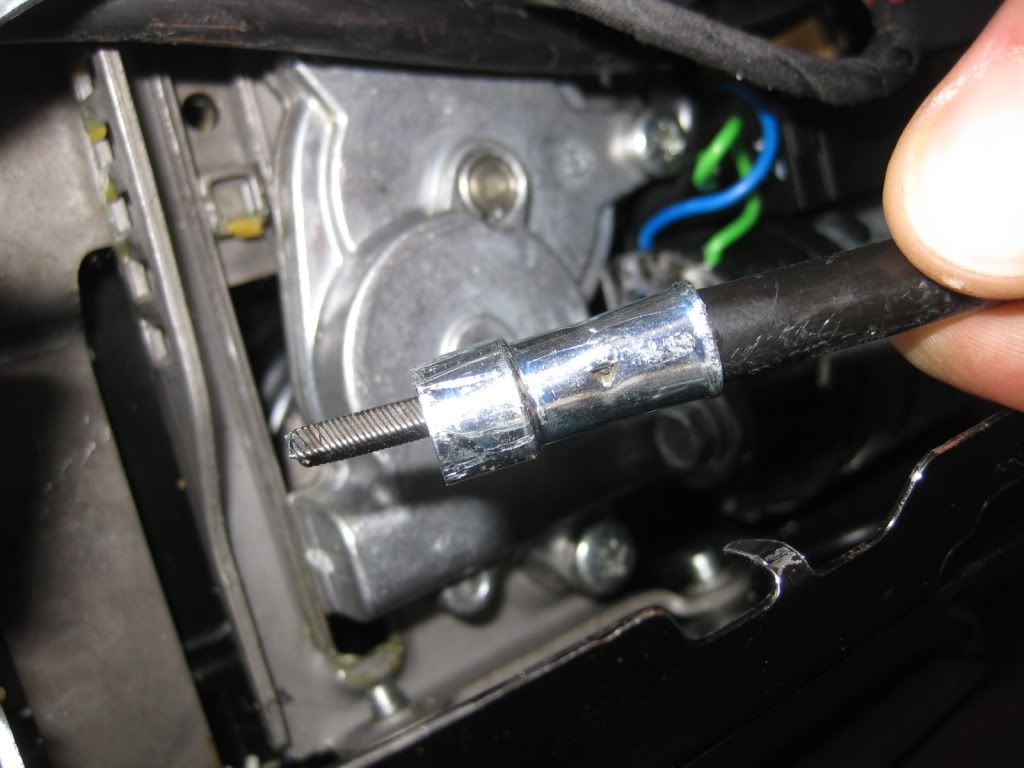
Here is what the cable looks like:
![Image]()
You need about a half inch of the metal ridged cable exposed in order for the motor to grip it properly. Once you find yours, odds are that it's shortened to about 1/4" or less exposed. Use your heat source to heat up the metal tip and pliers to pull it up and off the black insulation. Yes, this can be a real PITA. Keep at it. Trust me, that butane torch is awesome for this. Use a razor knife to cut away the black insulation to get the proper amount exposed. Then you have to heat it up again and reattach the metal tip. Once it's ready, plug it back in the motor and reassemble whatever you took apart.
In theory, that should do it and you should be able to reverse all this to complete the procedure. HOWEVER, that may not be it. Here are additional issues that can come up:
1) you were unable to get the seat level previously and so now the two halves of the motor are not synced up right. This happened to me, I put it all back together and found that one buttcheek was sitting at least a half inch lower than the other. This will eventually drive you crazy. So, you need to re-sync the two motor halves. What you can do is all the above, make sure the black cable is all repaired and ready. Before reattaching to motor, put the seat back in the car. Make sure it is in the exact proper location where all the bolts are aligned. Why? Because the seat is weird, trust me on this one, if you are going to level it you ONLY want to do it when it's in the car in its normal spot. Otherwise, what is "level" on your garage floor won't be level in the car. I found this out the hard way.
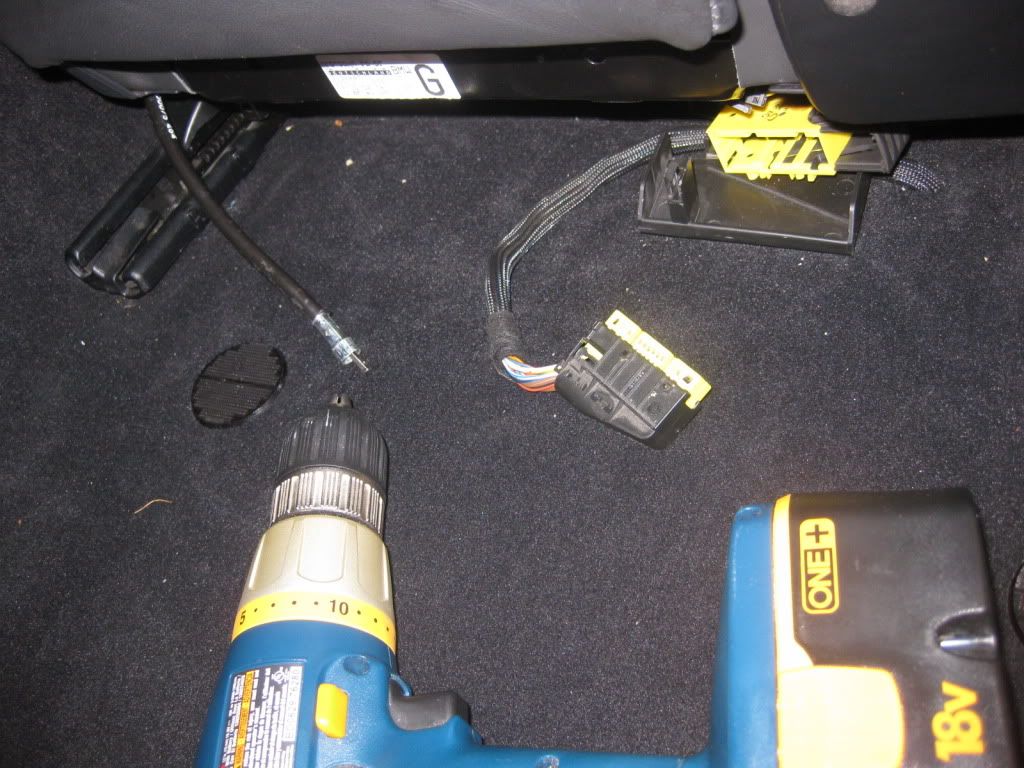
So, you have put the seat back in the car with the black cable hanging loose. Pull it out so you can get at it, grab your cordless drill and wind that sucker (whichever way it is) until you get stuff leveled. Here is a pic to help you envision this:
![Image]()
2) now it's leveled out. Take seat back out, reattach cable to motor, reassemble everything, put back in car, finish it all off and you should be good.
Okay, that's all for now, I gotta go catch a flight to Vegas for the weekend. I hope that helps some of you guys, send me a PM if you need anything and I should get it via my email.
cheers :cheers:
Sean Paul
Enough about all that. I know I took a LOT more photos but I'm having trouble locating some of them now, so I will just have to go with what I've got here. I'm going to go through this procedure as it pertained to me, which is to say that I had to do the full Monty on this repair. There are several places where you may get lucky and not have to do all these steps. Let's just say that a simple "look under the seat, heat up the black wire and pull it out" fix did NOT work for me.
A note about airbags (SRS): I had no issues with this. Make sure you leave the key in the house or whatever and do NOT insert it at any time when your seat is unplugged. Follow that and you'll be fine. Also note that the power seats and such only operate for a certain amount of time, say 15-20 mins, when a door is initially opened and there are no keys in the ignition. So if at any point you are wondering "why don't my seat controls work?", it could be that your doors have been open for too long, just shut them, reopen and resume.
What you will most likely need: A socket wrench and assorted size sockets, a smaller flat-blade screwdriver, various pliers, possibly a cordless drill, an 8mm box wrench (one that ratchets if you have it!), a plastic level, something to heat with (I prefer a small handheld butane torch from Home Depot, works absolutely perfectly for $15 or whatever and looks like a small gun), razor knife, someplace clean to set your seat, and probably a helper elf to pull this heavy-@ss seat out of the Beast.
Summary of the issue: the reason your seat is twisting (half of it is raising, or tilting back, or whatever) is because all of the motions that are available are controlled by motors underneath. Each silver motor has two black cables running into it (one on each side) and each cable does half the seat. Inside the black, plasticky insulation is actually a mechanical cable with ridges in it. Something inside the motor clamps onto those ridges and physically spins the cable (inside the black insulation), creating a winding motion and moving the seat. One of your motors has lost half of its spinning, which means the mechanical cable has become "disconnected". What you are looking to do now is to pull that cable out, cut back the insulation to allow more of the cable to push into the motor, and reinsert so that the motor spins both halves of the seat together again. Sounds easy, right??
First, try to manipulate the controls of the seat such that everything is in "normal" position. In other words, the seat bottom and seat back are level. Sure, they may not be where you want them (since you were trying to move the seat in the first place, right?) but just get them level.
Step 1: Seat Removal - Raise the seat vertically to allow easier access to removing it. If you have never removed your seat before, you need to take out the metal stopper piece in the seat track behind the driver's seat. Ignore this if you are working on your passenger seat. The stopper is in the right side track, here is a pic:
Now you can move the seat all the way back to access the bolts in the front. There are two in the front and two in the back, all size 13mm or whatever it is. The ones in the back are protected, pull aside the plastic like this:
While you are underneath there, you need to disconnect the seat belt. Here is a photo of the bolt you need to remove, after which the belt will pull up through the plastic trim and separate from the seat (it stays hanging in the car):
Now, in the same area (lower left behind seat, for the driver side) you need to remove the seat belt tensioner pin. It's sort of like a cotter-pin, you'll figure it out. This thing is what keeps tension on the seatbelt as the seat moves forward and back. Here's a closesup:
Okay, there is only one more thing to do in order to get the seat out of the car (or, if you are feeling lucky and want to attempt it, you can try to do the repair while your seat is merely laying all the way back so you can access underneath it while working in the footwell area. Personally, I don't recommend it. Anyhow, the one thing is to disconnect the power cable to the seat. This will erase your memory seat settings, as they are kept in the seat, not in the buttons on the door.
Here is a picture of the cable: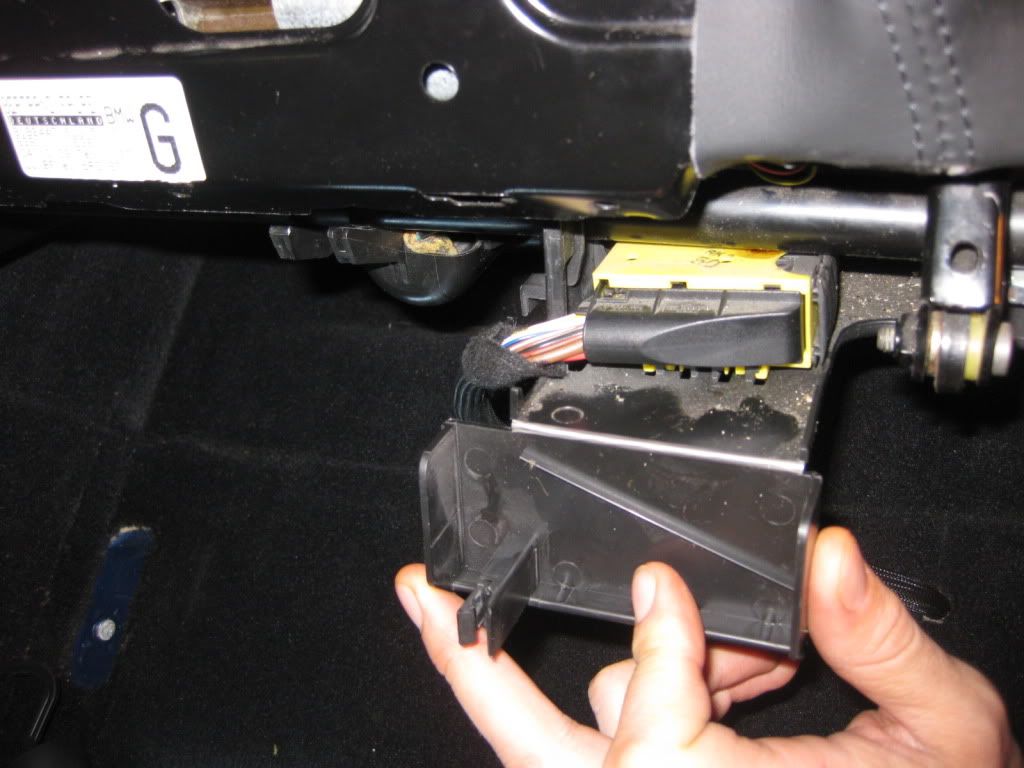
Before you pull this cable out and disconnect seat power, let me say this: you really prefer to have the seat raised to max vertical height before taking it from the car. It will make your work on the motors easier. Also, it may be good to tilt the seat back and disconnect a motor or two to figure out which one operates the seat function that is messed up. Do this now before you pull power and take the seat out.
Step 2: Motors and cables
I def wish I had those other pics, they were much better at showing the entire bottom side of the seat. If I find them later, I'll edit this thread. Anyways, now you have the seat out and flipped upside down. You need to know which motor of the 3 is controlling the seat function that is twisting up. I'm running out of time for now so I'll assume you found out which one it is. Here is a pic, there are two motors in this one: one is middle right side, between the two large black support bars and the other is in the upper right corner. You can see the black cable going into it pretty clearly.
Each motor has 4 screws, they are 8mm I think. They will be very difficult to get at, in some cases. Those screws HAVE to be loosened at least somewhat in order to pull the black cable (with metal tip) out of the motor. Having those 4 screws tightened down is what locks the cable into the motor. You will need to bend some of the seat's metal tabs out of the way to access some screws, you'll see what I mean. The alternative is that if you want to try to heat up the black cable near the motor, and pull it out to work on it while leaving the metal tip embedded in the motor, you can try. It's going to be difficult but some people got lucky with that, aka anyone that was able to just get under their seat, heat it up with a lighter and do the repair. Good luck with that.
Here is a photo where I have bent a tab, removed some screws and pulled out the cable:
Here is what the cable looks like:
You need about a half inch of the metal ridged cable exposed in order for the motor to grip it properly. Once you find yours, odds are that it's shortened to about 1/4" or less exposed. Use your heat source to heat up the metal tip and pliers to pull it up and off the black insulation. Yes, this can be a real PITA. Keep at it. Trust me, that butane torch is awesome for this. Use a razor knife to cut away the black insulation to get the proper amount exposed. Then you have to heat it up again and reattach the metal tip. Once it's ready, plug it back in the motor and reassemble whatever you took apart.
In theory, that should do it and you should be able to reverse all this to complete the procedure. HOWEVER, that may not be it. Here are additional issues that can come up:
1) you were unable to get the seat level previously and so now the two halves of the motor are not synced up right. This happened to me, I put it all back together and found that one buttcheek was sitting at least a half inch lower than the other. This will eventually drive you crazy. So, you need to re-sync the two motor halves. What you can do is all the above, make sure the black cable is all repaired and ready. Before reattaching to motor, put the seat back in the car. Make sure it is in the exact proper location where all the bolts are aligned. Why? Because the seat is weird, trust me on this one, if you are going to level it you ONLY want to do it when it's in the car in its normal spot. Otherwise, what is "level" on your garage floor won't be level in the car. I found this out the hard way.
So, you have put the seat back in the car with the black cable hanging loose. Pull it out so you can get at it, grab your cordless drill and wind that sucker (whichever way it is) until you get stuff leveled. Here is a pic to help you envision this:
2) now it's leveled out. Take seat back out, reattach cable to motor, reassemble everything, put back in car, finish it all off and you should be good.
Okay, that's all for now, I gotta go catch a flight to Vegas for the weekend. I hope that helps some of you guys, send me a PM if you need anything and I should get it via my email.
cheers :cheers:
Sean Paul


